Lists visualization application based on mobx-state-tree MobX powered state container and Office UI Fabric React components
GitHub Repository: https://github.com/Ashot72/spfx-lists-visualizer
Video: https://www.youtube.com/watch?v=0yCj5I7eJd0&feature=youtu.be
MobX https://mobx.js.org/index.html is a state management library for JavaScript frontend application. The philosophy is very simple:
Anything that can be derived from the state, should be derived automatically which includes the UI, data serialization, server communication etc.
mobx-state-tree https://github.com/mobxjs/mobx-state-tree is a state container that combines the simplicity and ease of mutable data with the traceability of immutable data and
the reactiveness and performance of observable data.
Office UI Fabric React https://developer.microsoft.com/en-us/fabric#/components is a responsive, mobile-first collection of robust components designed to make it quick and simple for you to
create web experience using the Office Design Language.
This application is a SharePoint framework (SPFx) demo application showing the power of MobX. One of the greatest features of MobX is separating the state from view.
React applications usually depend on component hooks for fetching data.
It is common to have a code like this
componentDidMount() {
fetchAllData();
}
in React apps.
With MobX we do not do this as components can reactively react to state that lives outside of components. So, the app should not depend on component hooks and data fetching should happen
in the store instead of components. You can write unit tests against the store to verify data fetching is happening without UI. It enables independent development of stores and components as UI is
just renders this state. With MobX, usually one store captures entire state and logic of the application.
What about routing?
If the view is to be purely derived from the state, then routing should affect the state not the derived component tree. This means that we can take any generic router not specific to React by integrating browser history api.
Routing and history is just another set kind of actions /reactions.
So, instead of mounting components we just call store methods to transition our application the correct state.
In React router case we write <Route path= '/products/' component={ Products } />
Instead, we should write <Route path='/products /' onEnter = { () => store.LoadProducts() } />
and don't depend on router/links for navigation in MobX apps.
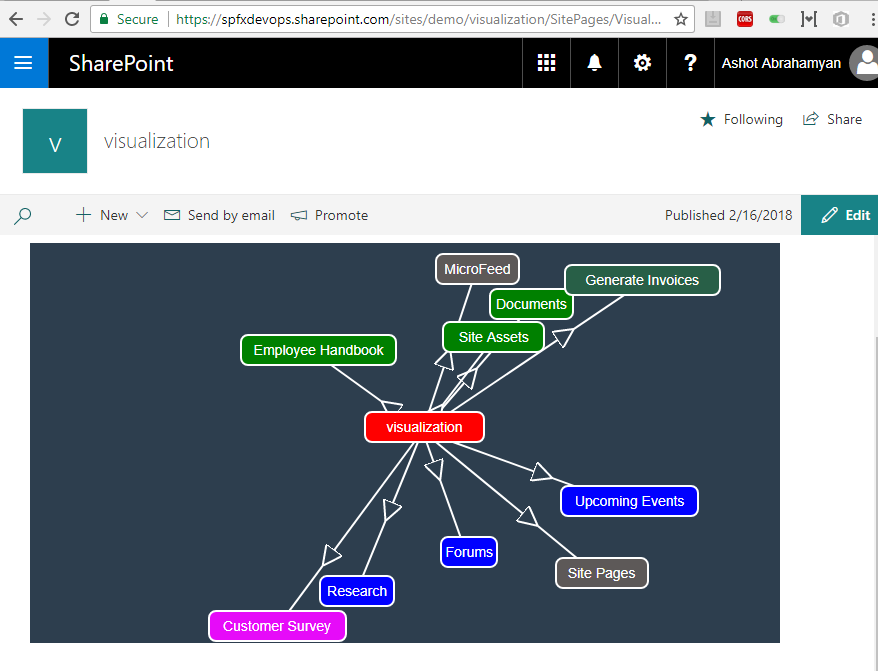
Figure 1
I published the app and ran it. The app displays the current web title 'visualization' at the center of the canvas in red and lists titles around it connected via arrows going out from the web.
(Hidden and Gallery lists are not retrieved). Lists are randomly rendered as their top/left values are generated randomly. Rectangles are draggable.
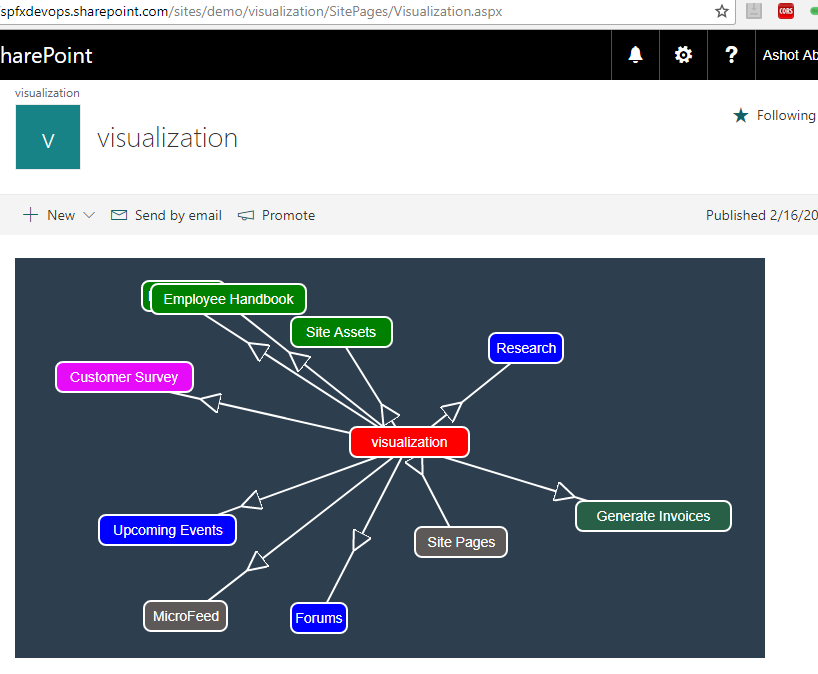
Figure 2
I refreshed the page and got another view.
In mobx-state-tree (MTS) each node in the tree is described by two things: Its type (the shape of the thing) and its data.
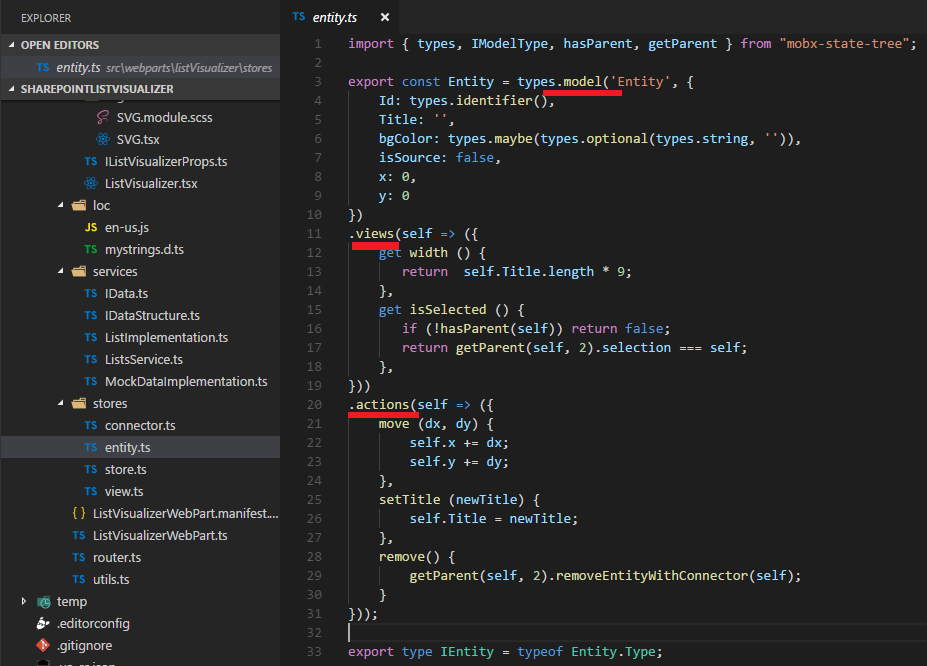
Figure 3
Here is entity.ts store file (we render both web and lists boxes based on this model). The most important type in MTS is types.model, which can be used to describe the shape of an object.
By default, nodes can only be modified by one of their actions, or by actions higher up in the tree. Any fact that can be derived from your stat is called View.
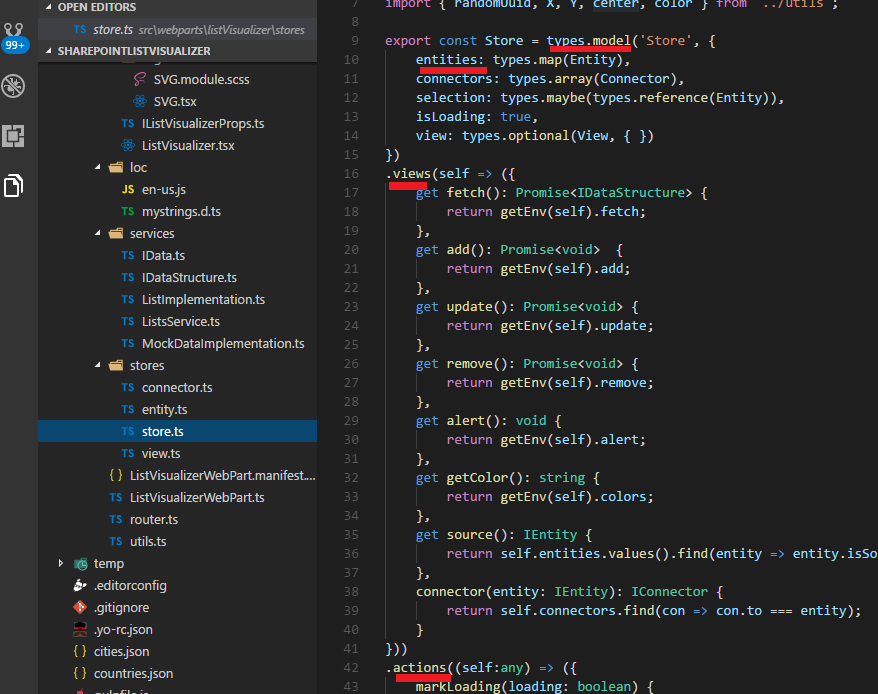
Figure 4
It is the main Store which includes other stores and defines its own views and actions.
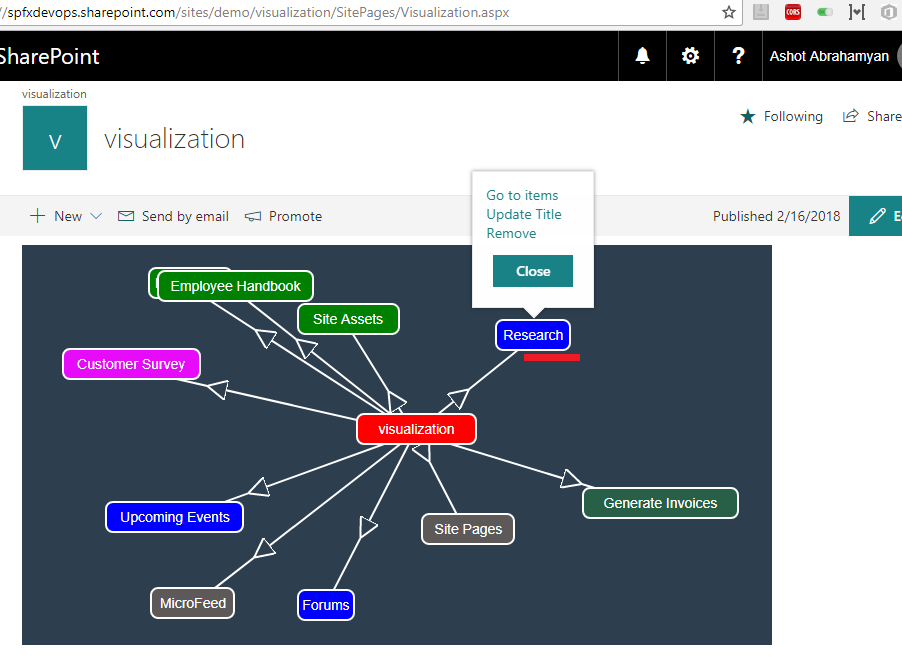
Figure 5
Context menu appears If you click on one of the lists. This is an actually Office UI Fabric React Callout control.
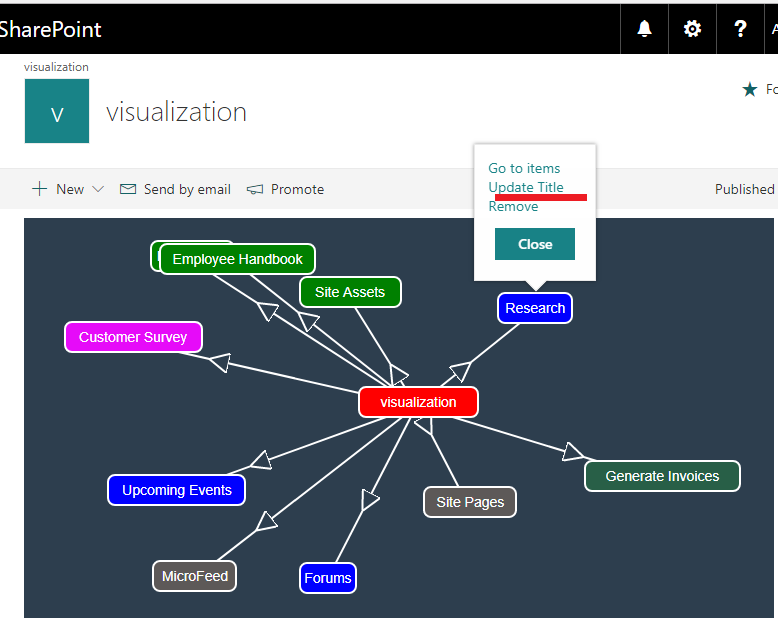
Figure 6
Clicking 'Update Title' link.
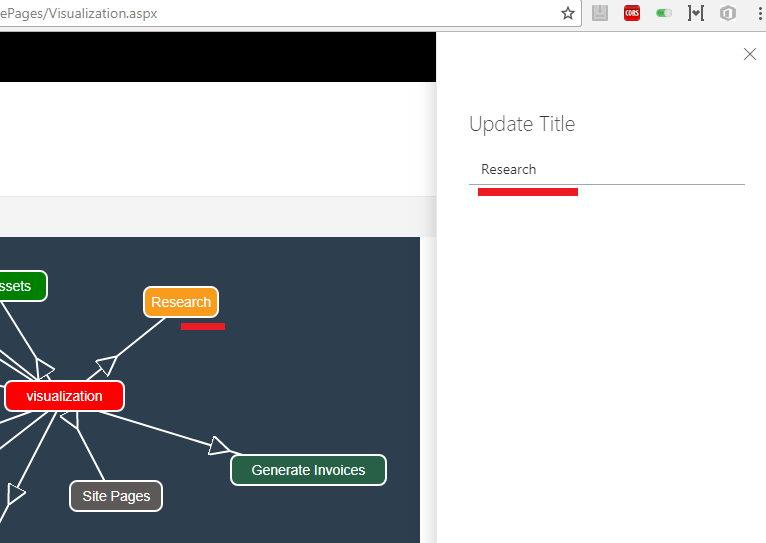
Figure 7
The selected rectangle's background is changed to orange. The sidebar, which is Office UI Fabric React Panel control, is opened so the user can update the title.

Figure 8
You will see instantaneous title update in the box as soon as you update the title in the sidebar.
The update will take some milliseconds though as I used debounce function of 300 milliseconds to reduce server call.
Only the arrow connecting the selected list (Research) to web (visualization) is rendered smoothly and
no other boxes or arrows are re-rendered on the canvas while updating the title on the side bar thanks to MobX.
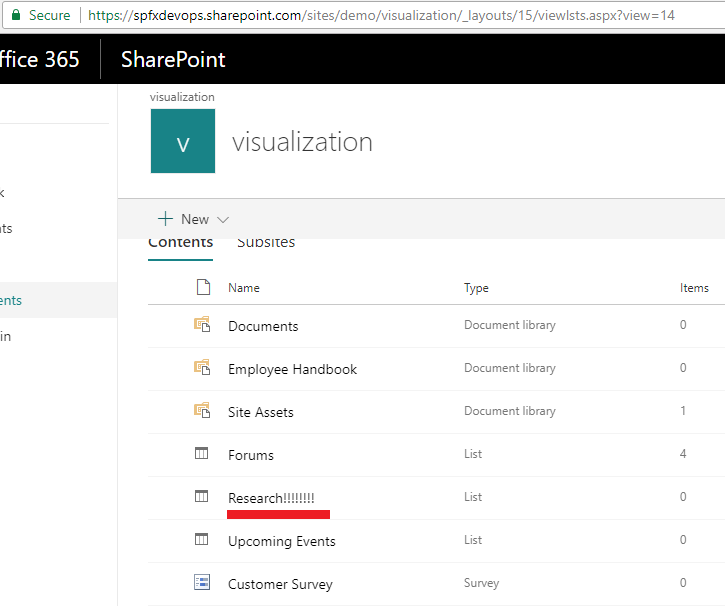
Figure 9
List title updated via the app.
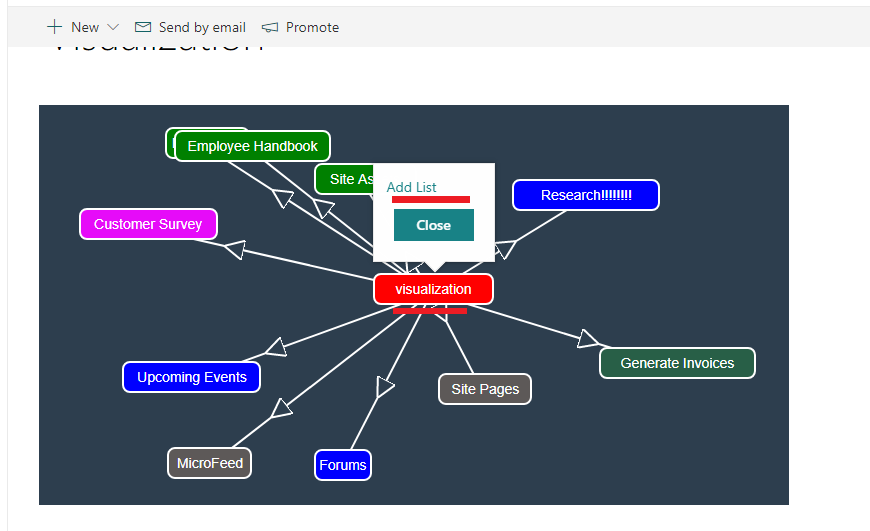
Figure 10
Adding a new list to 'visualization' web.
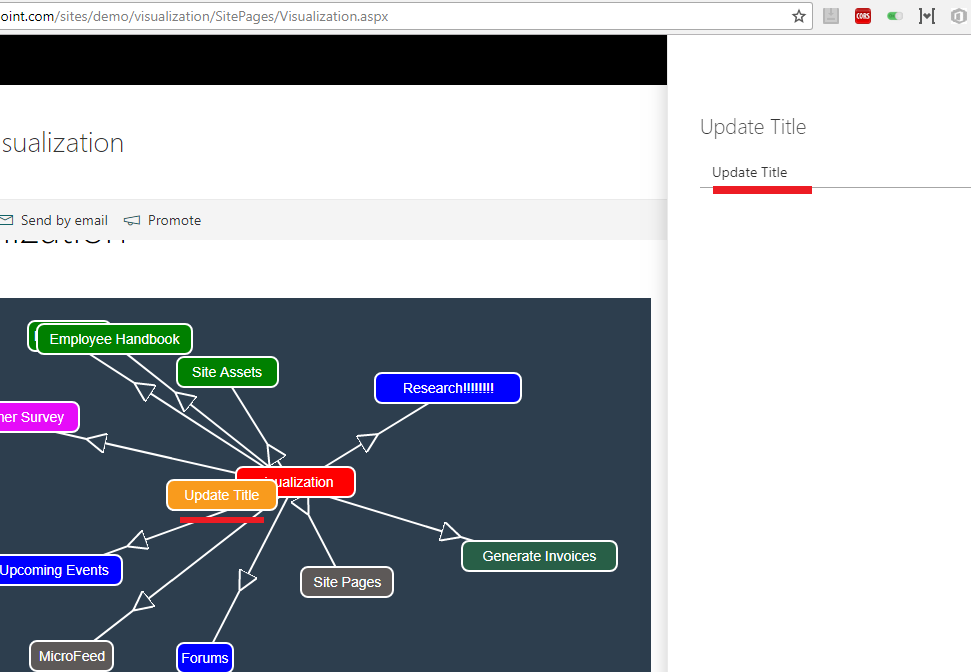
Figure 11
New list was created with title 'Update title'.
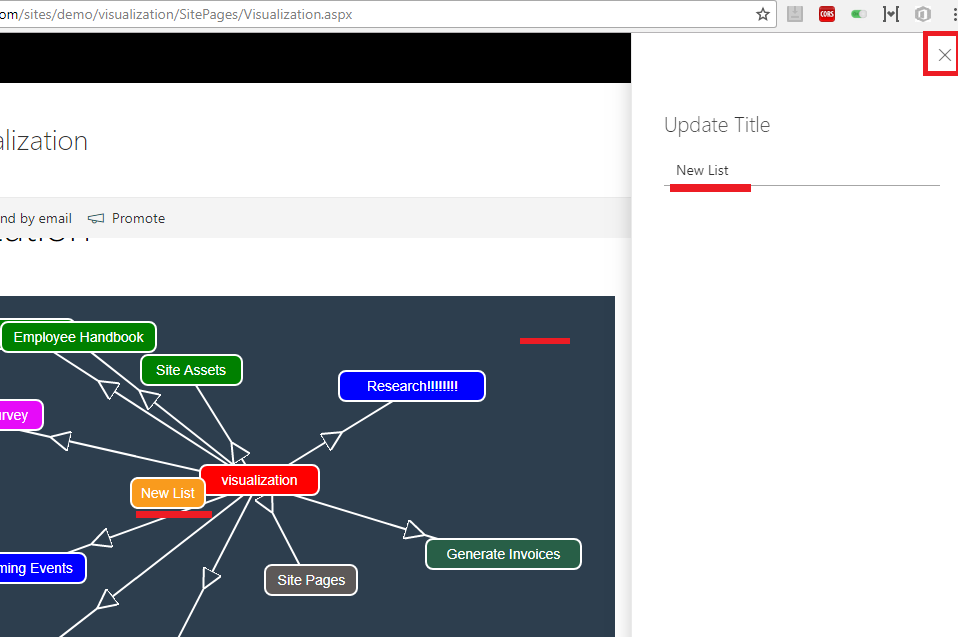
Figure 12
I updated the list title. You can either close x icon or click on the canvas to hide the panel.
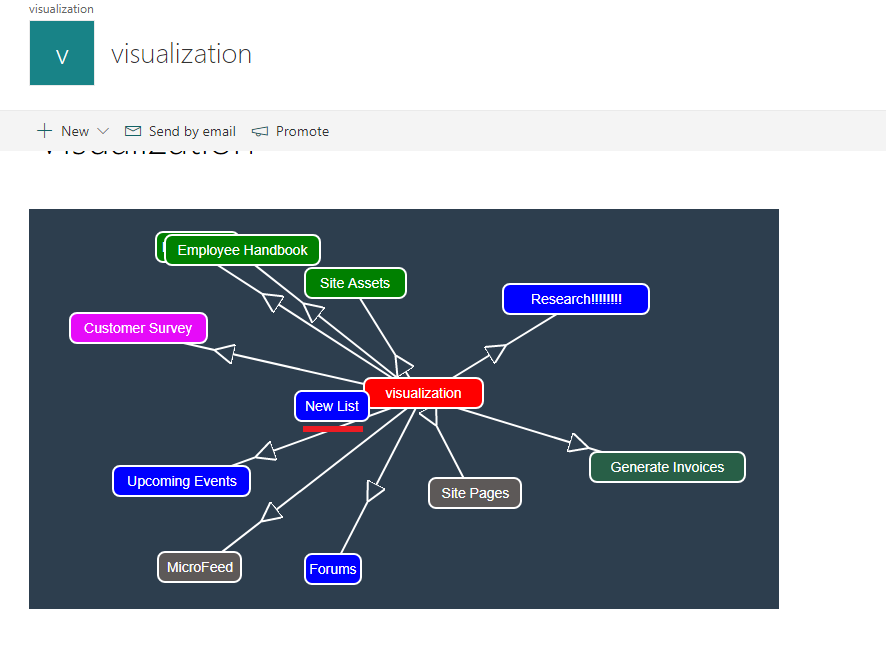
Figure 13
Side panel was closed the orange selection was changed to blue for 'New List'. We will discuss colors later to find out why 'New List' obtained blue background.
Figure 14
'New List' created.
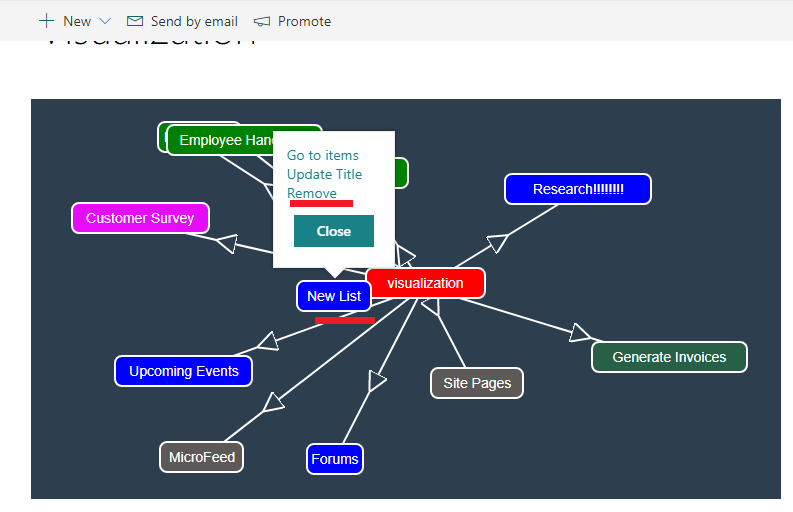
Figure 15
Let's remove newly created list.
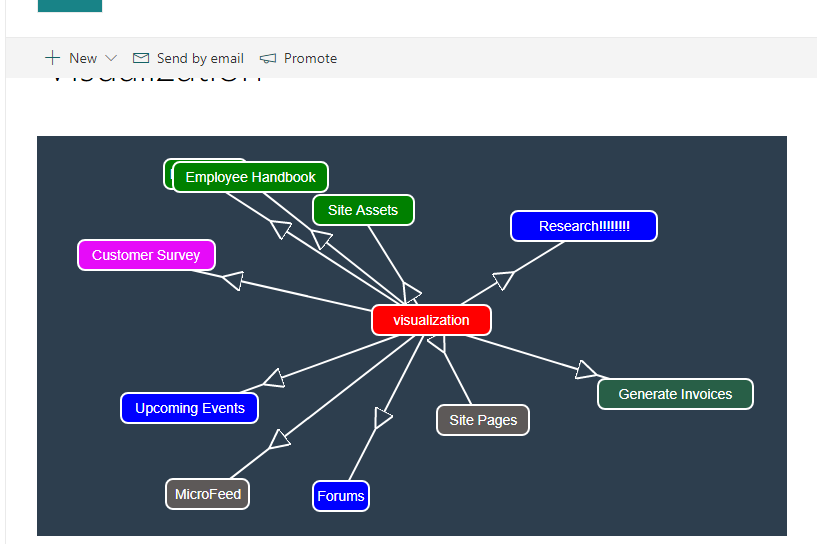
Figure 16
The list rectangle along with arrow was removed.
Figure 17
The list was removed.
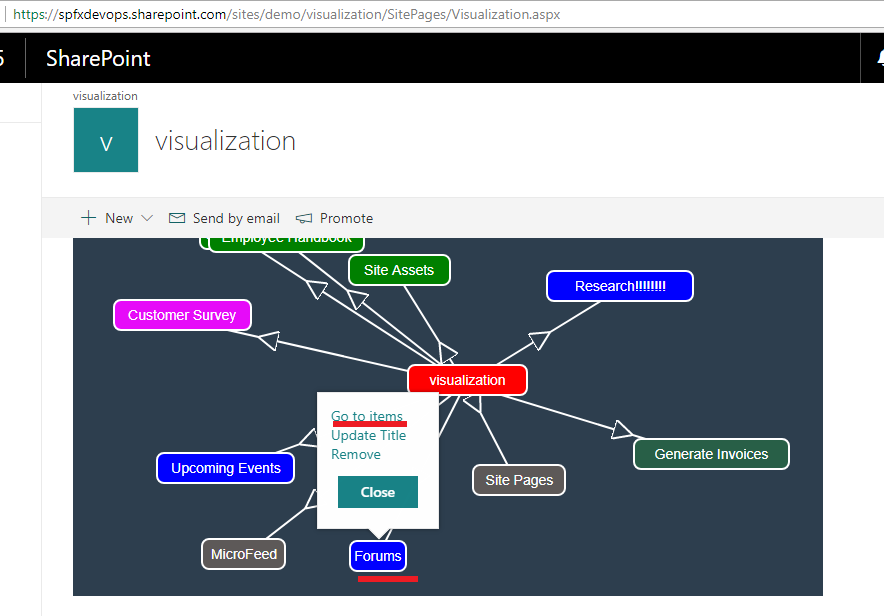
Figure 18
Clicking 'Go to Items' on 'Forums' list.
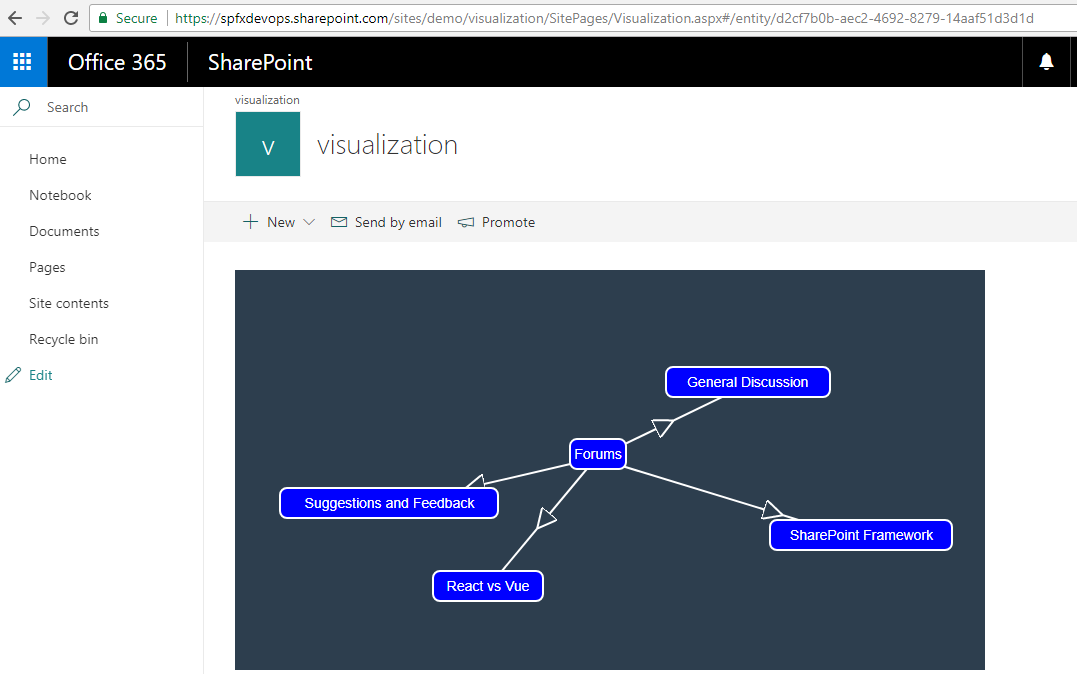
Figure 19
This time the list 'Forums' rendered at the center of the canvas along with its list items. Note, URL has changed (#/entity/d2cf7b0b-aec2-4692-8279-14aaf51d3d1d).
In our application we use just the same models (Figure 3) rendering both web with lists and list with list items because we only deal with web/list/listItem titles for rendering.

Figure 20
Here is data interface that required by store. You see the required property is 'Title' only. As we can see later with mock data implementation the interface is not implemented for SharePoint web and lists.
'Id' is an optional property. If not provided then new GUID is assigned as it required by the store. Property 'BaseTemplate' is specific to SharePoint lists.
We fill rectangles with colors based on 'BaseTemplate' values. For example, 'BaseTemplate' value for GenericList is 100 which corresponds to color blue (More on colors later).
Logically we should have another name for 'BaseTemplate'. The reason I choose it is I do not want to do an extra operation to change list's 'BaseTempalte' to another name,
but you can still use 'BaseTempalte' for another implementation which will be discussed later. Rectangle's left and top properties will correspond to 'x' or 'y' optional property
if specified otherwise the values will randomly be generated.
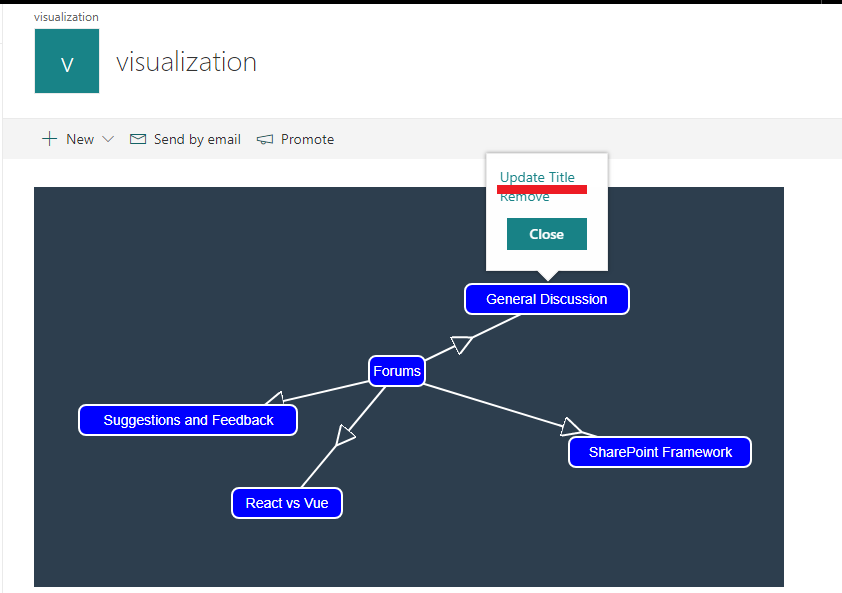
Figure 21
Let's update the list item title the same way as we did for the list.
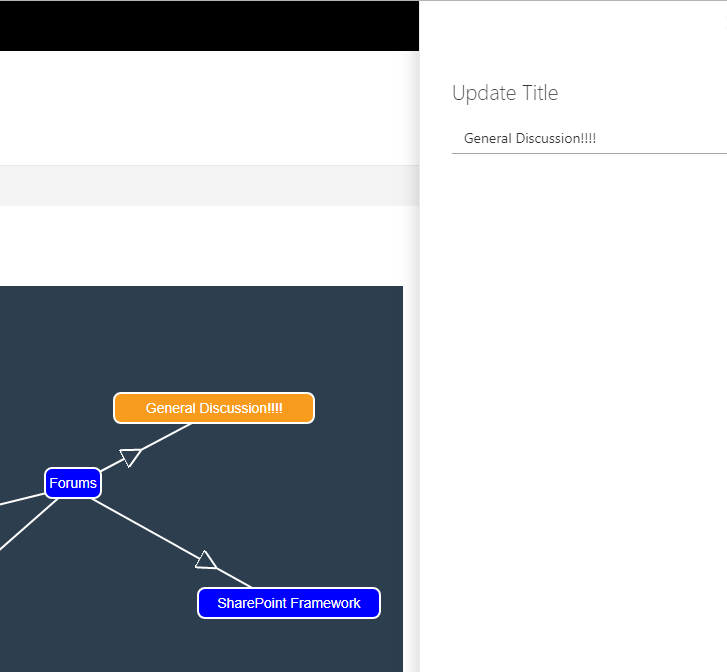
Figure 22
Title updated on the canvas.
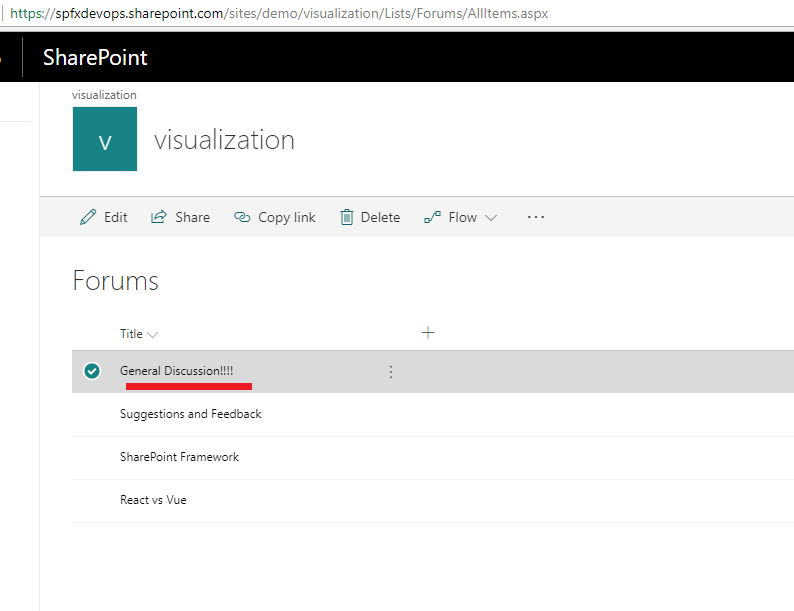
Figure 23
Title updated.
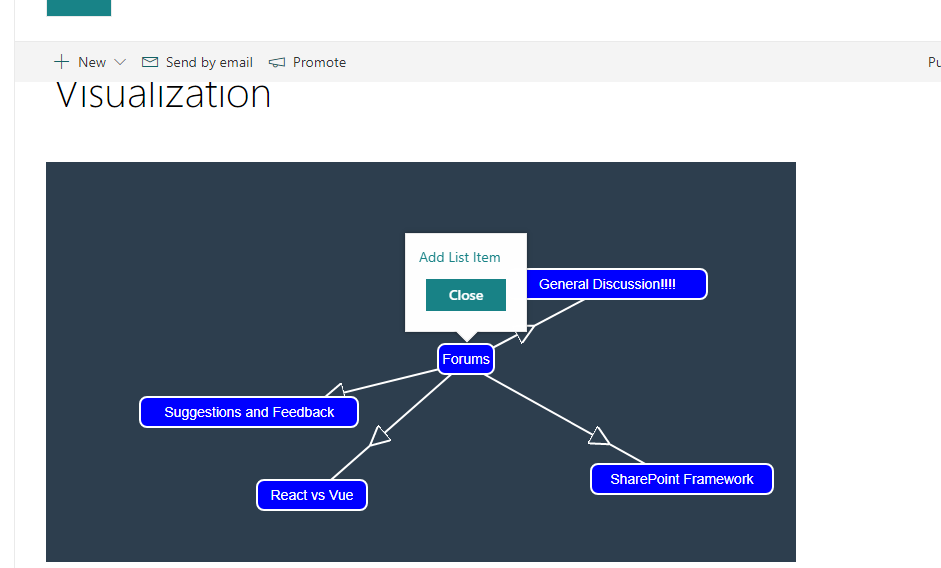
Figure 24
Adding new list item.
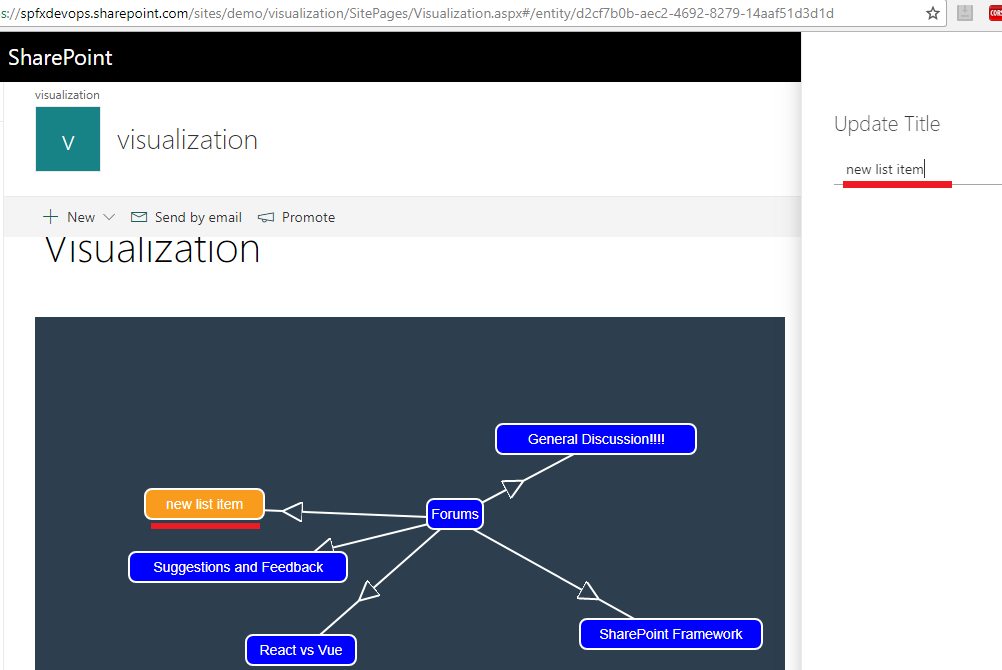
Figure 25
'new list item' rendered on the canvas.
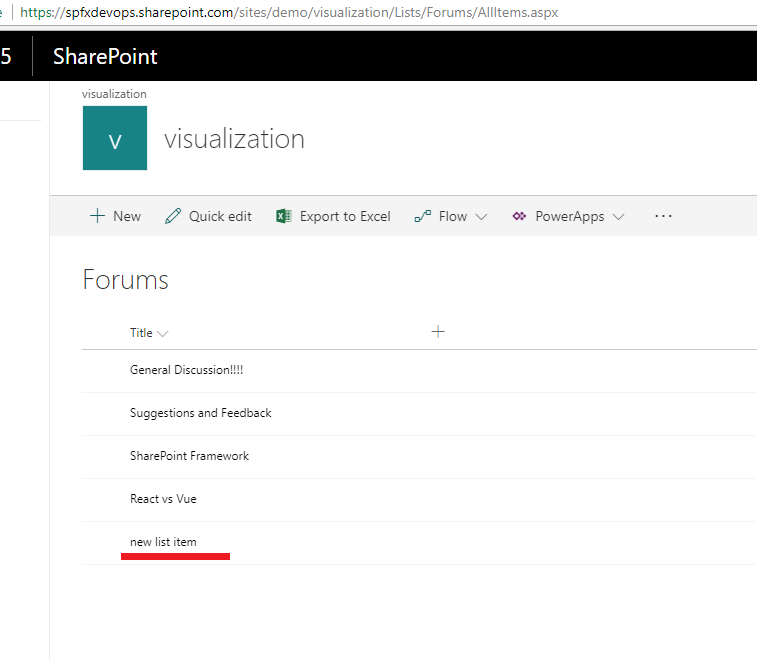
Figure 26
'new list item' created.
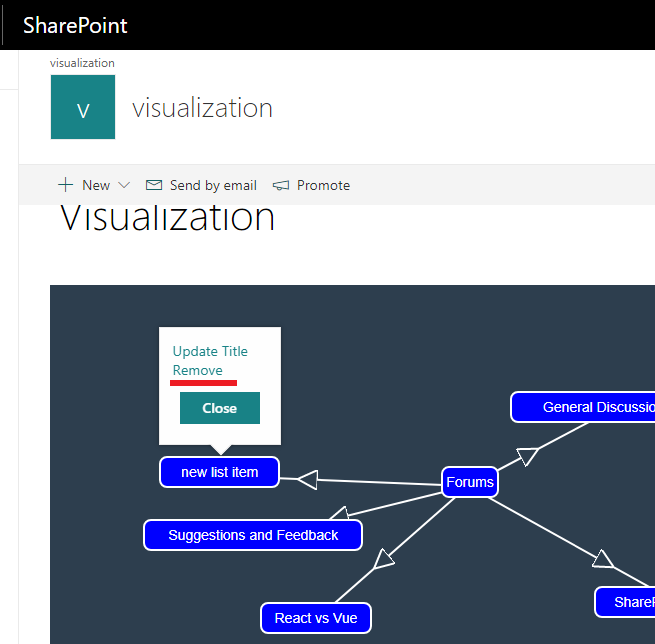
Figure 27
Removing 'new list item'
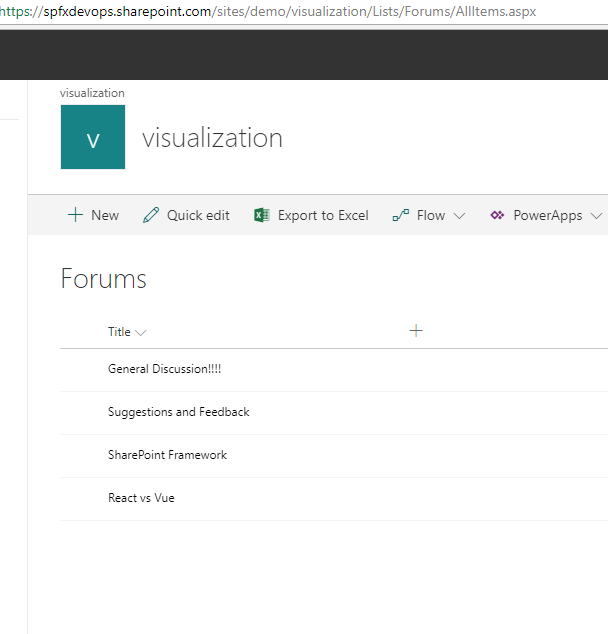
Figure 28
'new list item' removed.
The application is not implemented for SharePoint lists only. The app uses mobx-state-tree Dependency Injection. When creating a new state tree, it is
possible to pass in environment specific data by passing an object as the second argument to a .create call. This object should be immutable and can be passed
by any model in the tree by calling getEnv(self).
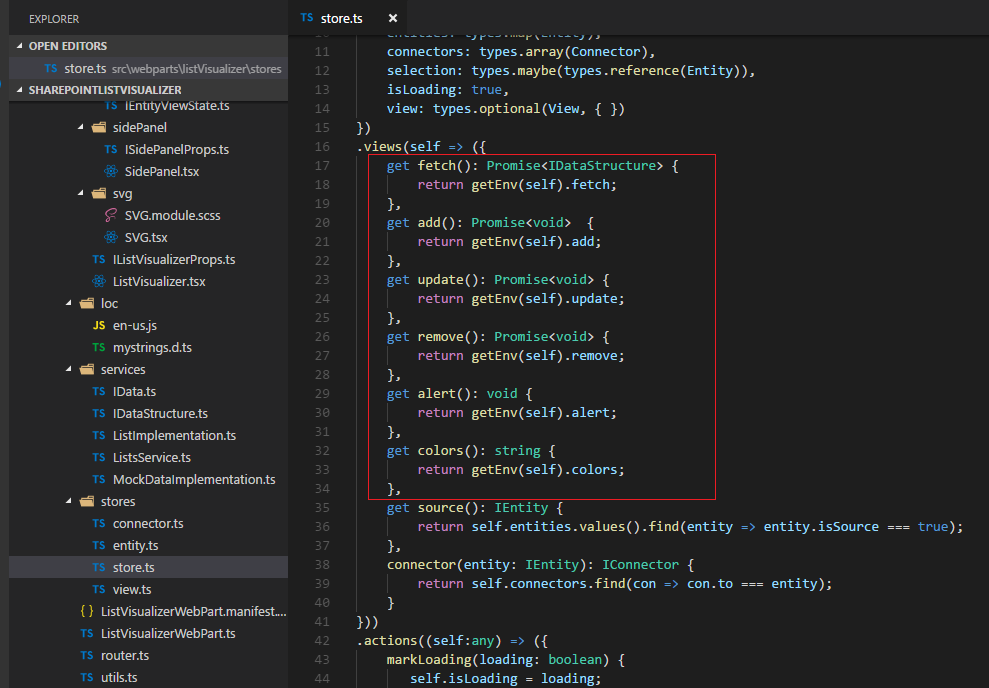
Figure 29
In the main store under 'views' we define 'getEnv' for fetching, adding, updating, removing, alerting and getting color.
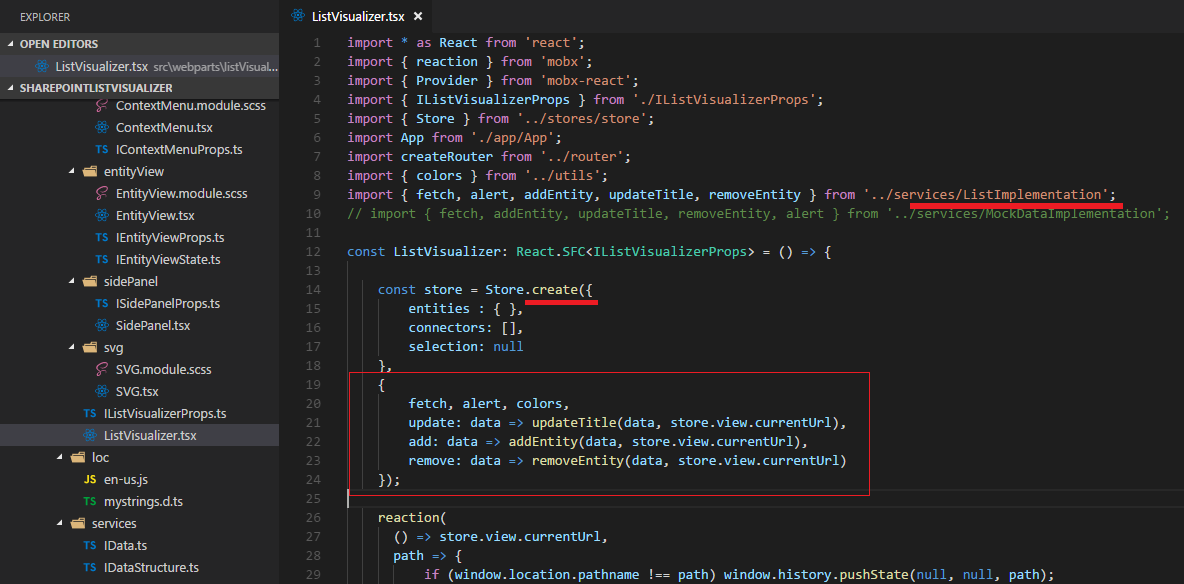
Figure 30
As stated, we pass in environment specific data by passing an object as the second argument to a '.create' call. Currently it is consuming 'ListImplementation'.
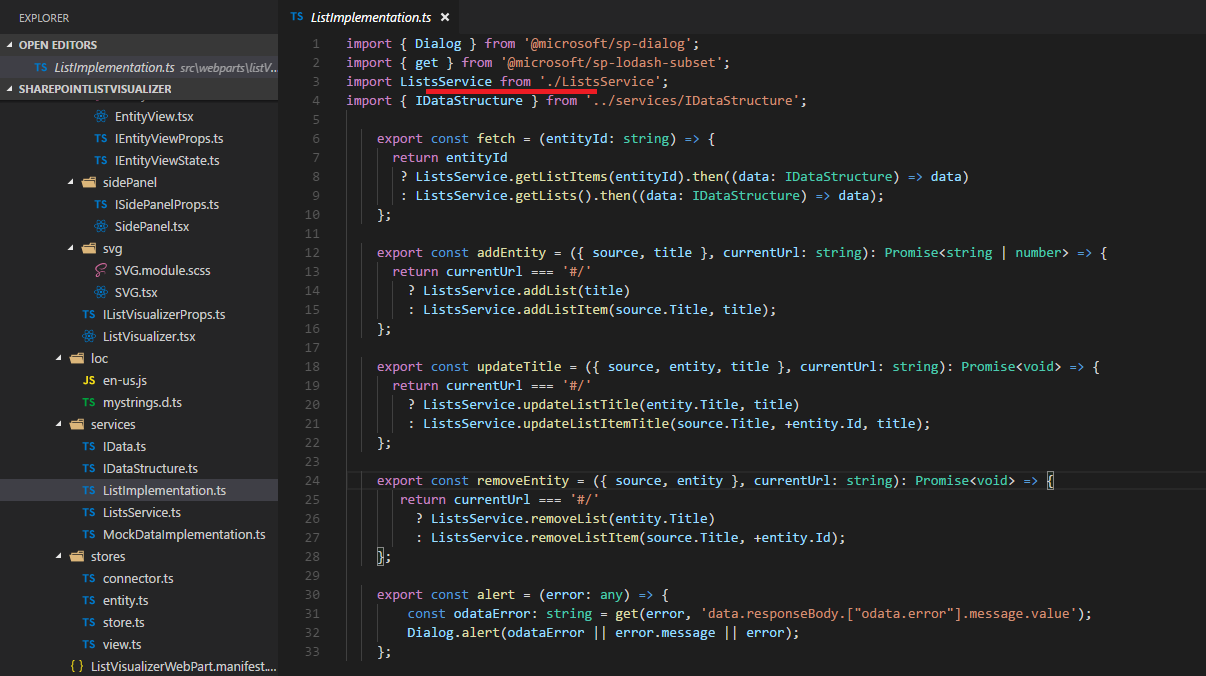
Figure 31
We fetch data, add lists or list items, remove etc. via ListsService.
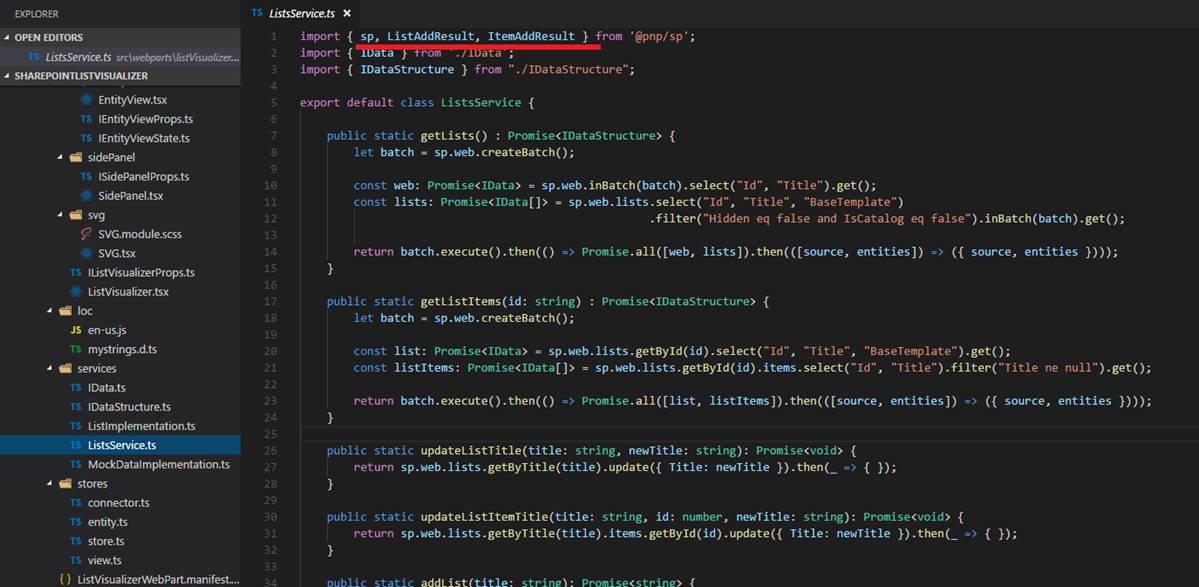
Figure 32
I use @pnp/sp https://pnp.github.io/pnp/sp/index.html which contains fluent api to call the SharePoint rest services.
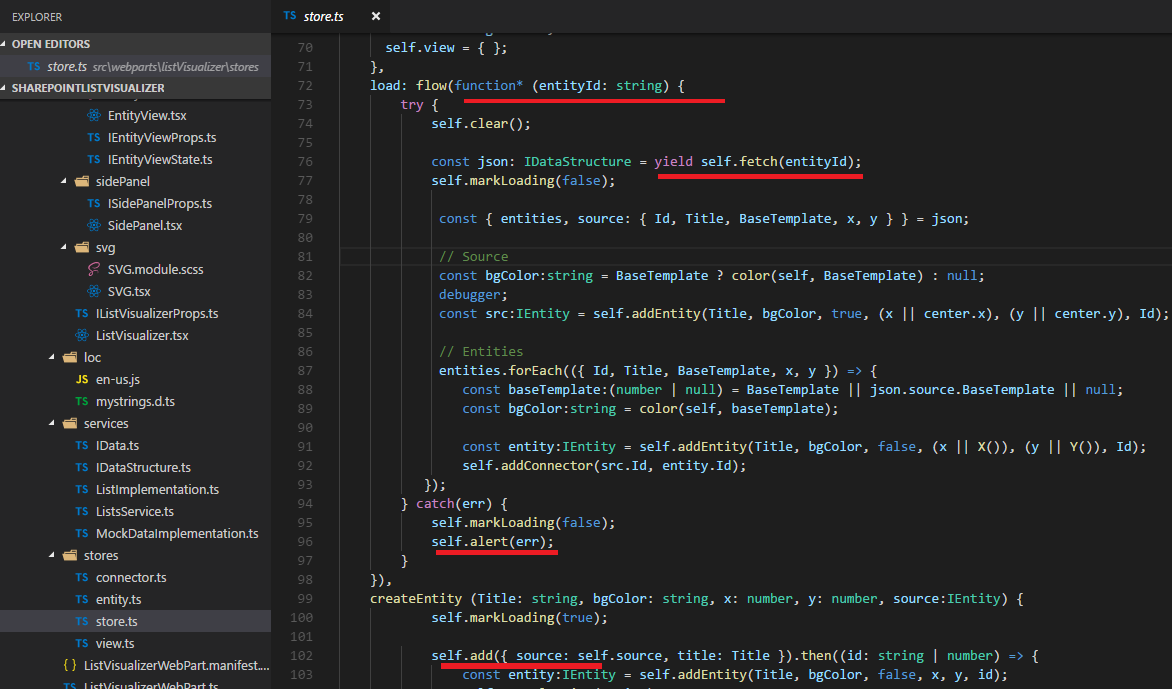
Figure 33
In store, we fetch data using JavaScript Generators, add lists or list items etc. all via 'getEnv(self) '. We also pass error via self.alert and display the error message the way we prefer.
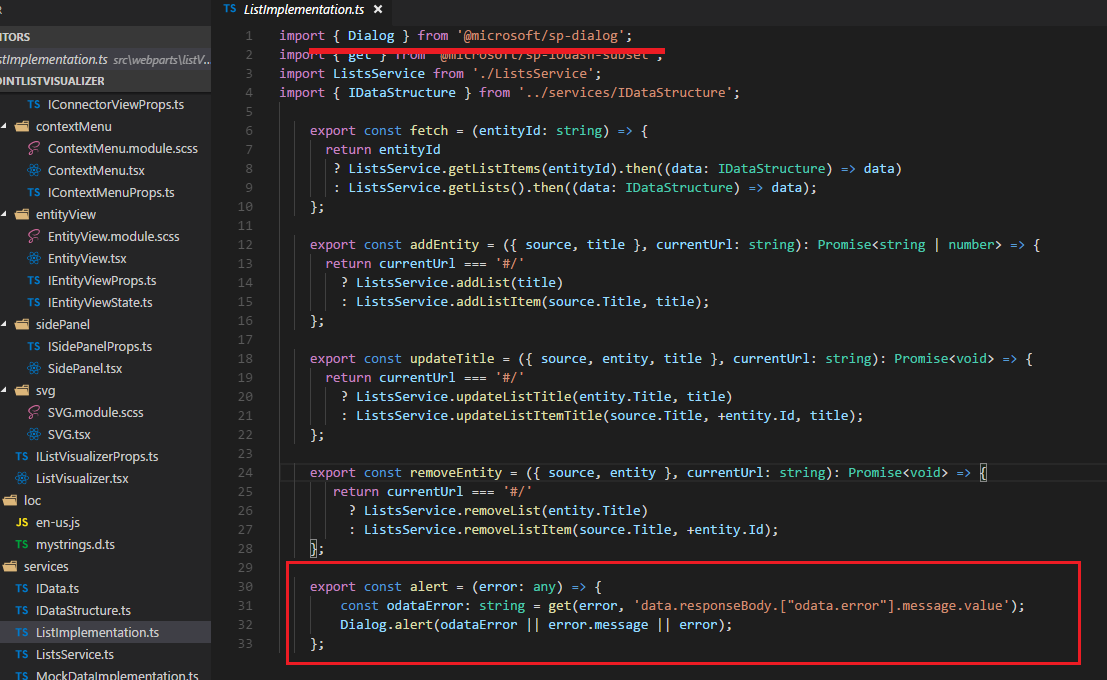
Figure 34
First, we check if the error is odataError otherwise display the error message or error using Dialog from '@microsoft/sp-dialog'.
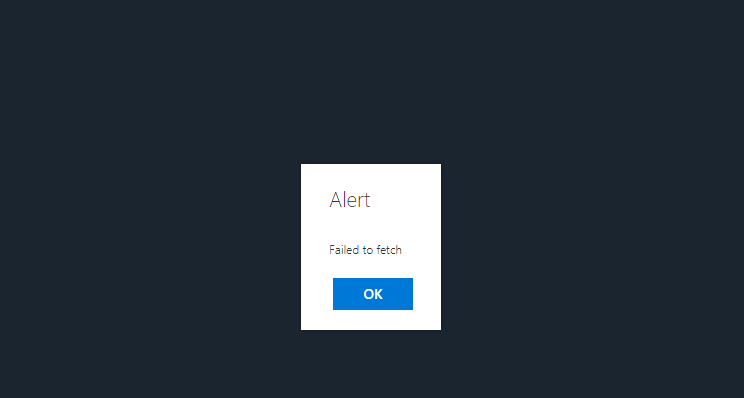
Figure 35
'Failed to fetch' alert.
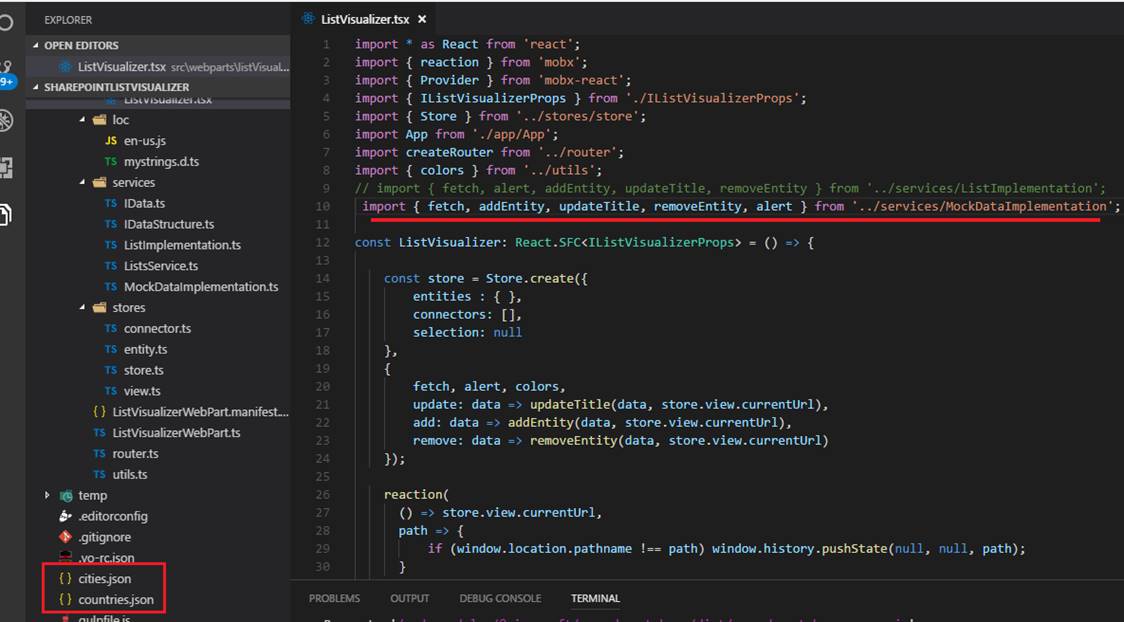
Figure 36
Let's switch to MockDataImplementation instead of ListImplementation. This time I will use local workbench as I have to serve 'cities.json' and 'countries.json' files.
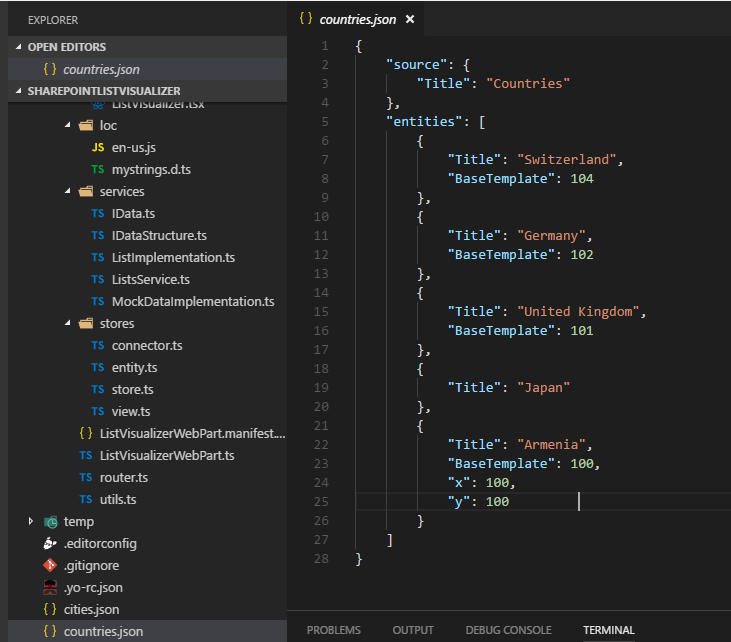
Figure 37
Here is the format we pass to store. The source is located at the center of the canvas. In lists implementation case the source was web 'visualization' and
'entities' were lists.
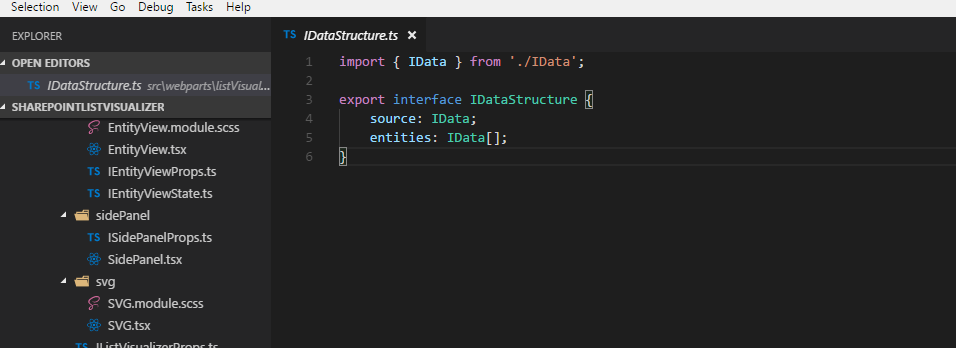
Figure 38
Actually, we defined interface for that.
In mock data implementation case (Figure 37) the source title name is 'Countries' and entities are countries (IData interface (Figure 20)).
We do not have to specify Id as it will be generated if not provided. Also, I specified 'BaseTemplate' for countries except for Japan. Armenia defines x and y values so
It will always be rendered in left 100 and top 100 position.
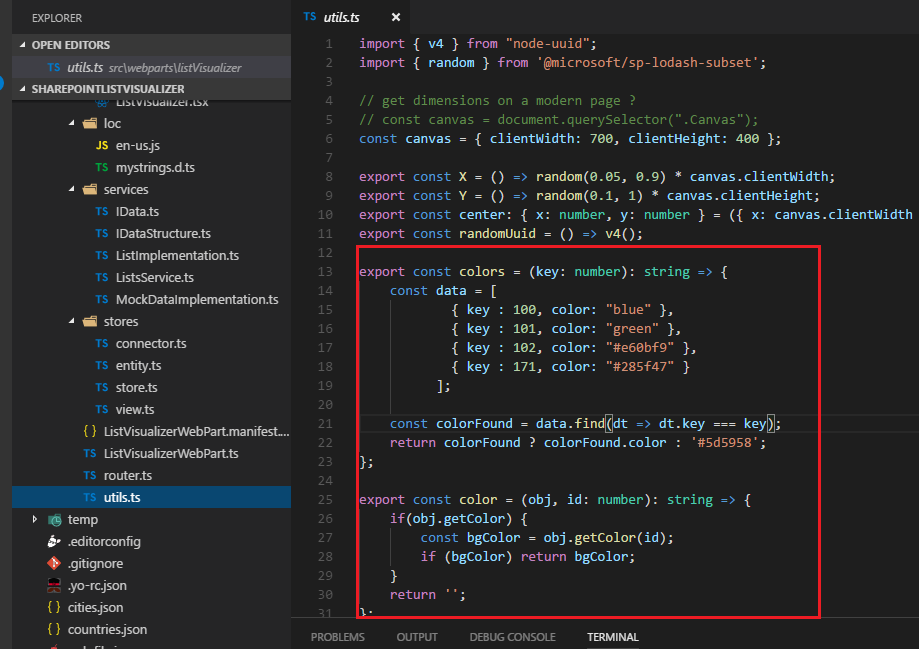
Figure 39
Colors are defined in utils.ts file where key is 'BaseTemplate' number.
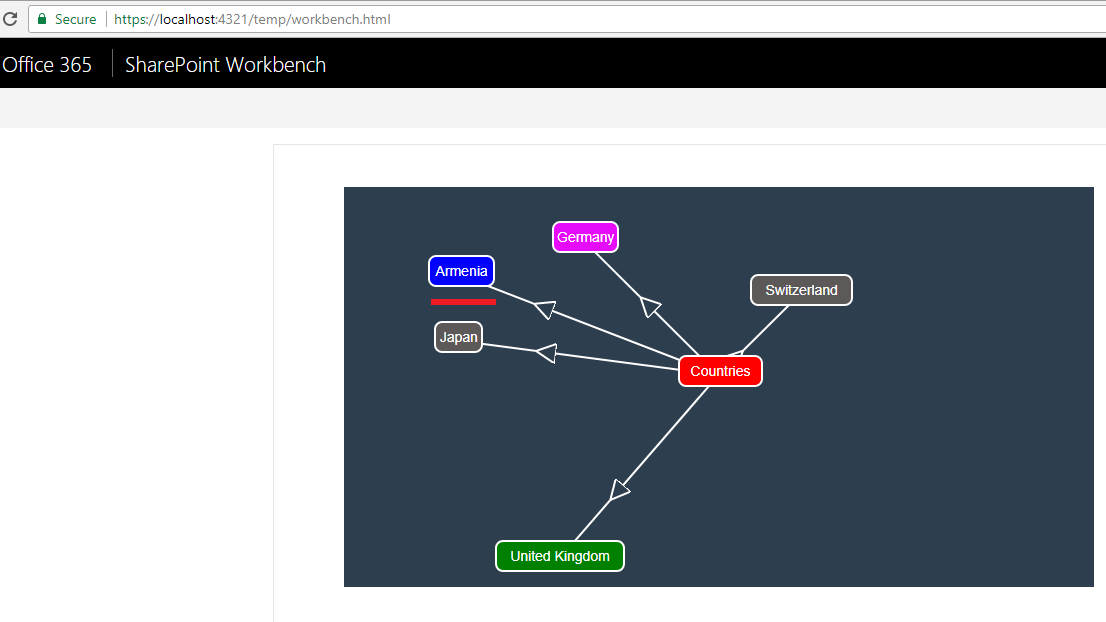
Figure 40
As you see 'Countries is the source and Countries are entities. Note 'Armenia' is rendered in top 100 and Left 100 position. Both Japan and Switzerland are gray because there is no matching color
for them (Japan does not define 'BaseTemplate' and Switzerland 'BaseTemplate' number is 104 and no matching color for it).
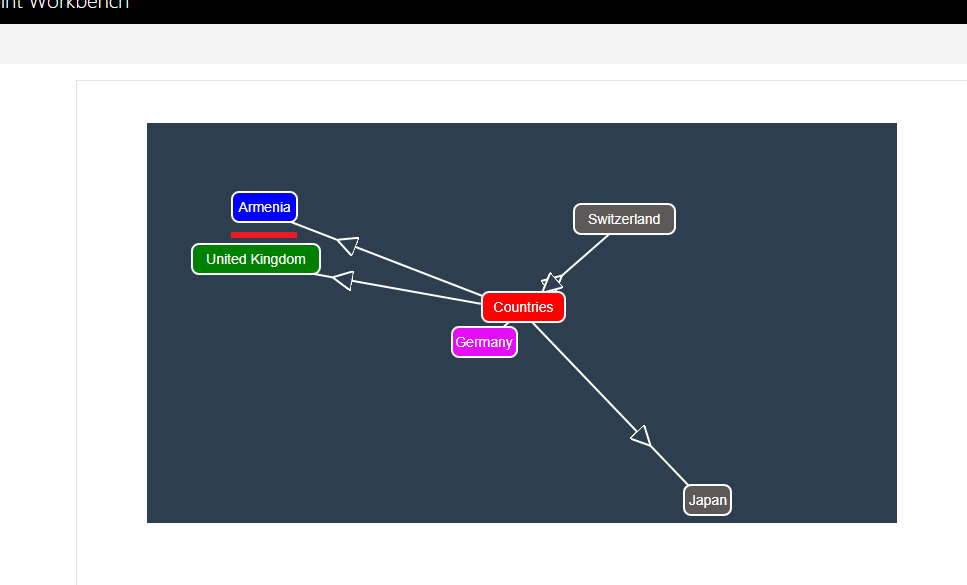
Figure 41
I refreshed the page and Armenia is still in the same position (100, 100).
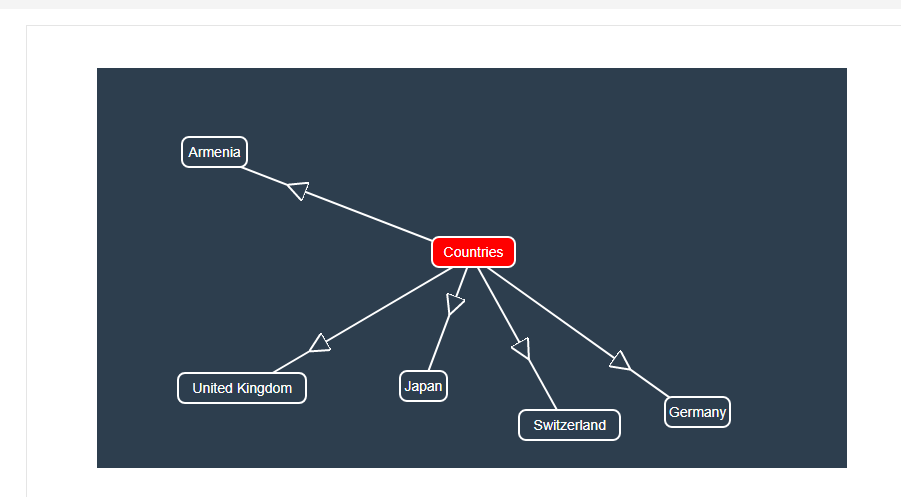
Figure 42
You may not specify colors for entities and the source if you want to.
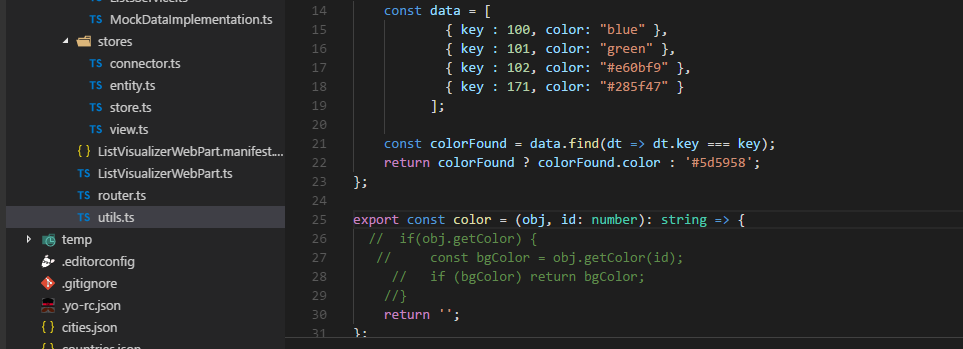
Figure 43
I just commented some lines. The same is true for source color.
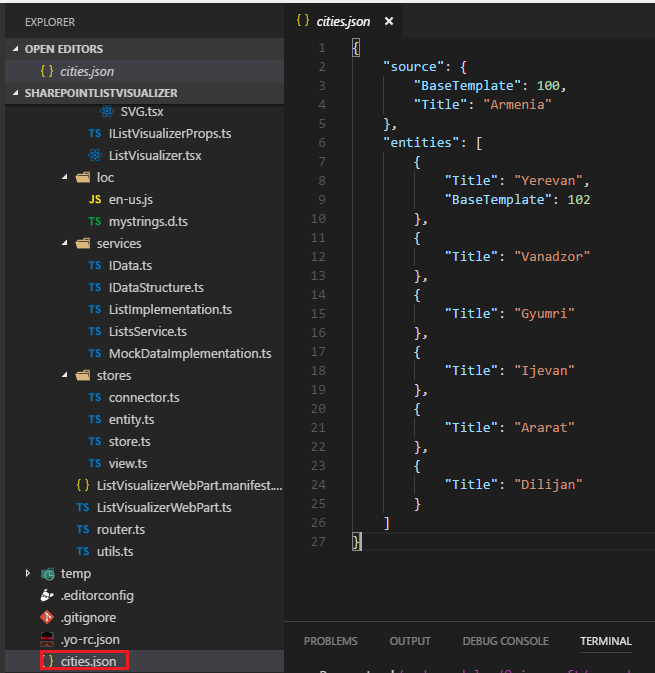
Figure 44
Here is cities.json file. The source is Armenia. Entities are cities of Armenia. If entities do not provide 'BaseTemplate' then the color is inherited form the source, in this case
'BaseTemplate' is 100. Entity 'Yerevan' will have its own color as it is the capital of Armenia.
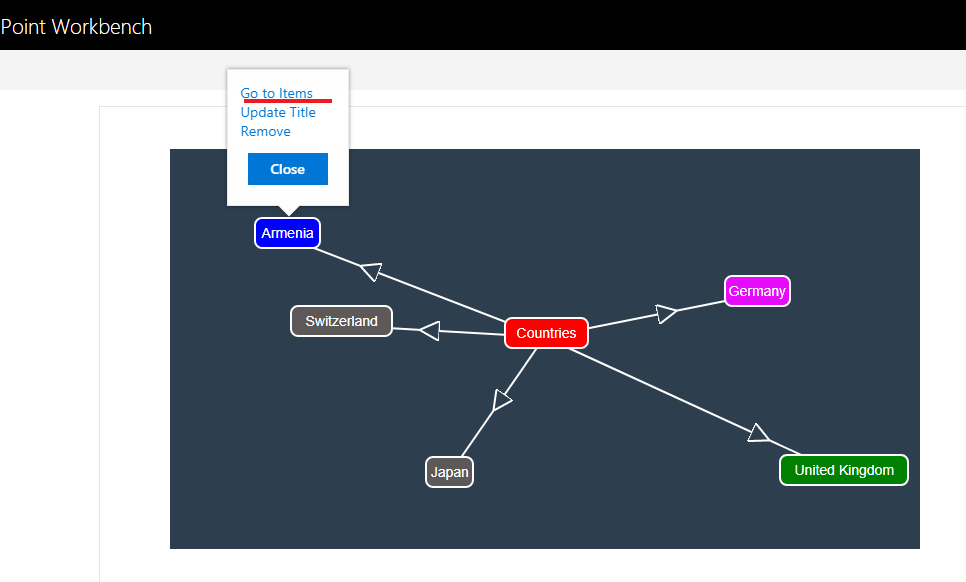
Figure 45
Selecting 'Armenia' and clicking on Go to Items (name 'Go to Items' is not changed for mock data).
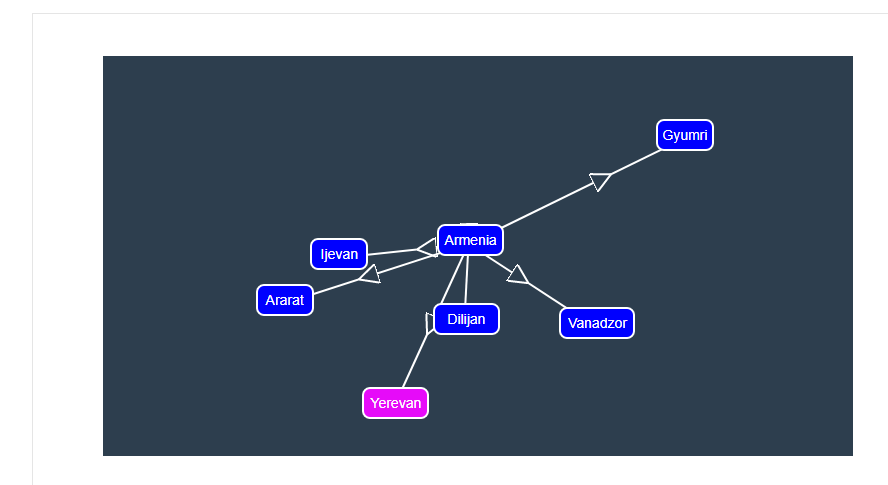
Figure 46
All entities inherited blue color from 'Armenia' source but Yerevan has its own color.
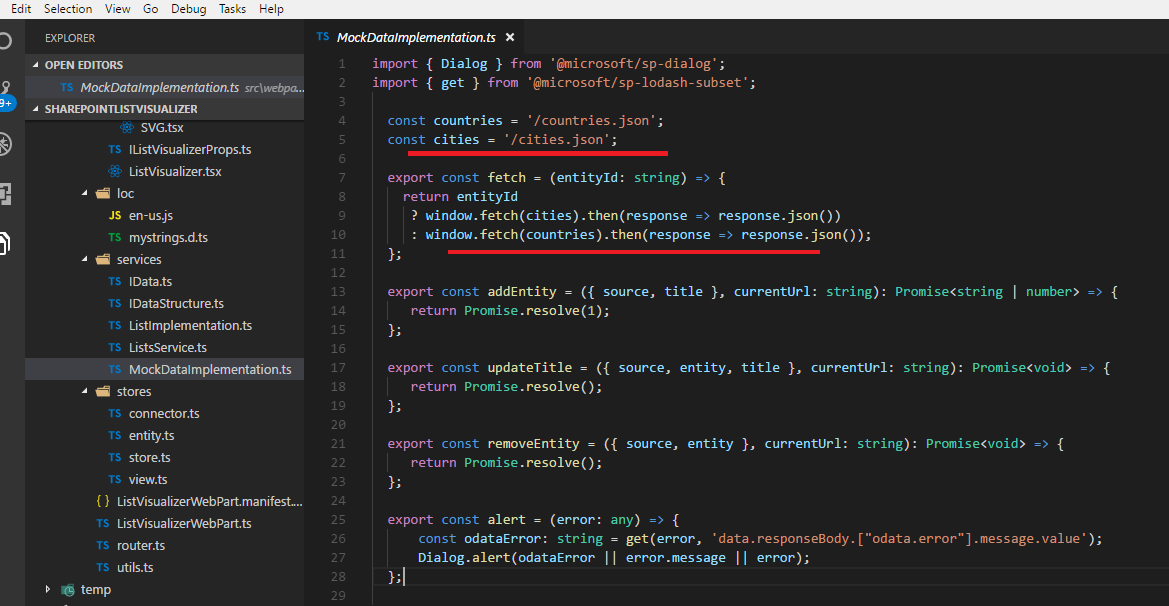
Figure 47
Only fetching is implemented for mock data but we could also implement other methods as well. You will not get an error on UI though if you try to add, update or remove list and list items.
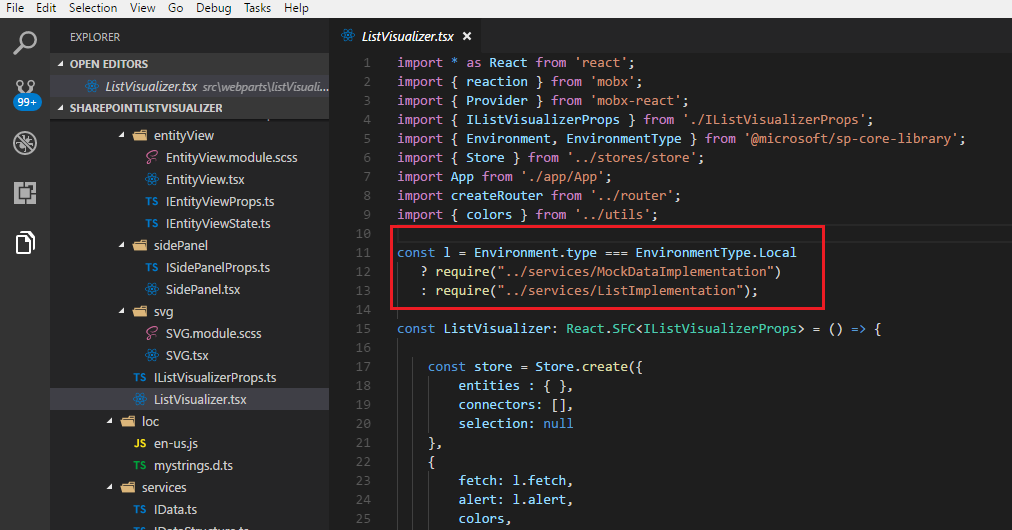
Figure 48
I changed the code to load respective implementation based on environment type. Mock data implementation will be consumed for local workbench automatically.
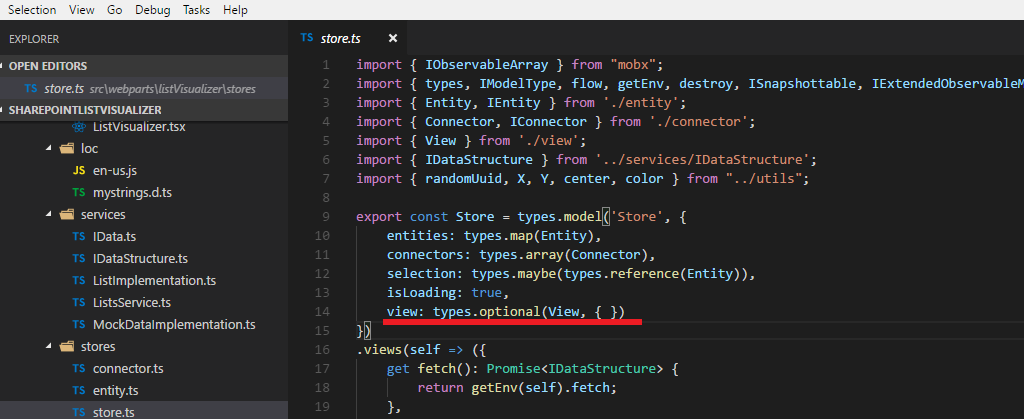
Figure 49
Our main store contains 'view' which is the view state. We already stated in MobX, usually one store captures entire state and logic of the application. This is our 'Store' store.
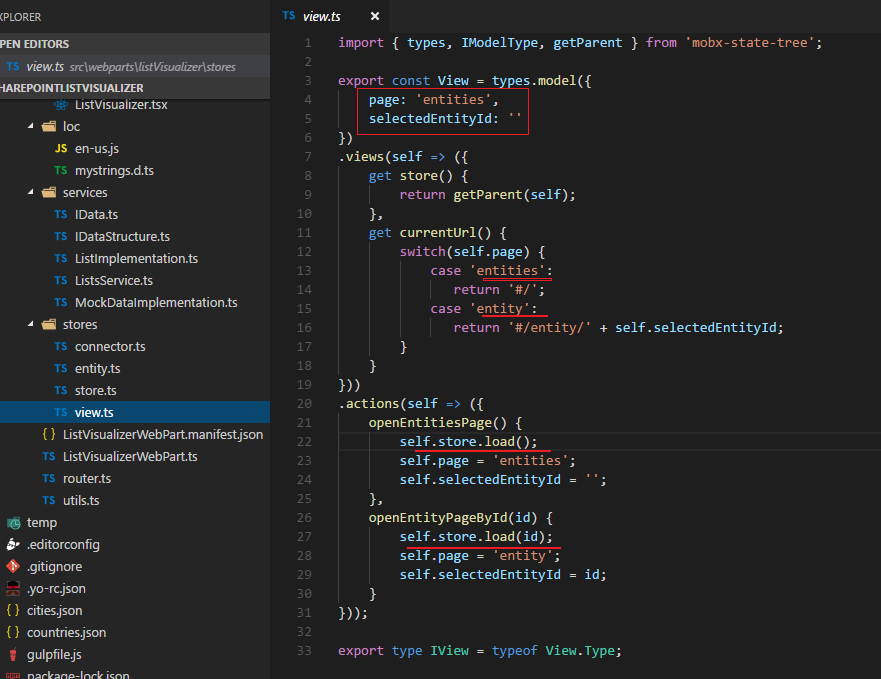
Figure 50
View type model has two properties 'page' and 'selectedEntityId'. We define currentUrl() where based on the current page we return different values. The store has
two actions. When app is being loaded then openEntitiesPage() action is being called. As you can see we do not load data via component hooks such as
componentDidMount() {
fetchAllData();
}
because the components can with MobX reactively react to state that lives outside of components. This also means that you can write unit tests against the store to
verify data fetching is happening without UI.
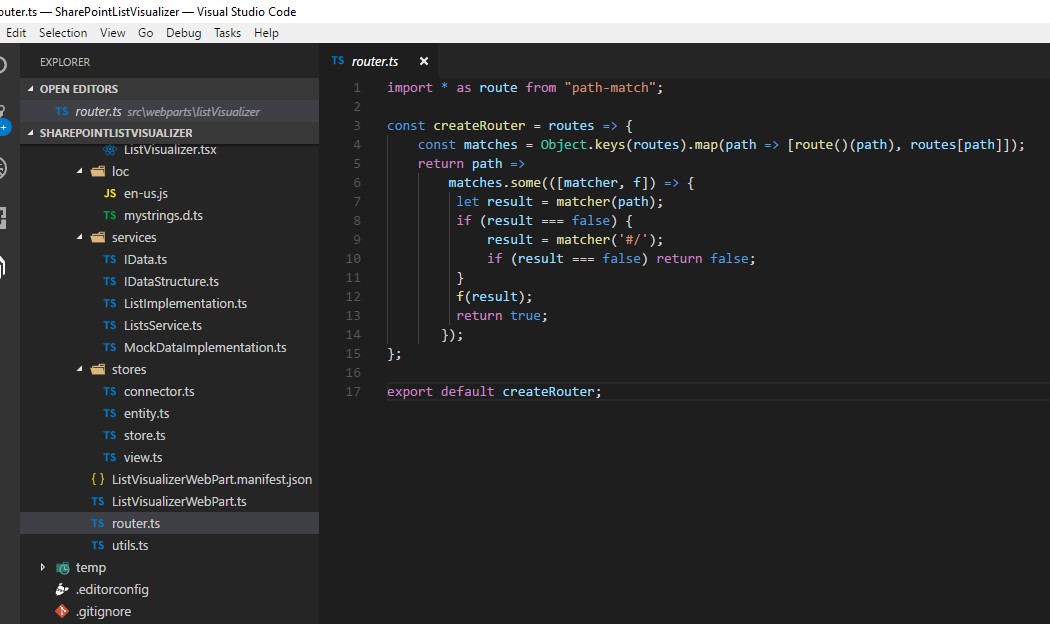
Figure 51
This is the router. It is a simple router not React specific.
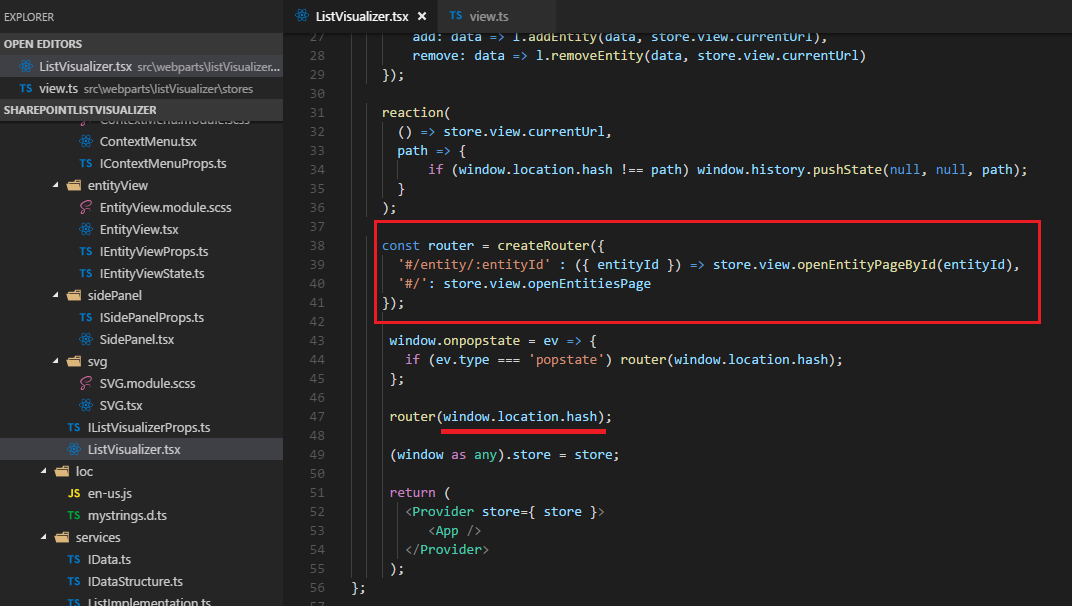
Figure 52
createRouter is being called as soon as the app is being loaded. Based on the path we call the respective method via store.view.
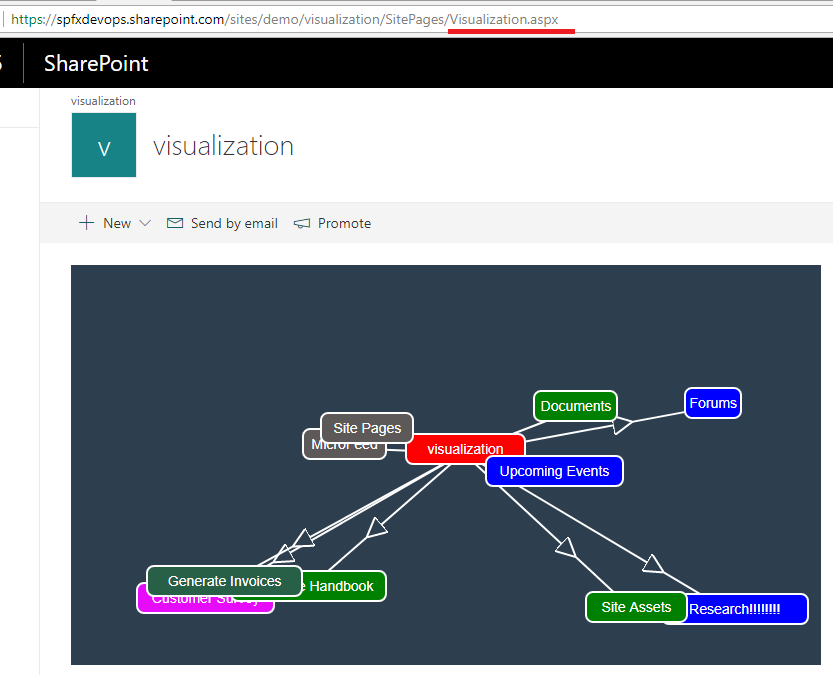
Figure 53
The app is loaded and store.view.openEntitiesPage() is called (Figure 50 ) then self.load.store() is called and data are retrieved form the server and rendered.
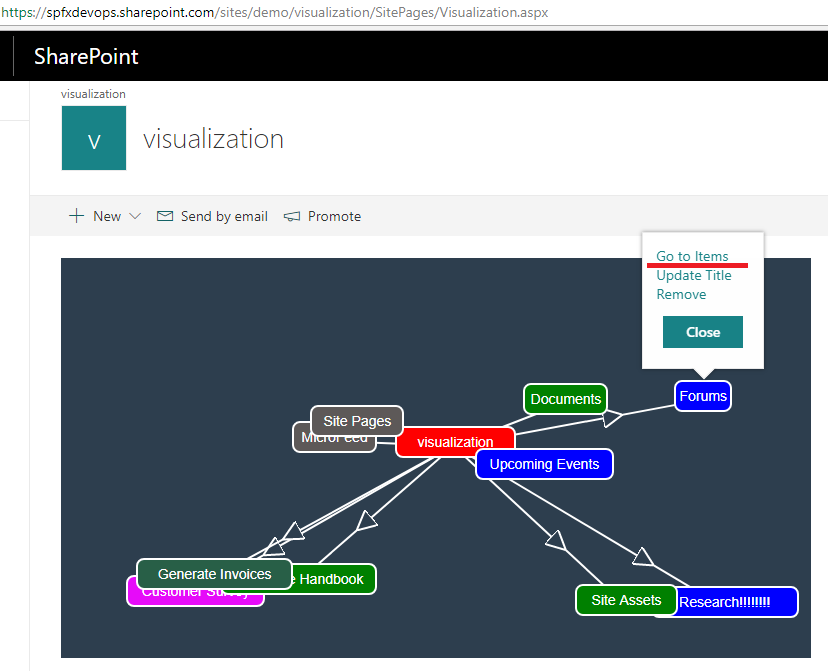
Figure 54
Clicking 'Go to Items'
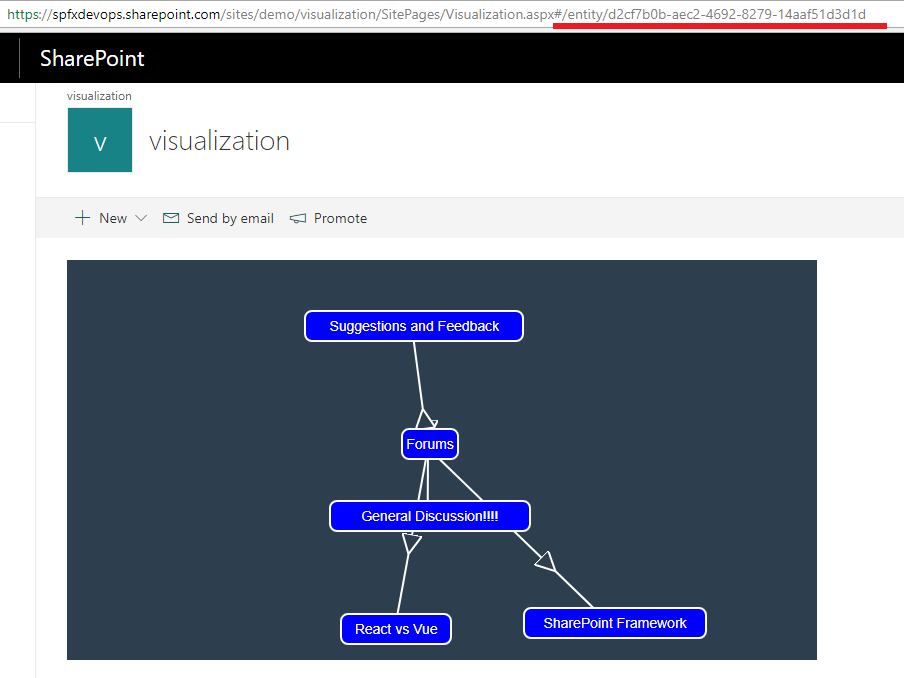
Figure 55
Route matched '#/entity/:entityId' and 'store.view.openEntityPageById(entityId) ' is called. '#/entity/d2cf7b0b-aec2-4692-8279-14aaf51d3d1d' is appended to the path.
If you try to refresh the page you will still be on the same page and see the same list items.

Figure 56
You see 'Reaction'. In MobX 'Reaction' takes two functions, the first one (the data function) is tracked and returns data that is used as input for
the second one the effect function.
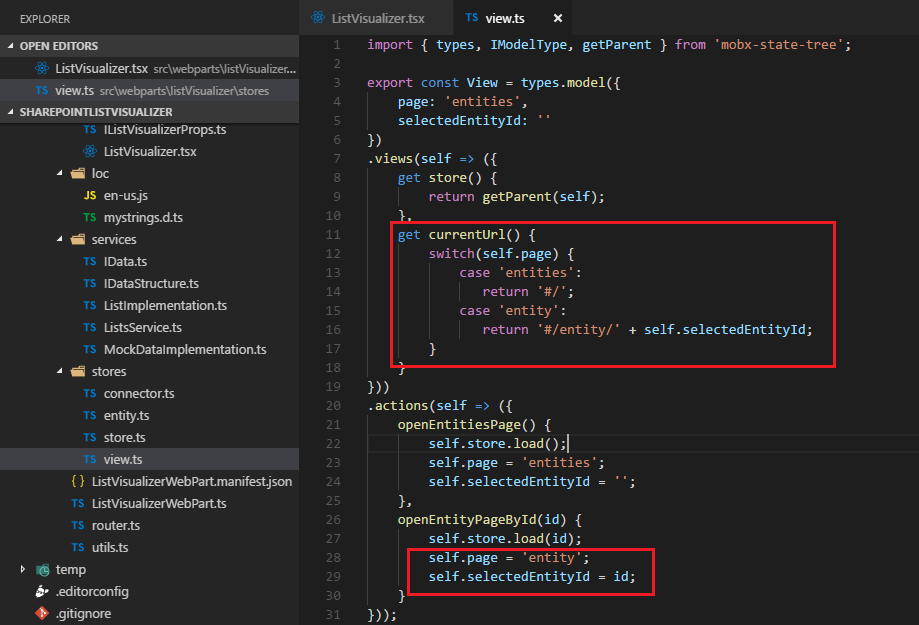
Figure 57
When openEntityPageById(id) was called then self.page value was changed to 'entity' and id was assigned to self.selectedEntityId. As we have
self.page (switch(self.page)) in currentUrl() and data function is () => store.view.currentUrl in 'Reaction' (Figure 56) then
window.history.pushState(null, null, path) (the effect function) is executed. Window.history.pushState() method allows to add history entries.
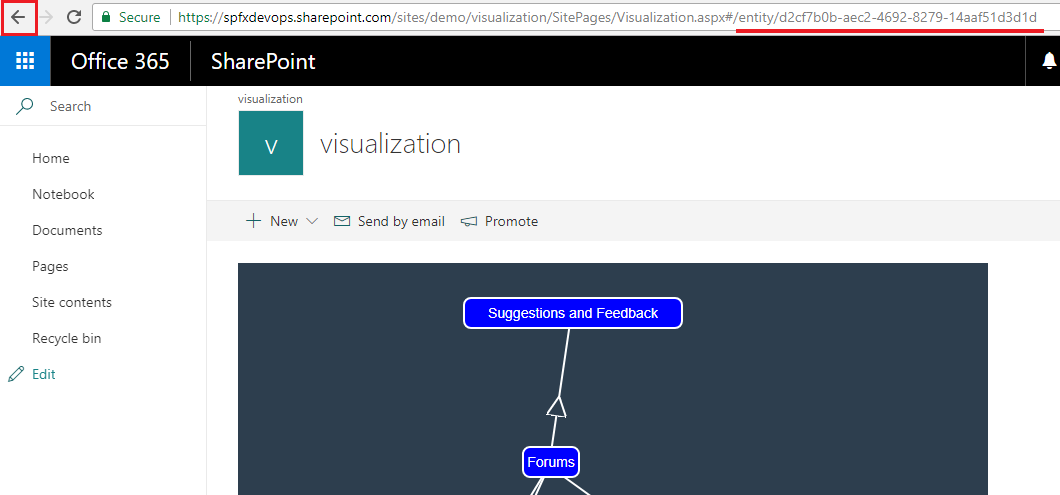
Figure 58
We will navigate back to the initial page by clicking browser's back button.
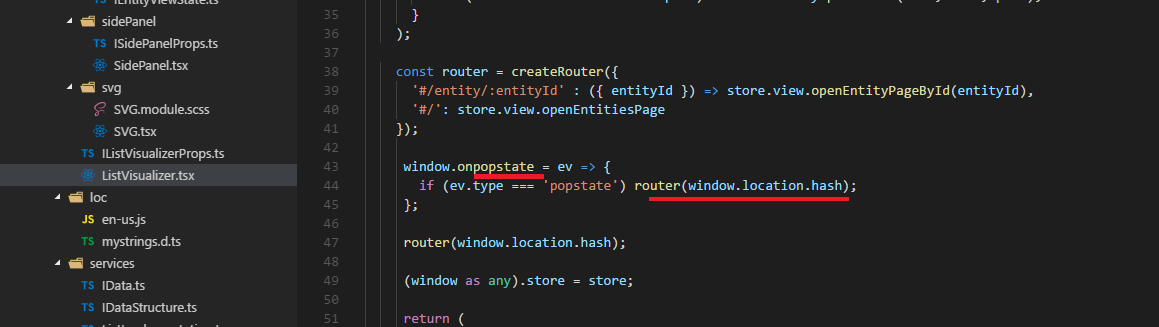
Figure 59
Onpopstate is an event handler for the popstate event on window. A popstate event is dispatched to the window each time the active history entry changes
between two history entries for the same document. When we clicked browser's 'Back' button then onpopstate event was called and we call router with the current hash.
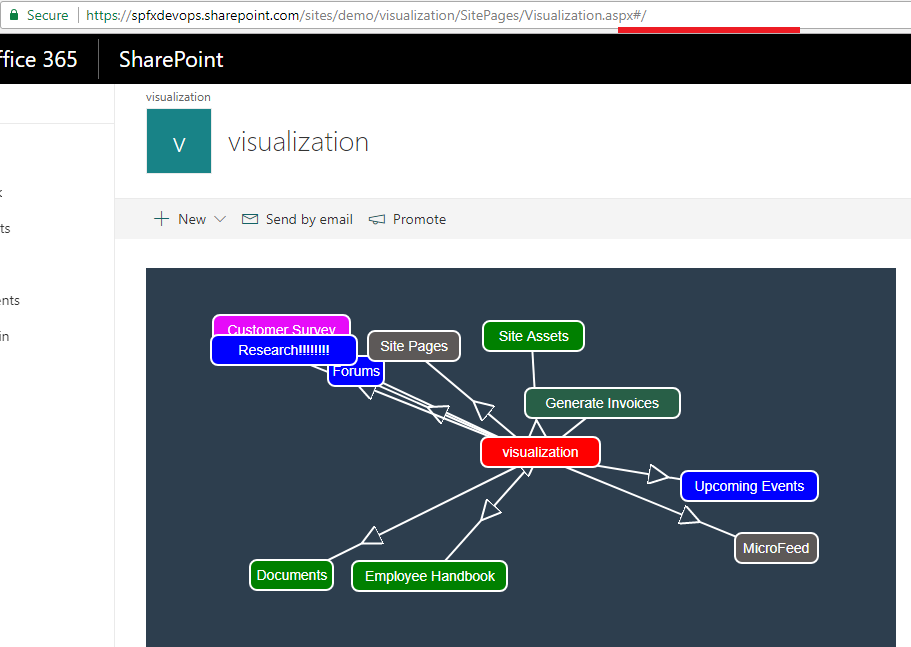
Figure 60
Back button was clicked and app is on the initial page. As you see we took a generic router not specific to React by integrating browser history api.
Routing and history is just another set kind of actions /reactions as stated.
We used URL to track the status of the application extending with # hash. It is preferable solution for Single Page Applications (SPA). We should not use the URL
in SharePoint applications as we do not own the hosting surface. At least you could see how to do it in your SPA applications and maybe in some cases people still prefer
hashing in SharePoint applications.
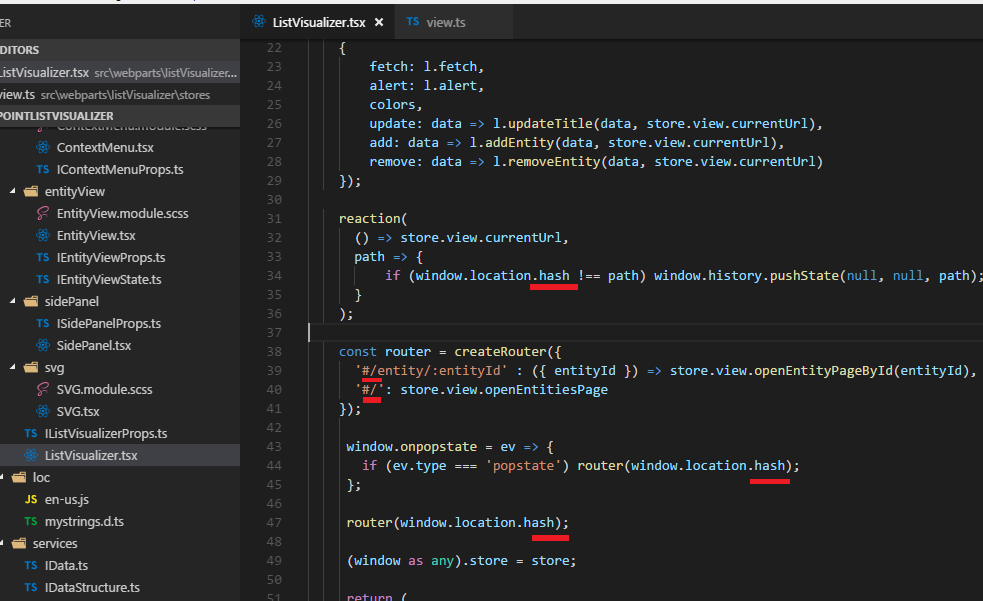
Figure 61
I used # hashing but you may prefer html5 routing (without hash) in your SPA application that hosted on Express for example. It is really easy to do it. What you have to do is
replace '#/' to '/' in the project and change 'hash' to 'pathname' in ListVisualizer.tsx file ( window.location.hash changed to window.location.pathname) .
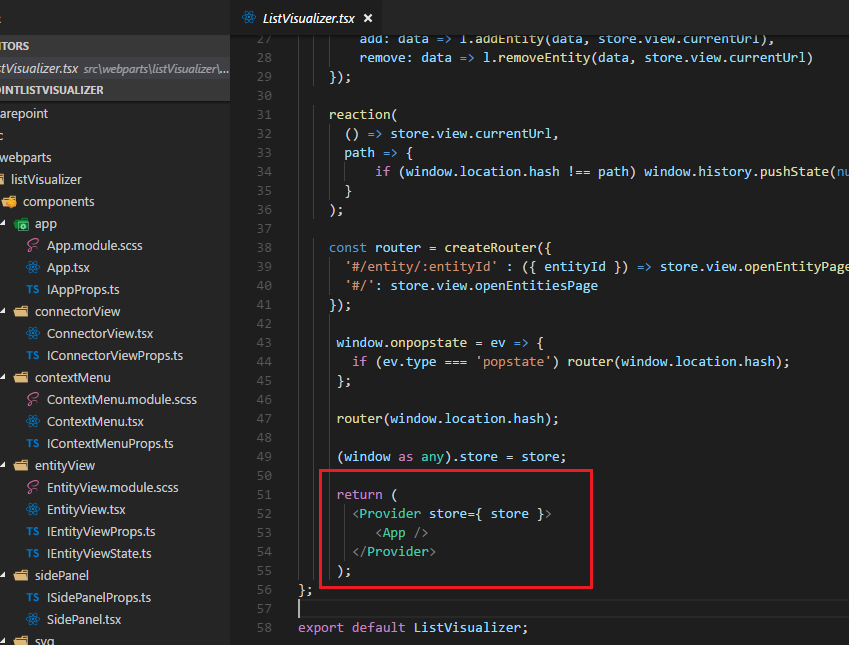
Figure 62
We just pass store to Provider. Provider is a component that can pass stores using React's context mechanism to child components.
This is useful if you have things that you don't want to pass through multiple layers of components explicitly. In our application we
also used inject. Inject can be used to pick up those stores.
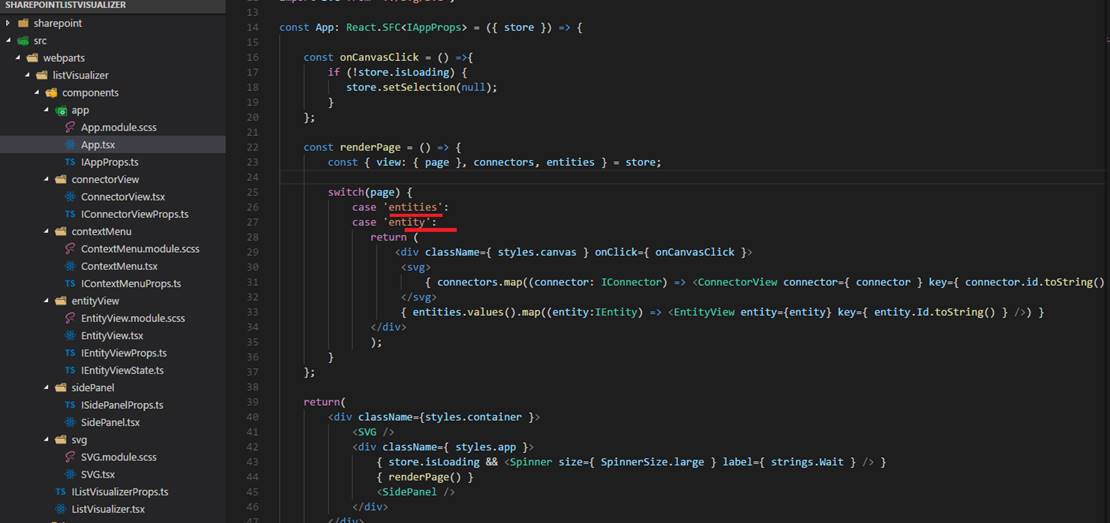
Figure 63
Based on the 'store.view.page' we render the same components in this application (list and list items pages look the same). Imagine another application, say, forums. You have different pages such as
forums, topics, create topic, posts pages. In that case you will render different components.
Let's try to run the app via Chrome console not touching the app. This time we keep UI so we can track UI changes. Next, we will remove UI entirely and do the same one more time.
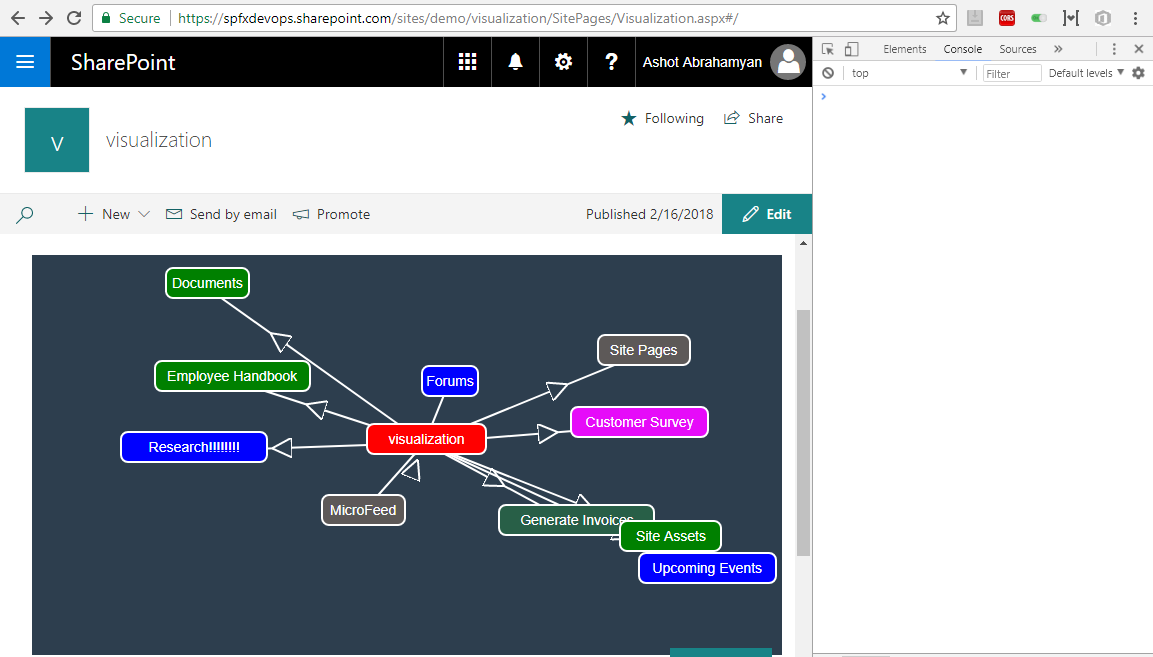
Figure 64
Here is the initial rendering after loading the page.
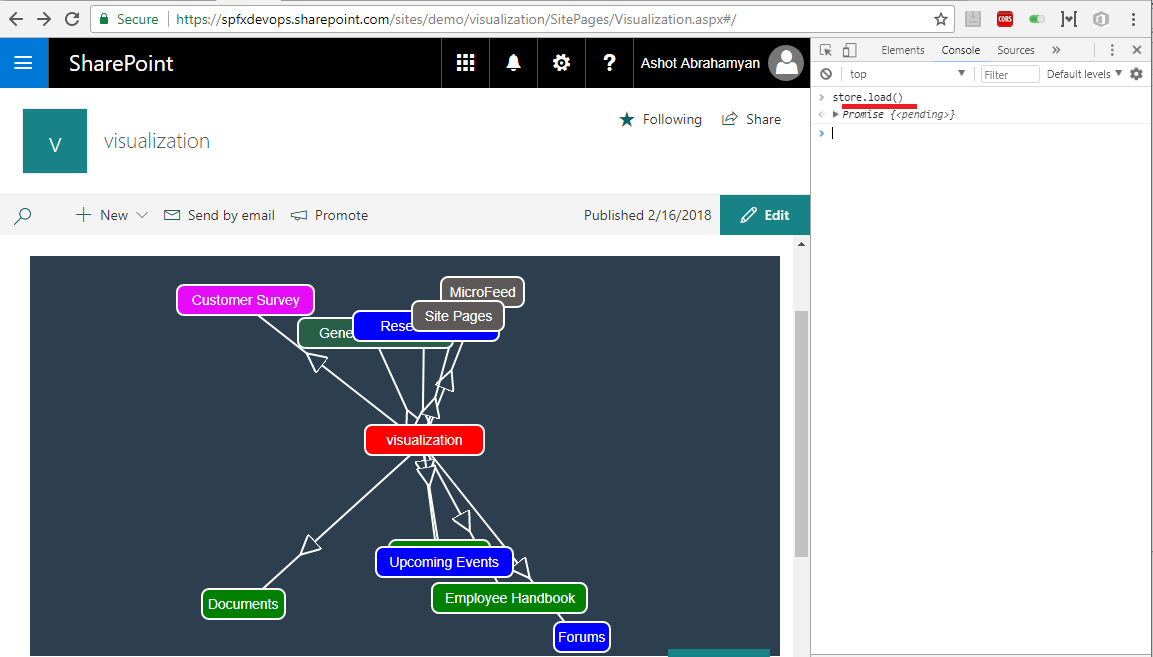
Figure 65
We ran store.load() and you see new rendering. (compare Figure 64 to Figure 65). I ran store.load() directly but you may run store.view.openEntitiesPage() instead.
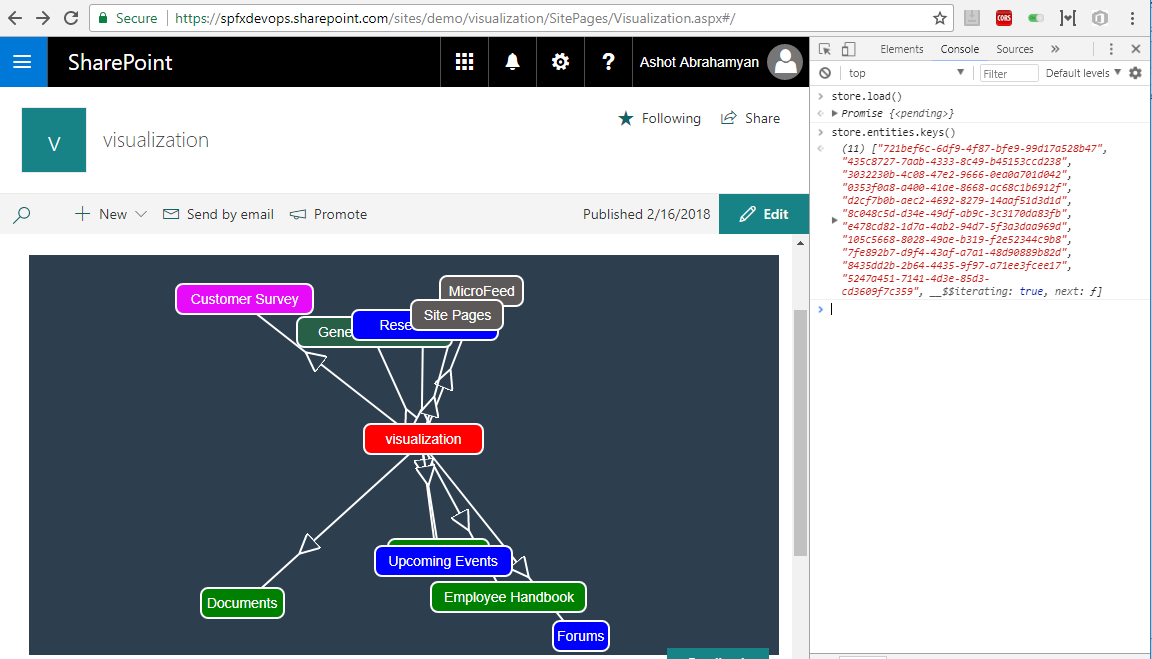
Figure 66
By running 'store.entities.keys()' we can obtain both source and entities keys.
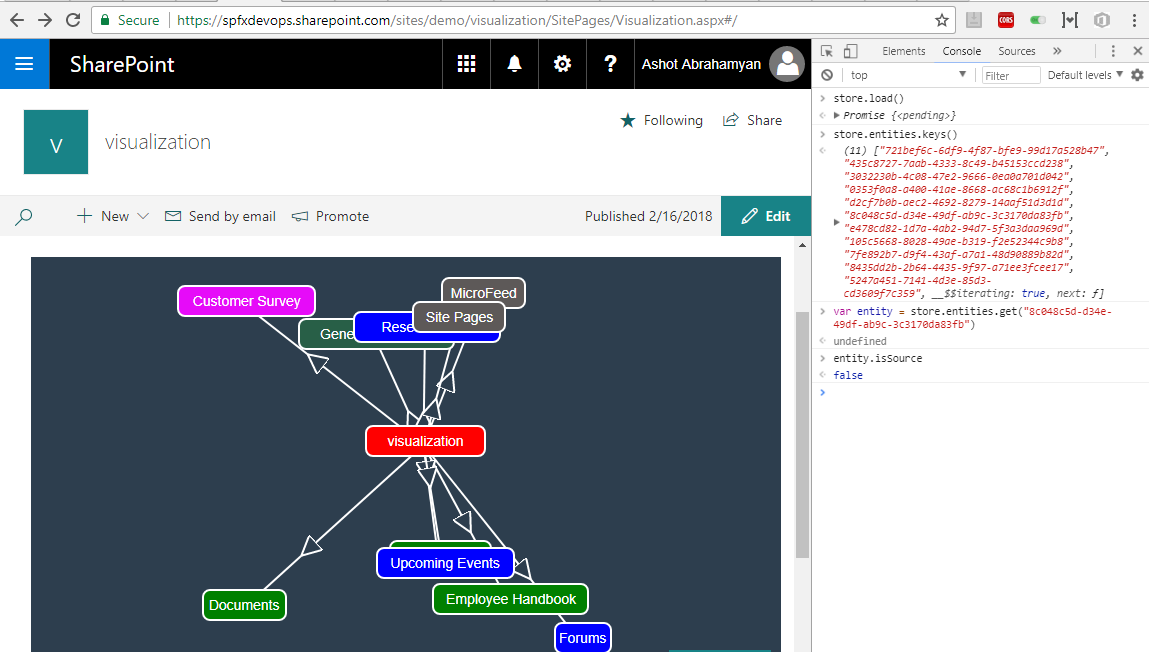
Figure 67
I ran var entity = store.entities.get('8c048c5d-d34e-49df-ab9c-3c3170da83fb') command to get the entity reference. Then I ran
entity.isSource to make sure that it is an entity not the source (source is 'visualization').
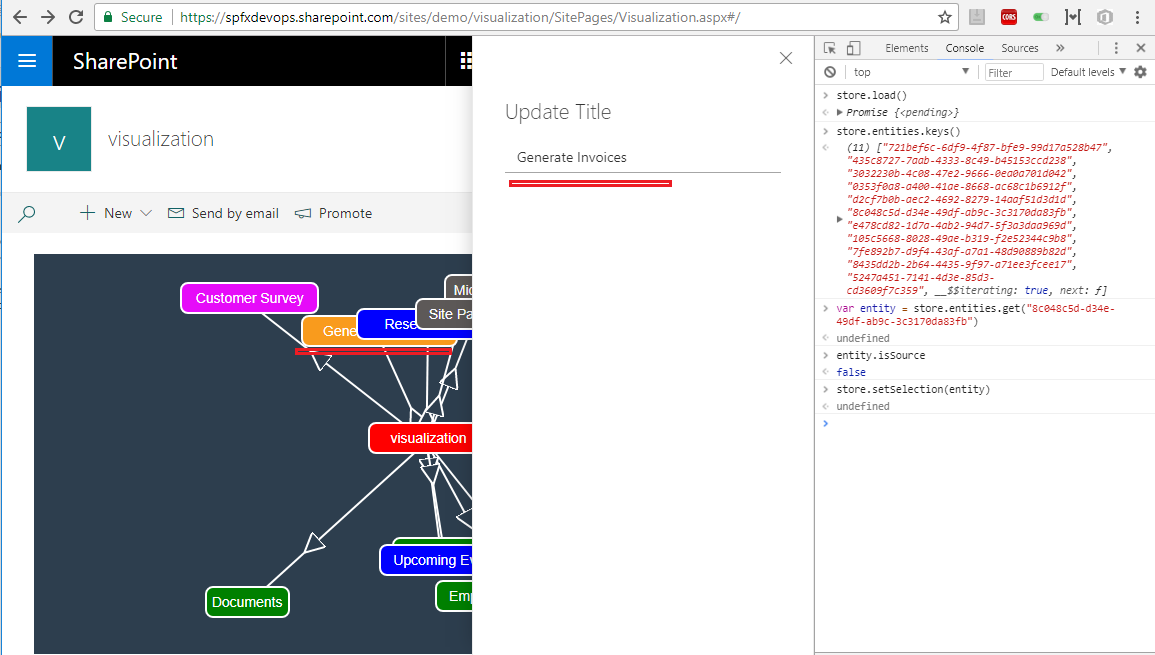
Figure 68
I called store.setSelection(entity) to select the entity. You can see the entity 'Generate Invoices' turned to orange as it is the one we selected. Also, side panel opened so we can update the entry.
By the way, instead of store.setSelection(entity) you could also call by Id store.setSelection('8c048c5d-d34e-49df-ab9c-3c3170da83fb') .
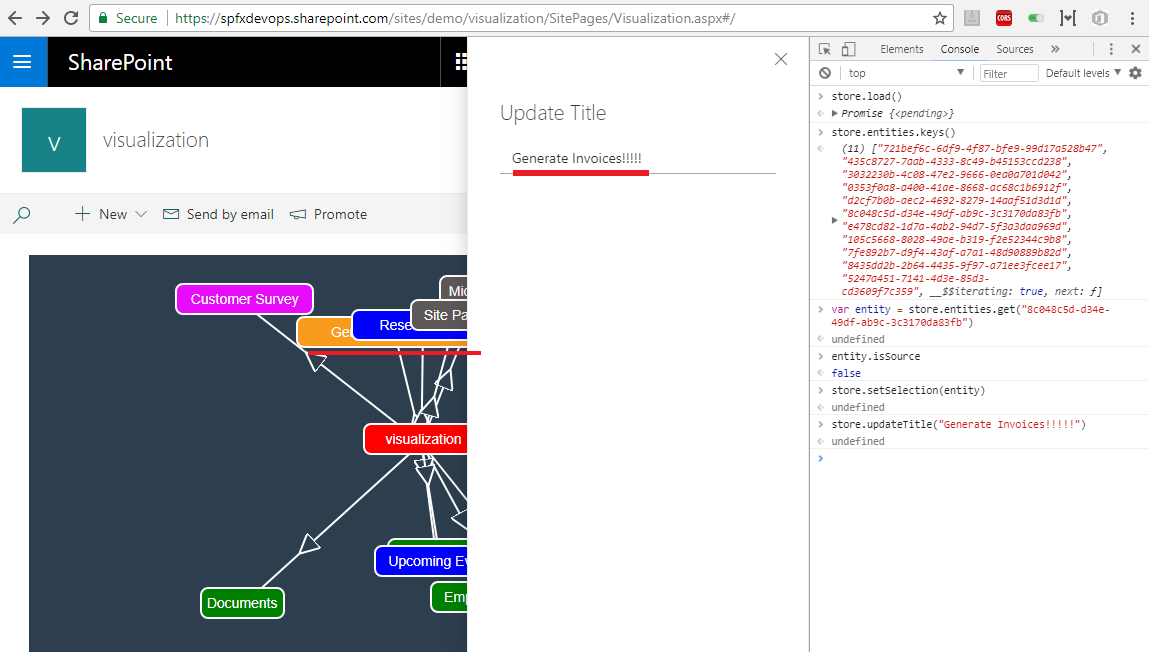
Figure 69.
I ran store.updateTitle('Generate Invoices!!!!! ') and you could see the title was updated both on the panel and UI.
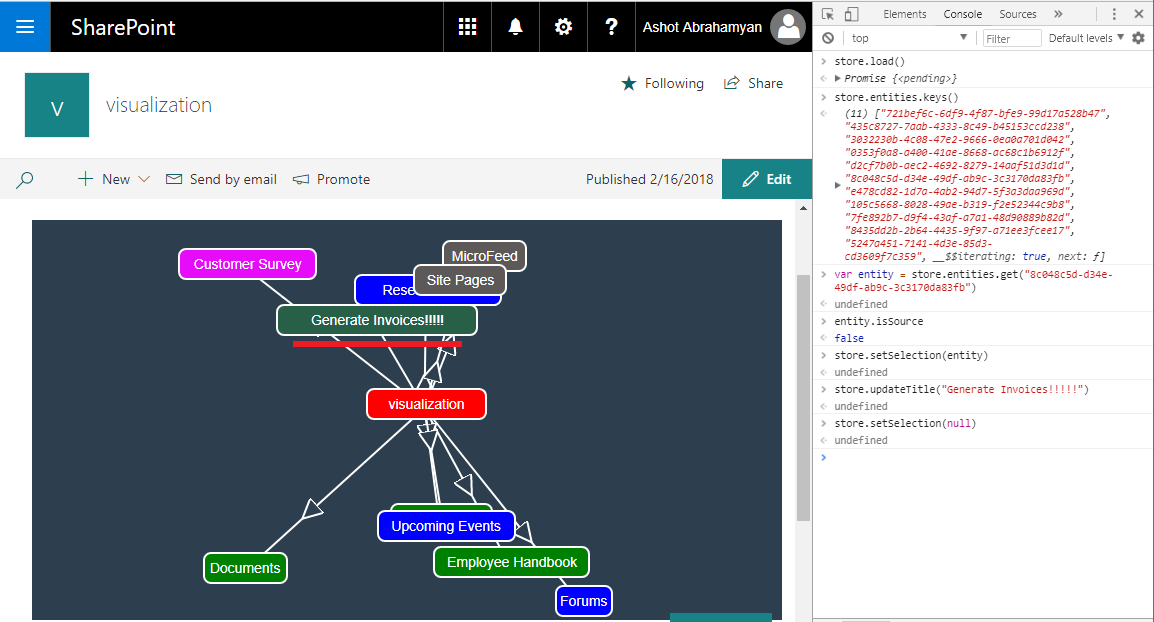
Figure 70
I ran store.setSelection(null). The panel was closed and orange selection turned into the color we defined for that entity.
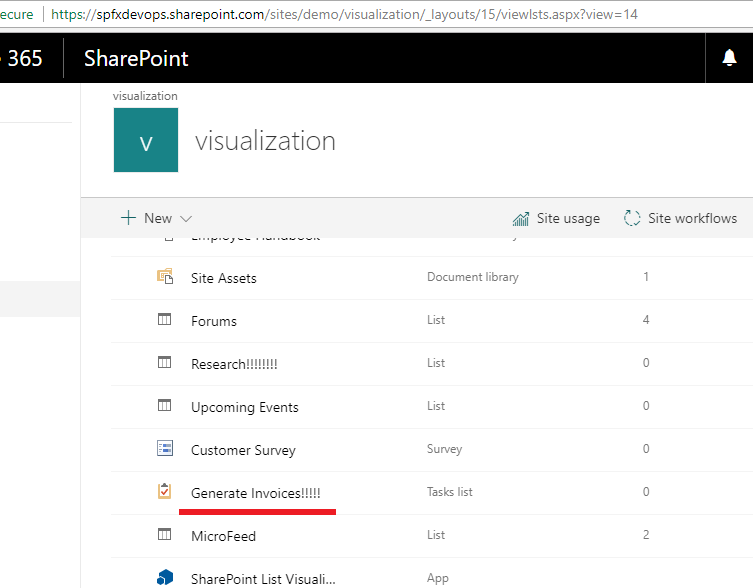
Figure 71
List title updated.
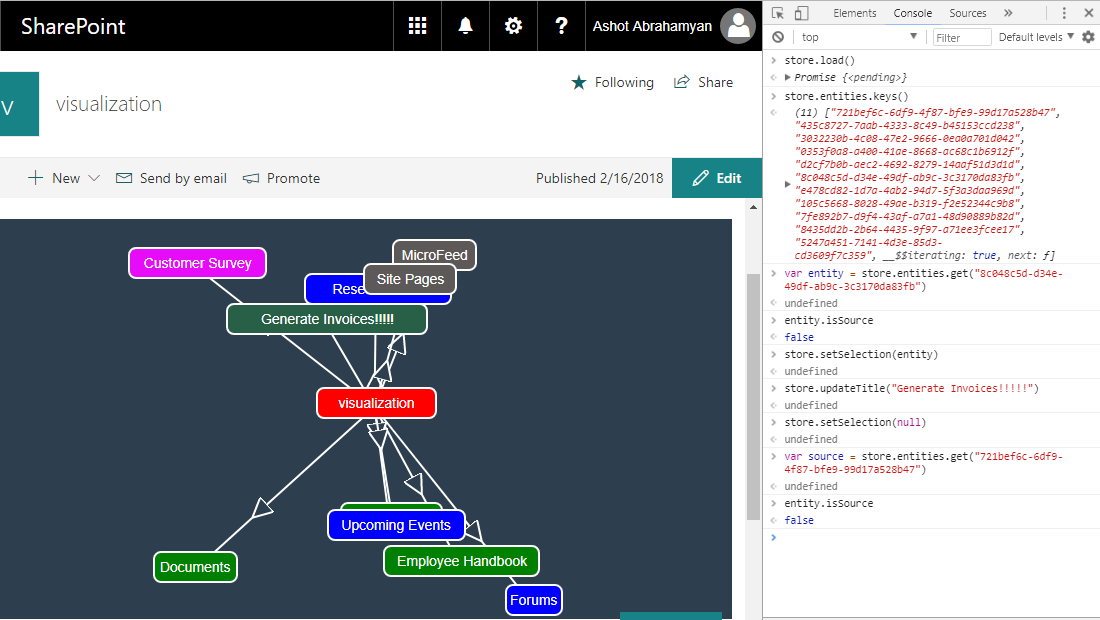
Figure 72
Getting source reference by calling var source = store.entities.get('721bef6c-6df9-4f87-bfe9-99d17a528b47') and running
entity.isSource to make sure it is the source.
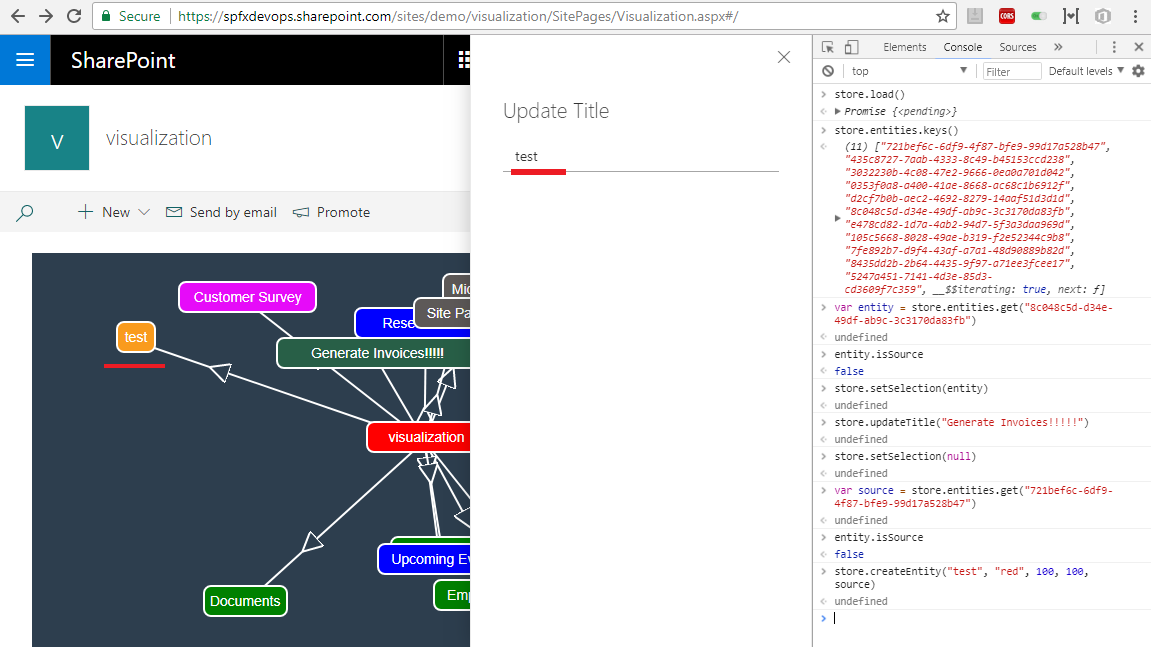
Figure 73
Creating new entity by calling store.createEntity('test', 'red', 100, 100, source). Entity was created and we can update the title if we want.
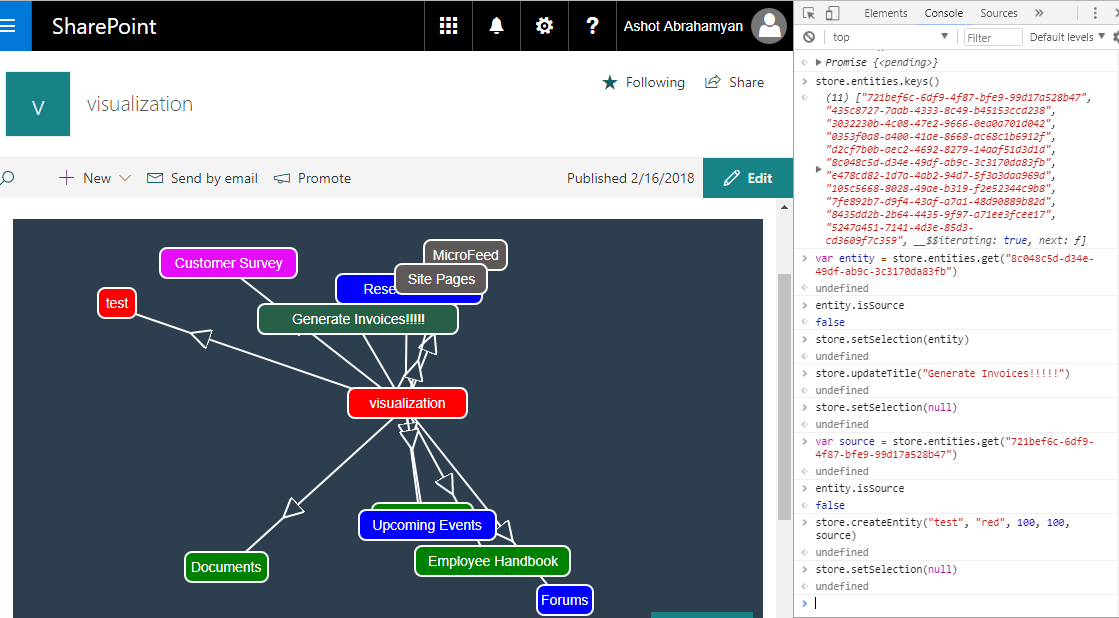
Figure 74
We do not want to update the title we just close the panel by running store.setSelection(null).
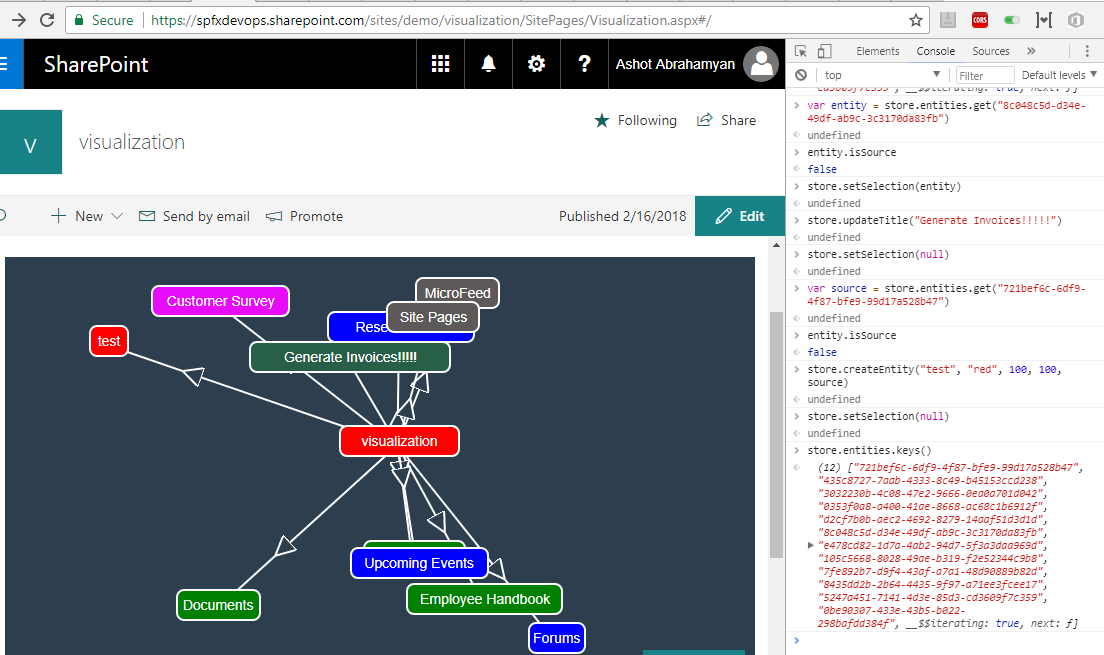
Figure 75
I run store.entities.keys() one more time to get the newly created entity id. It is the last one '0be90307-433e-43b5-b022-298bafdd384f'
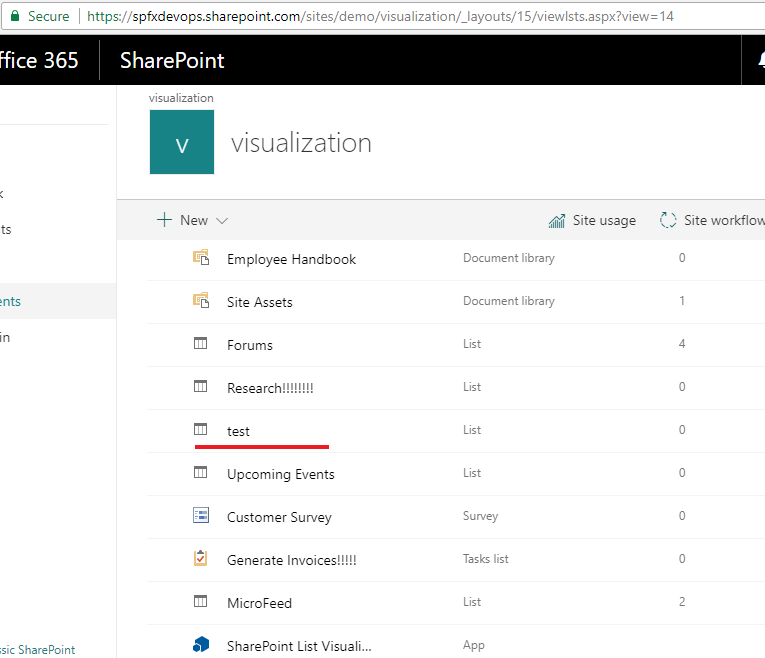
Figure 76
This is the 'test' list created.
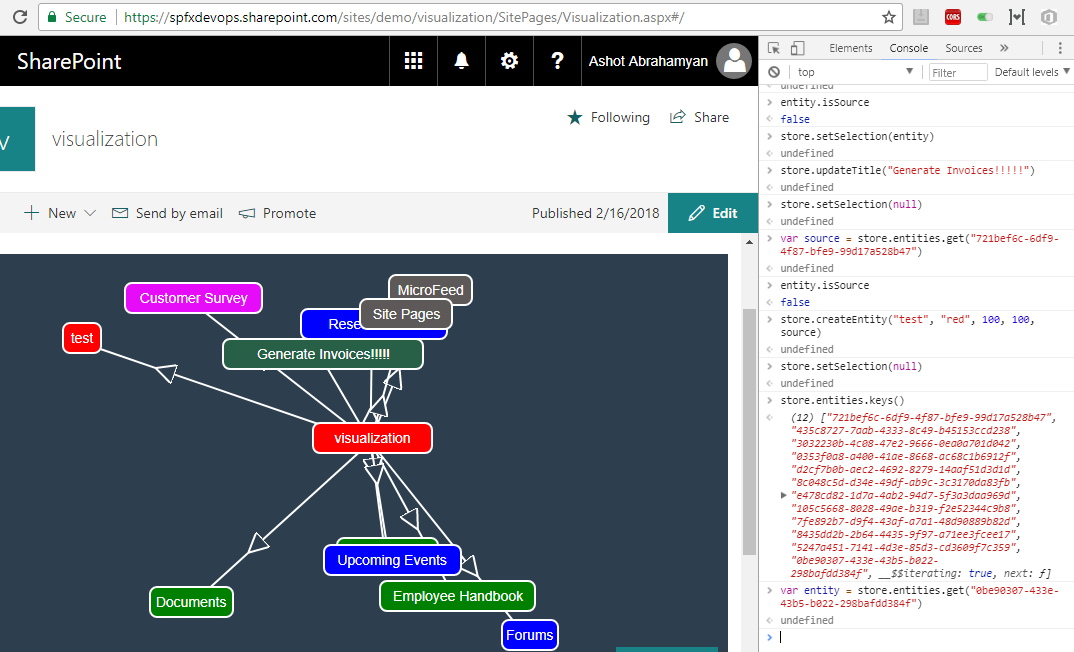
Figure 77
Getting the entity reference. var entity = store.entities.get('0be90307-433e-43b5-b022-298bafdd384f')
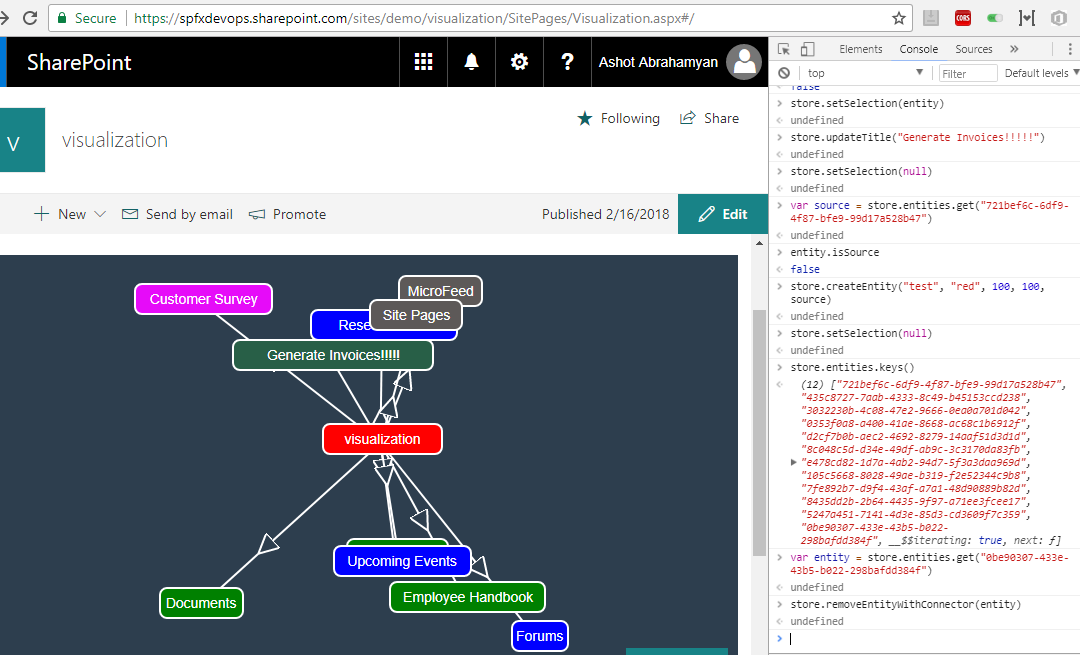
Figure 78
I removed the newly created entity, store.removeEntityWithConnector(entity).
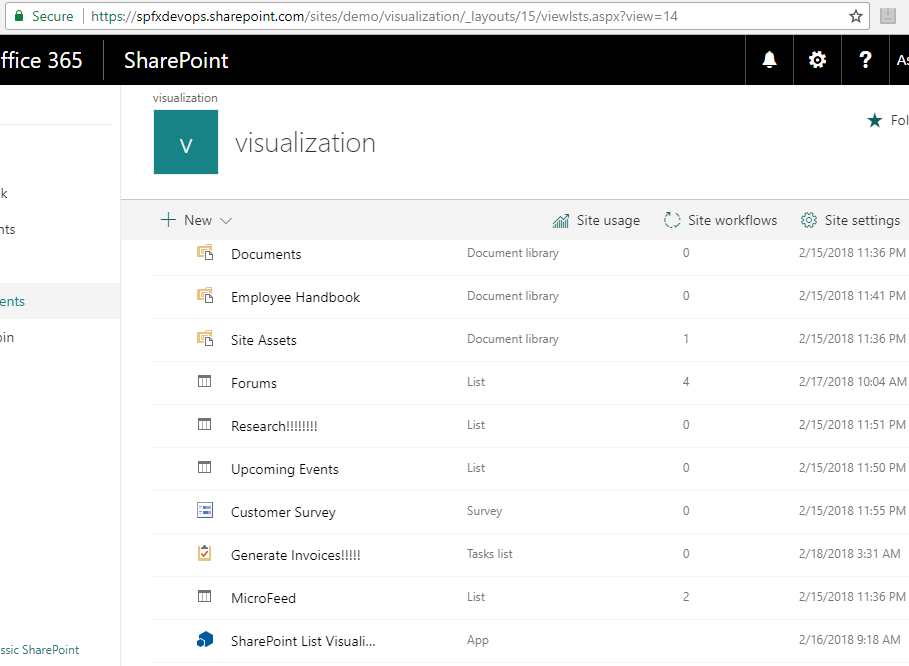
Figure 79
It is not there anymore.
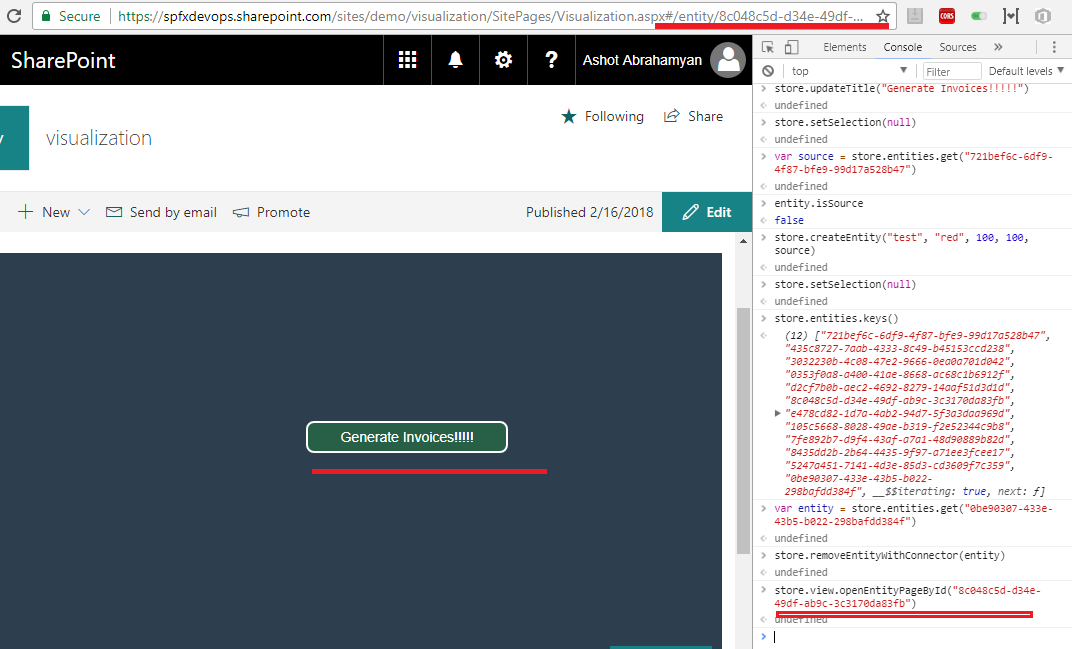
Figure 80
I ran 'store.view.openEntityPageById('8c048c5d-d34e-49df-ab9c-3c3170da83fb')' and navigated to list items page. Note, URL was changed.
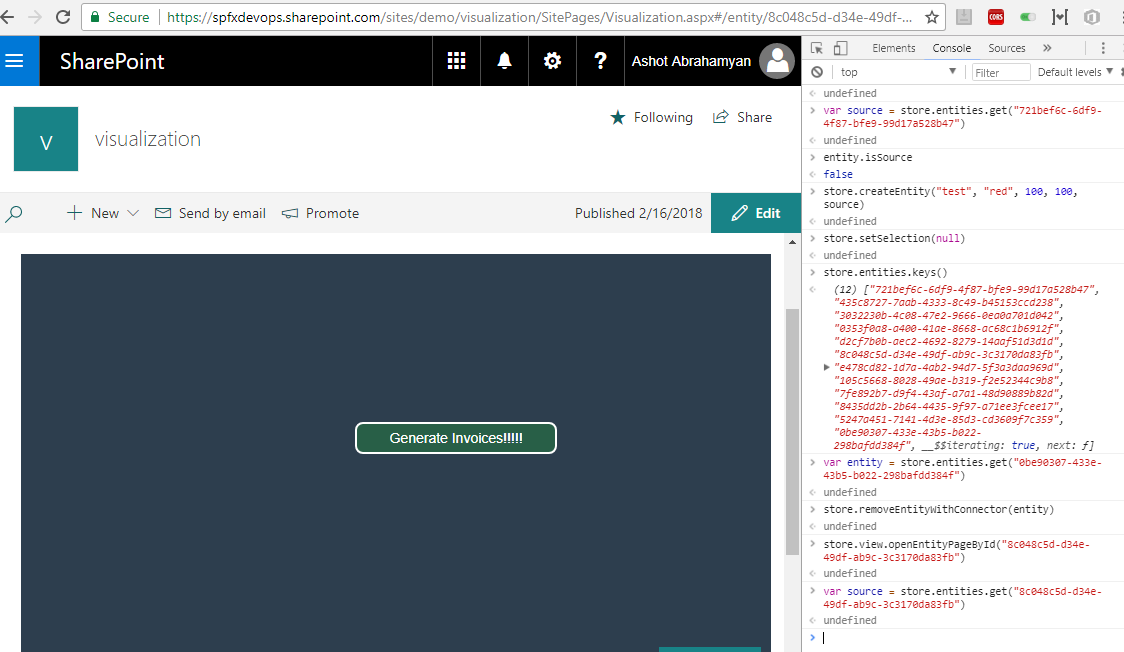
Figure 81
Getting the store reference. var source = store.entities.get('8c048c5d-d34e-49df-ab9c-3c3170da83fb')
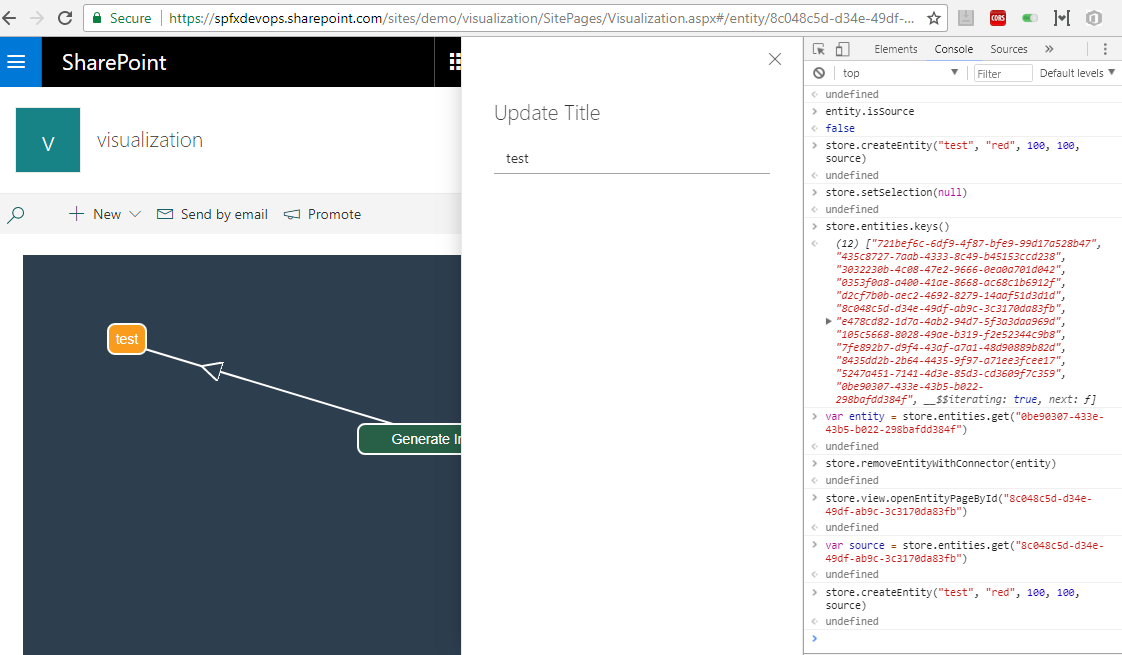
Figure 82
Creating new entity store.createEntity('test', 'red', 100, 100, source).
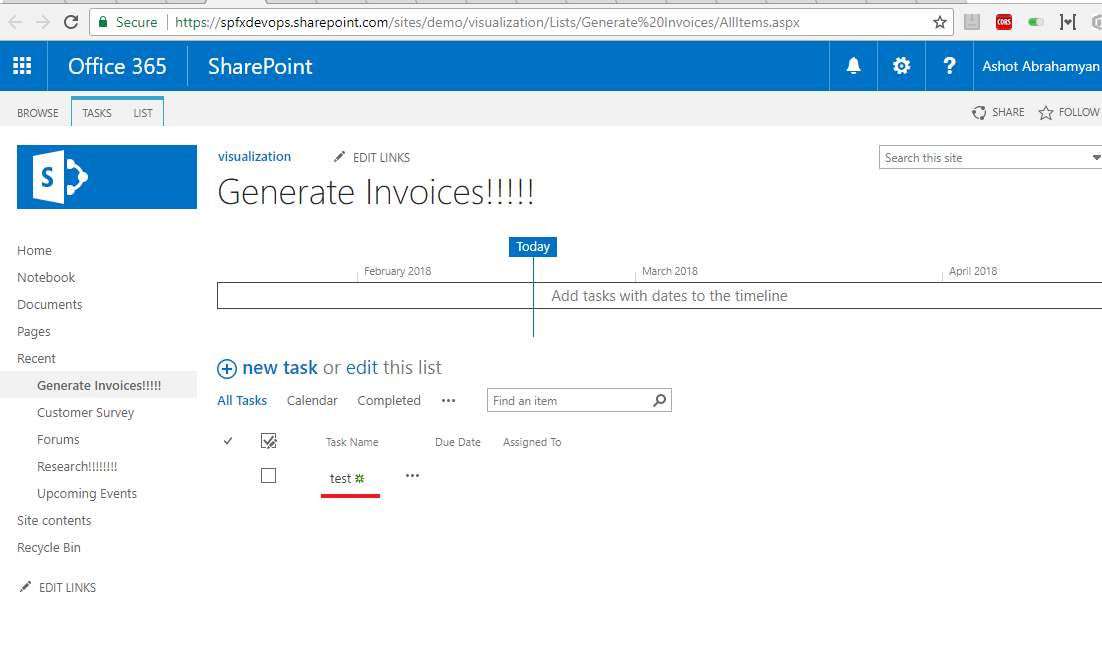
Figure 83
'test' list item created.
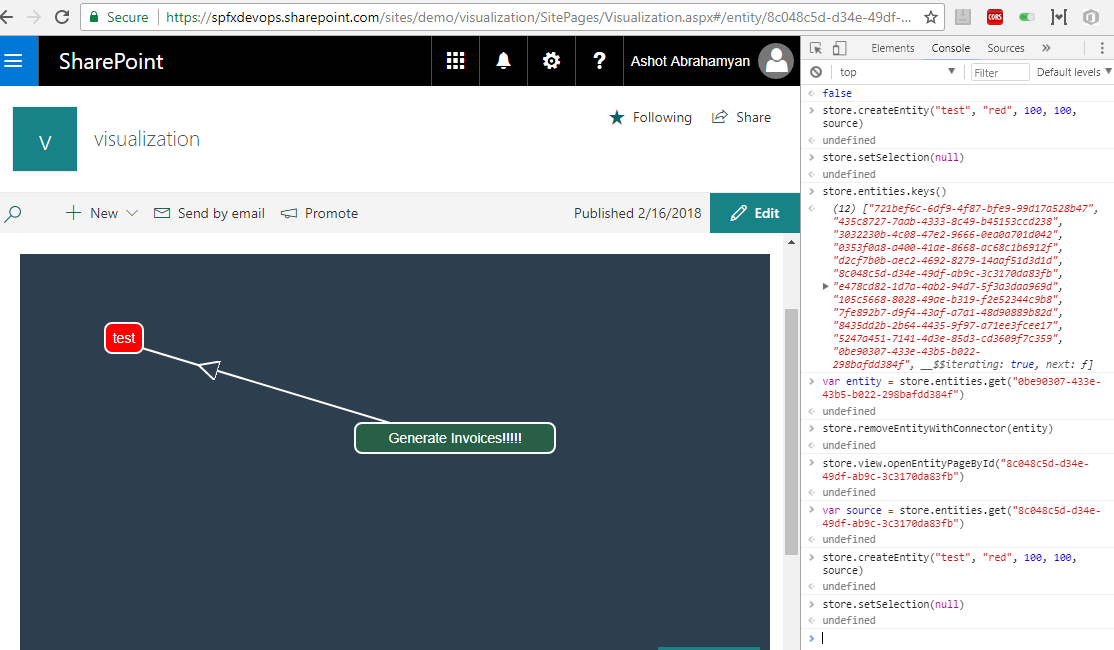
Figure 84
Unselect the entity. store.setSelection(null)
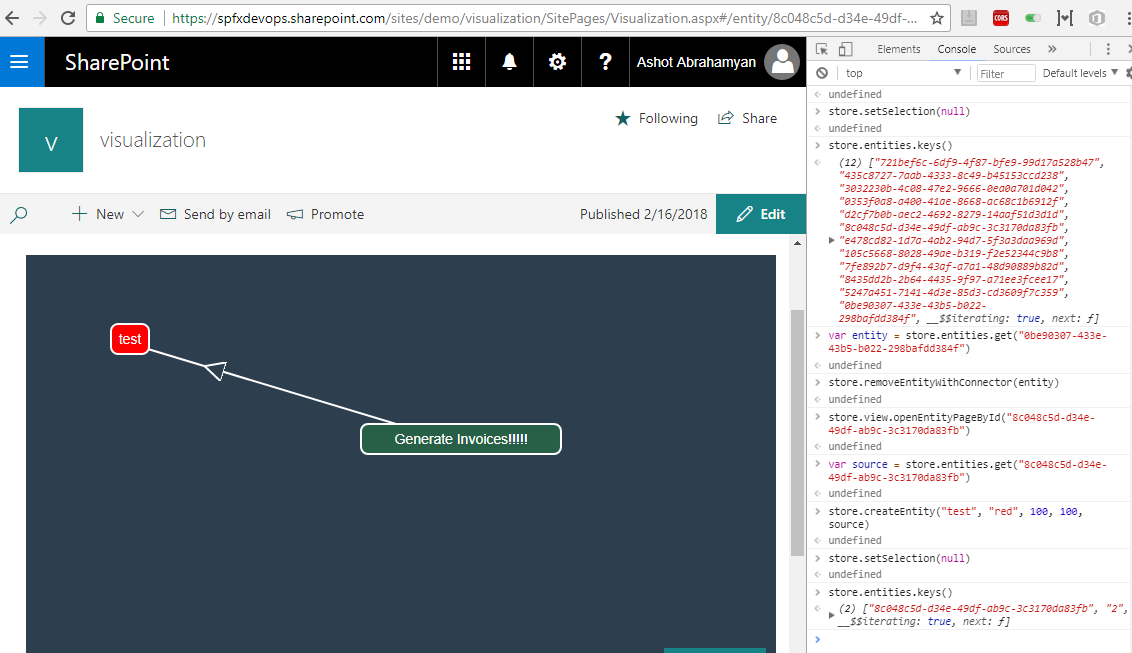
Figure 85
Run store.entities.keys() to get the entity Id.
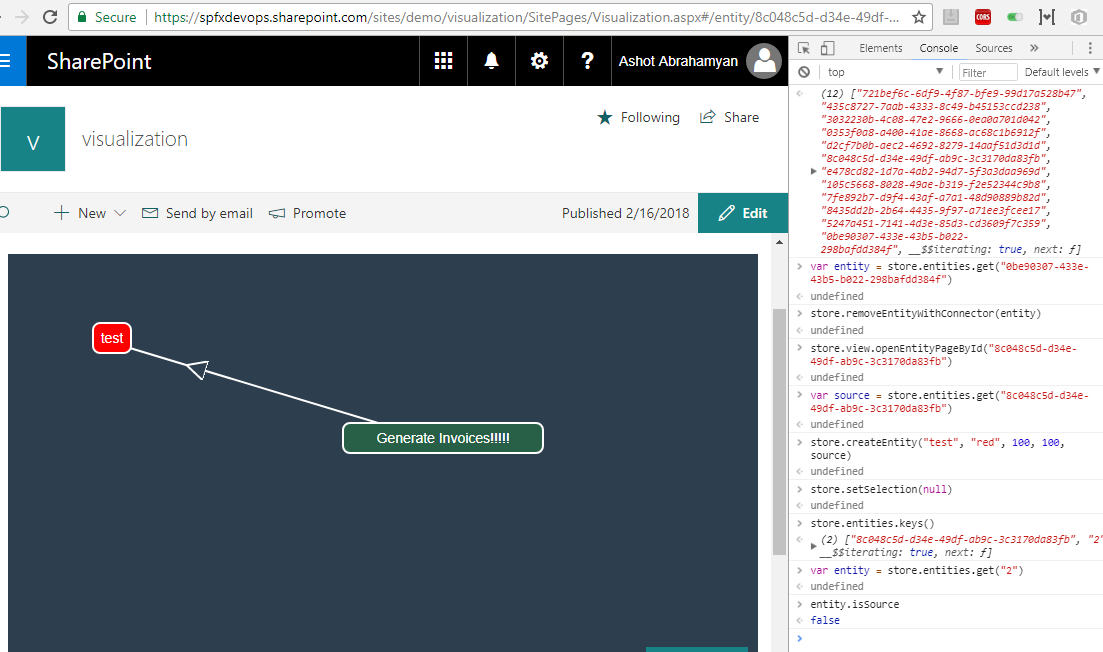
Figure 86
Getting the entity reference var entity = store.entities.get('2'). Also, to be sure it is the entity entity.isSource.
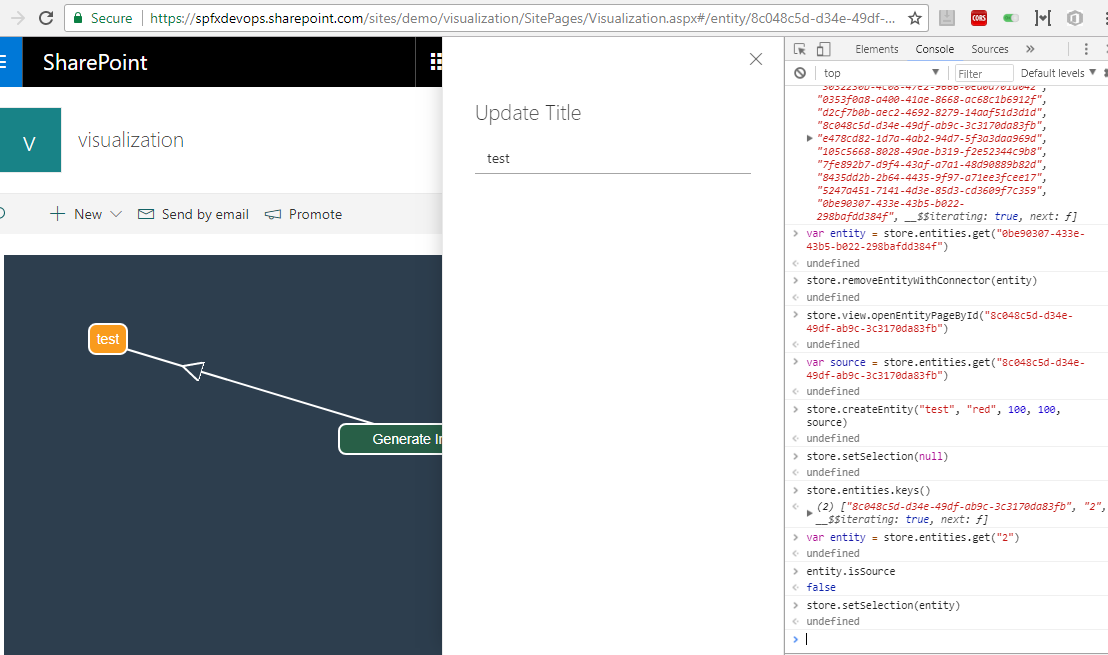
Figure 87
Select the entity - store.setSelection(entity)
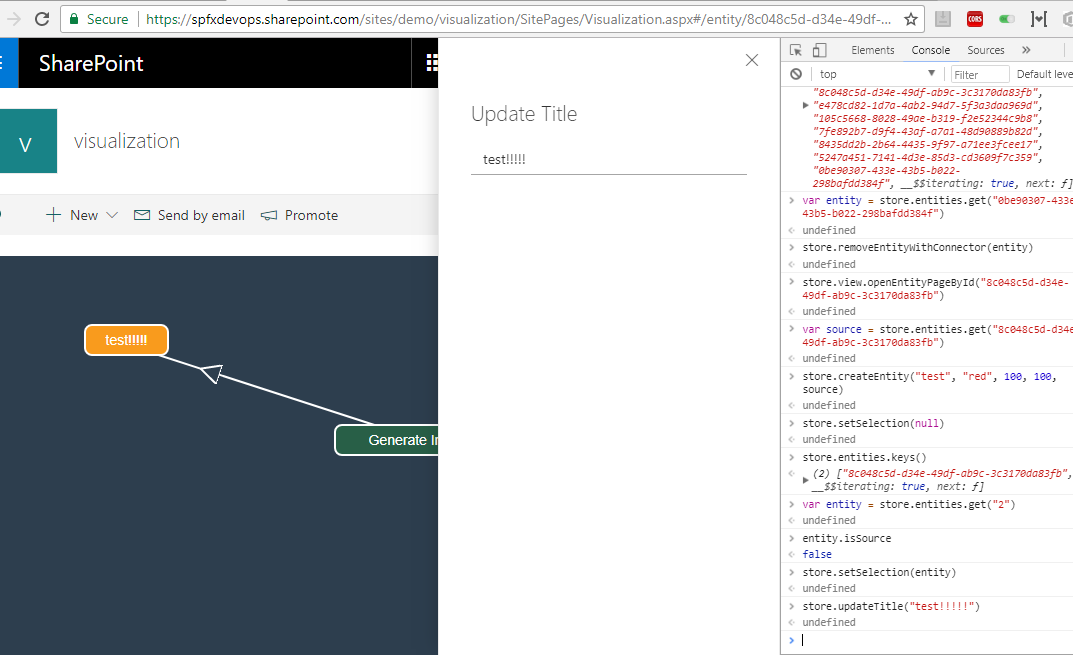
Figure 88
Updated the title store.updateTitle('test!!!!! ')
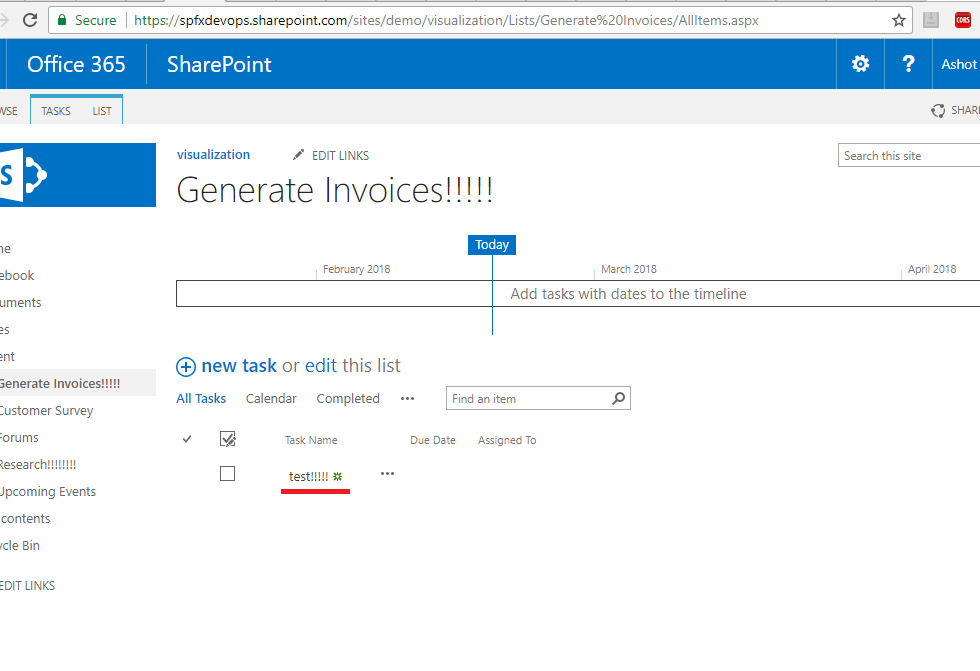
Figure 89
Title updated.
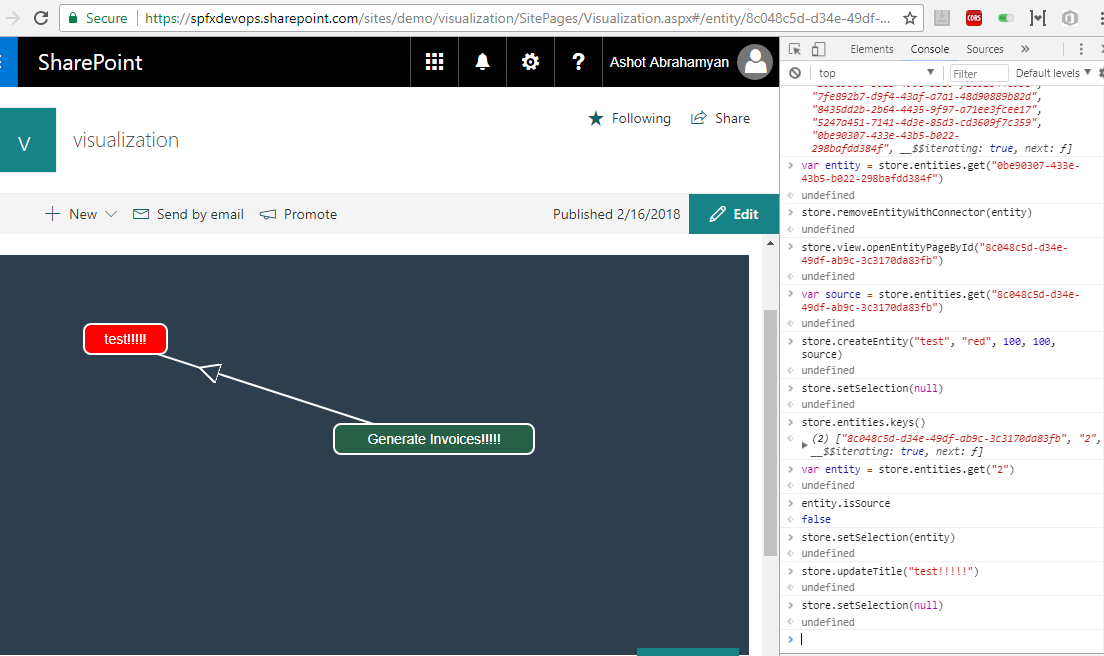
Figure 90
Unselect the entity. store.setSelection(null)
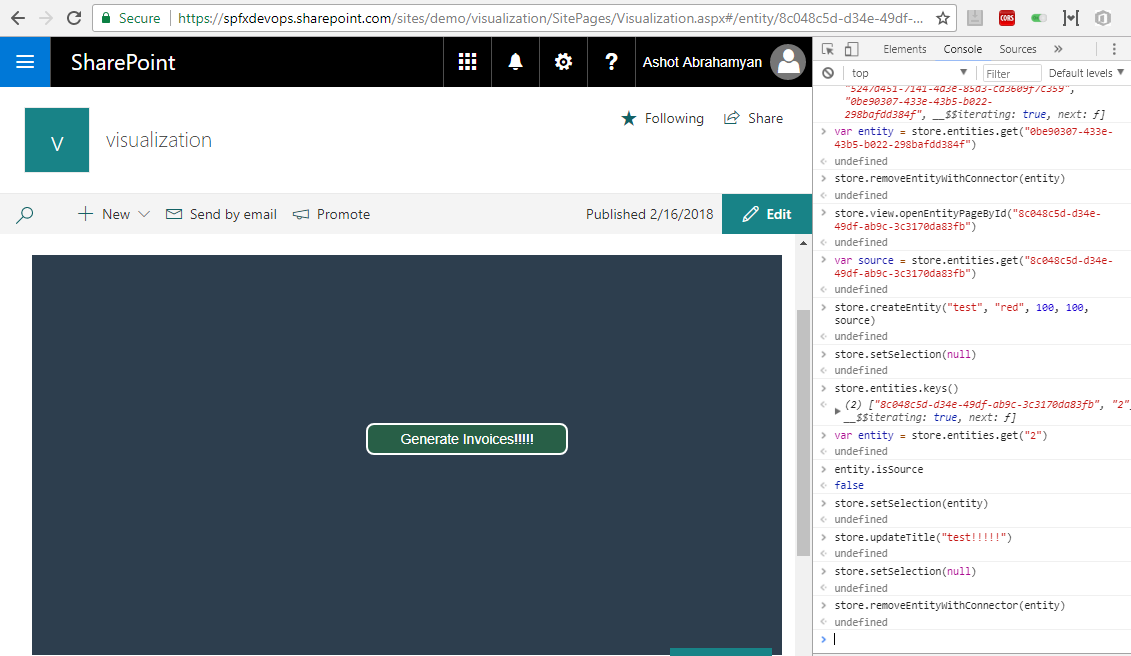
Figure 91
Remove the entity. store.removeEntityWithConnector(entity)
Figure 92
The list item deleted.
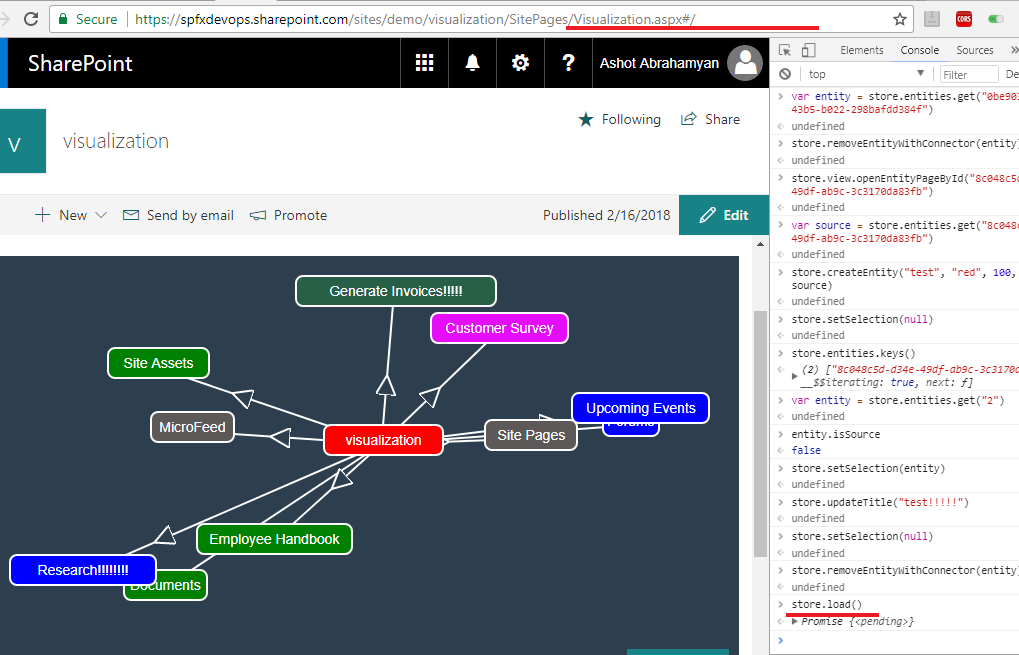
Figure 93
Back to initial page - store.load(). I ran store.load() directly but you may run store.view.openEntitiesPage() instead.
Let's throw away entire rendering and do the same.
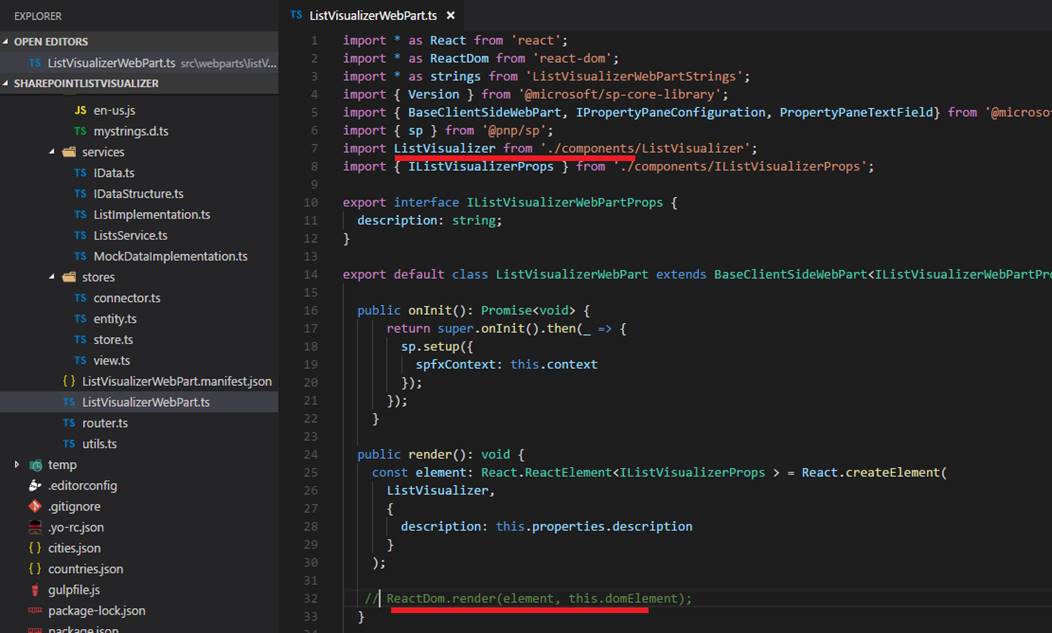
Figure 94
I would prefer to comment RactDom .render line and test the application, but create store part is defined in ListVisualizer file referenced from this file. I do not want to
modify this file and bring all the required code from ListVisualizer file here to test.

Figure 95
Instead I will change Provider section to null.
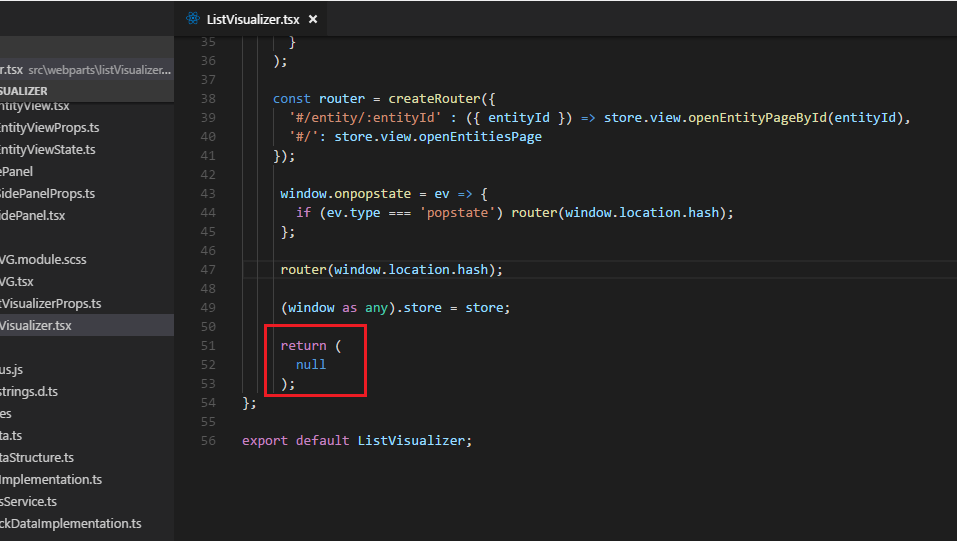
Figure 96
Here is the change.
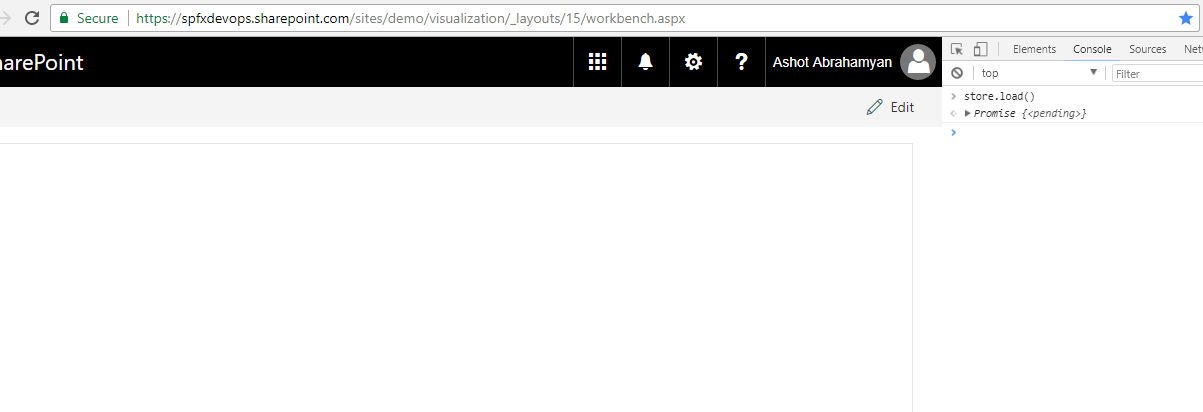
Figure 97
Nothing is rendered and I ran first command store.load();
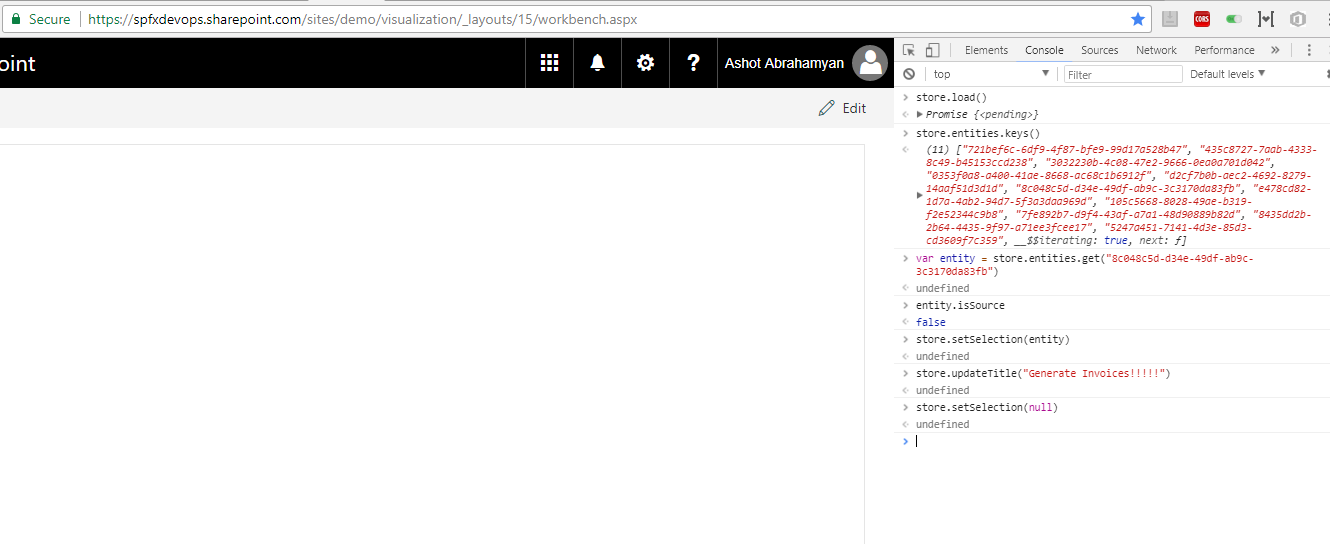
Figure 98
List title updated.
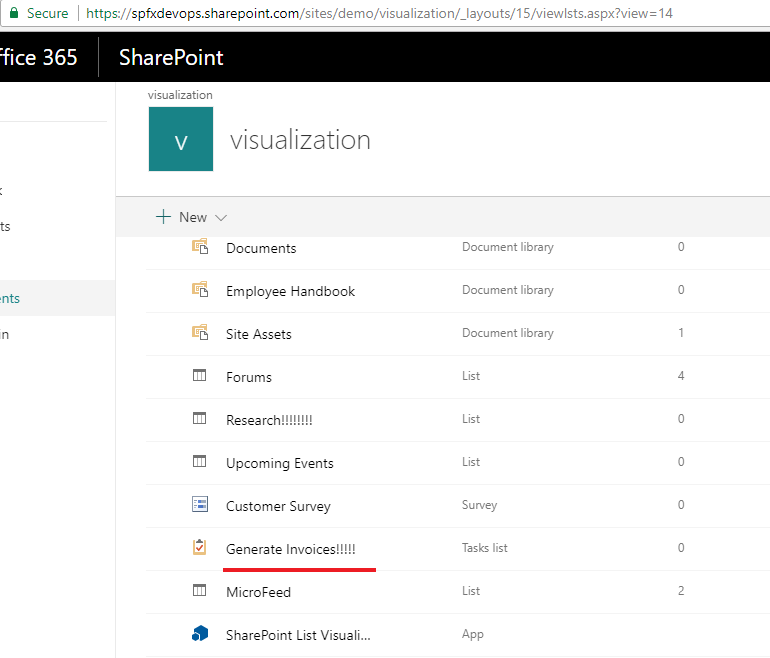
Figure 99
List title updated.
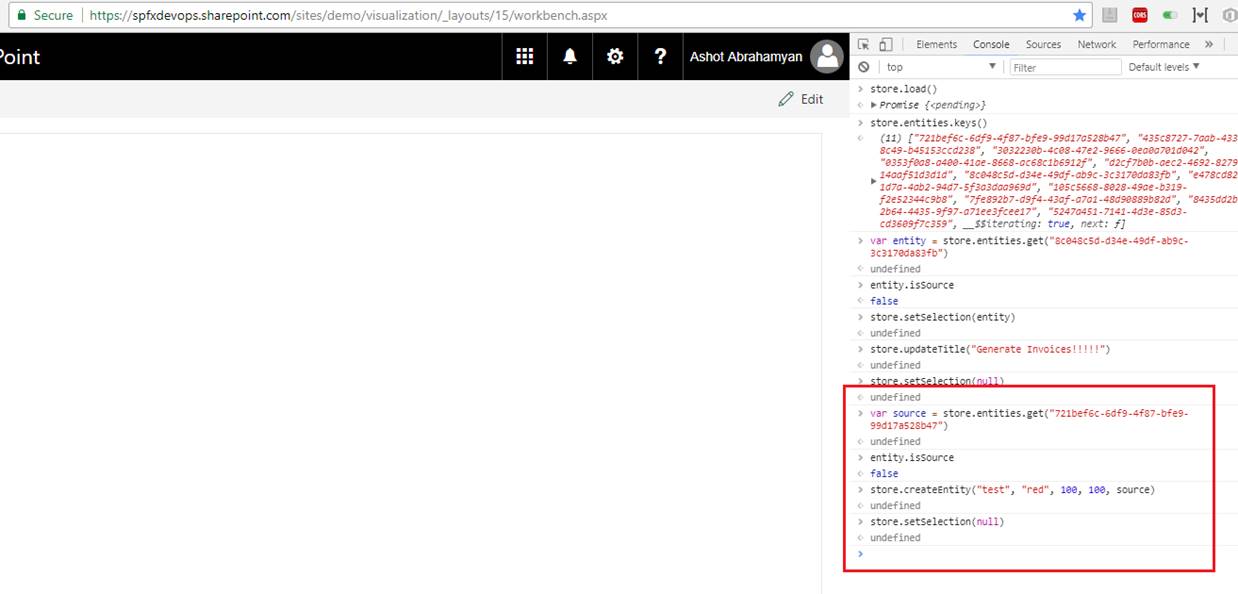
Figure 100
New List 'test' created.

Figure 101
New List 'test' created.
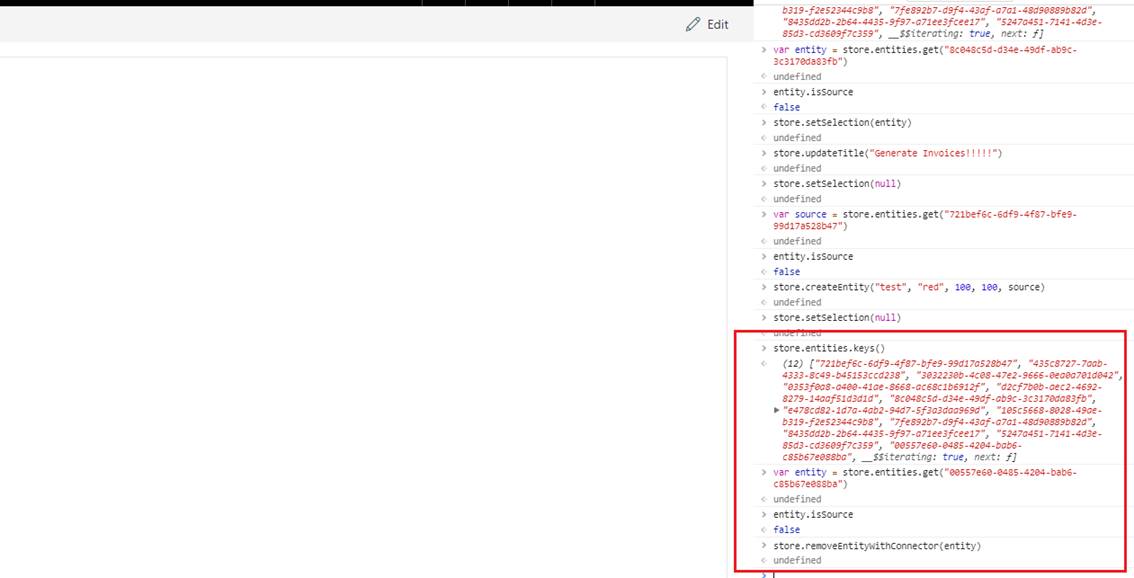
Figure 102
List 'test' removed.
Figure 103
List 'test' removed.
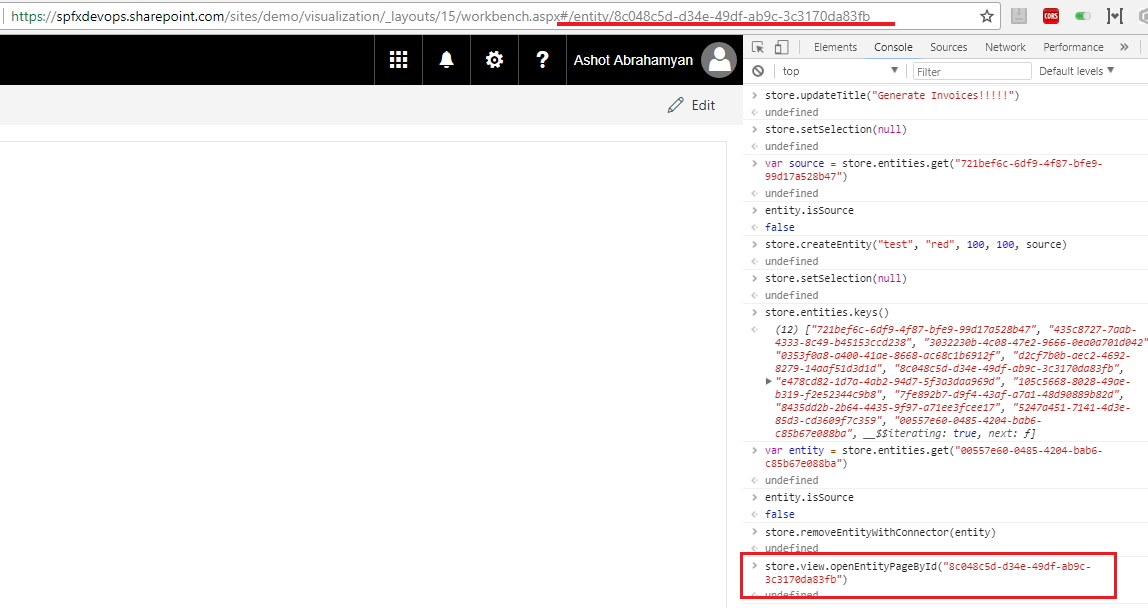
Figure 104
Navigated to the list item's page. URL was changed.
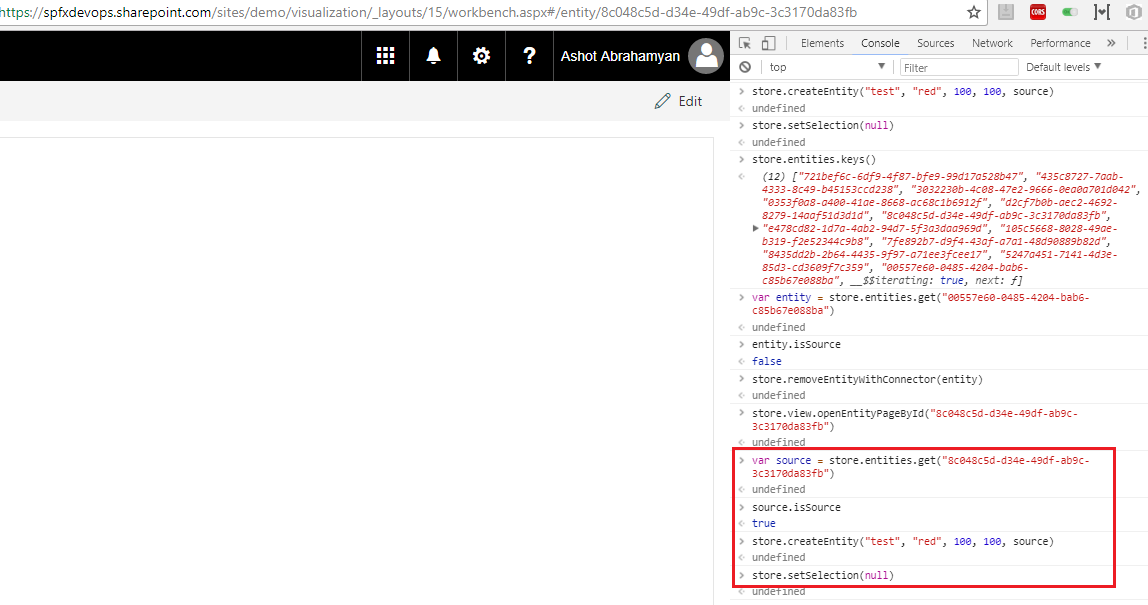
Figure 105
List item created.

Figure 106
List item created.
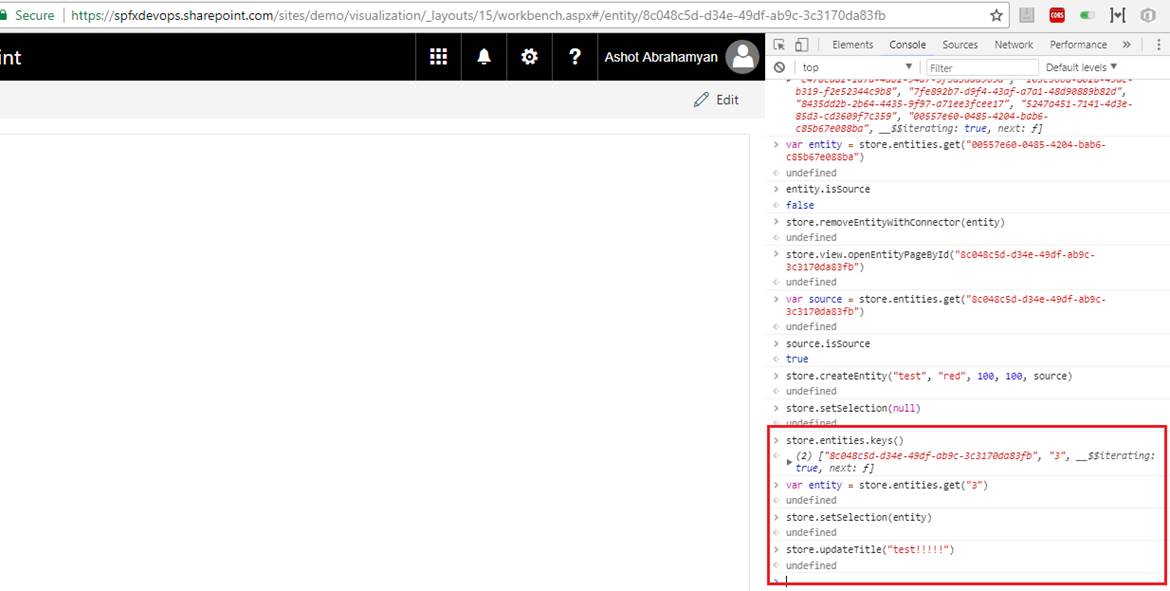
Figure 107
List item updated.
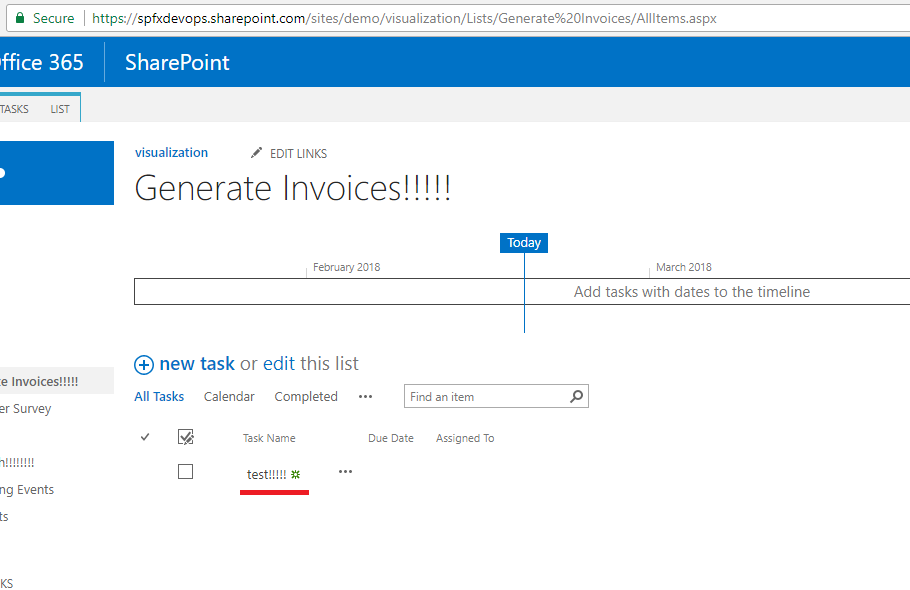
Figure 108
List item updated.
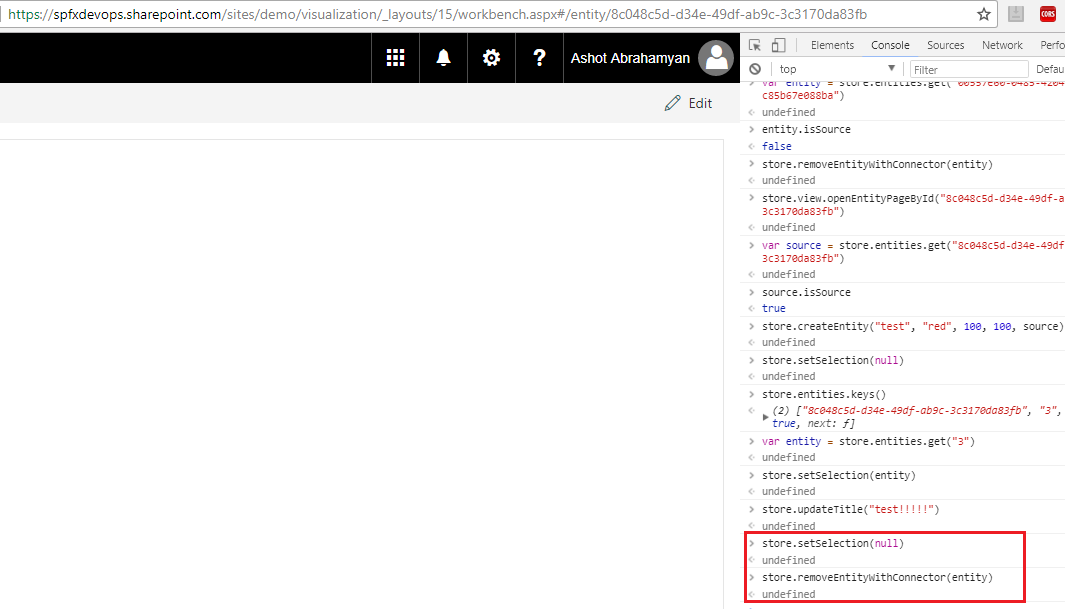
Figure 109
List item removed.
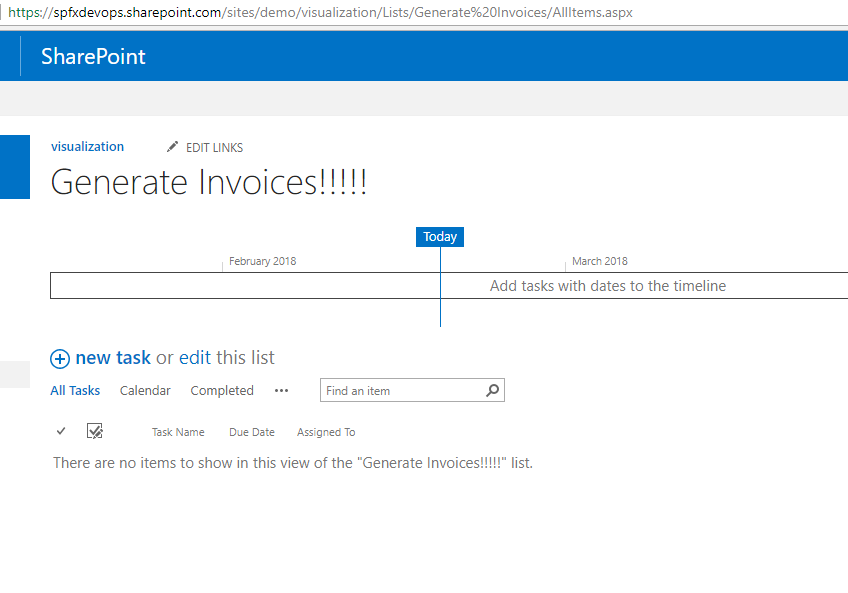
Figure 110
List item removed.
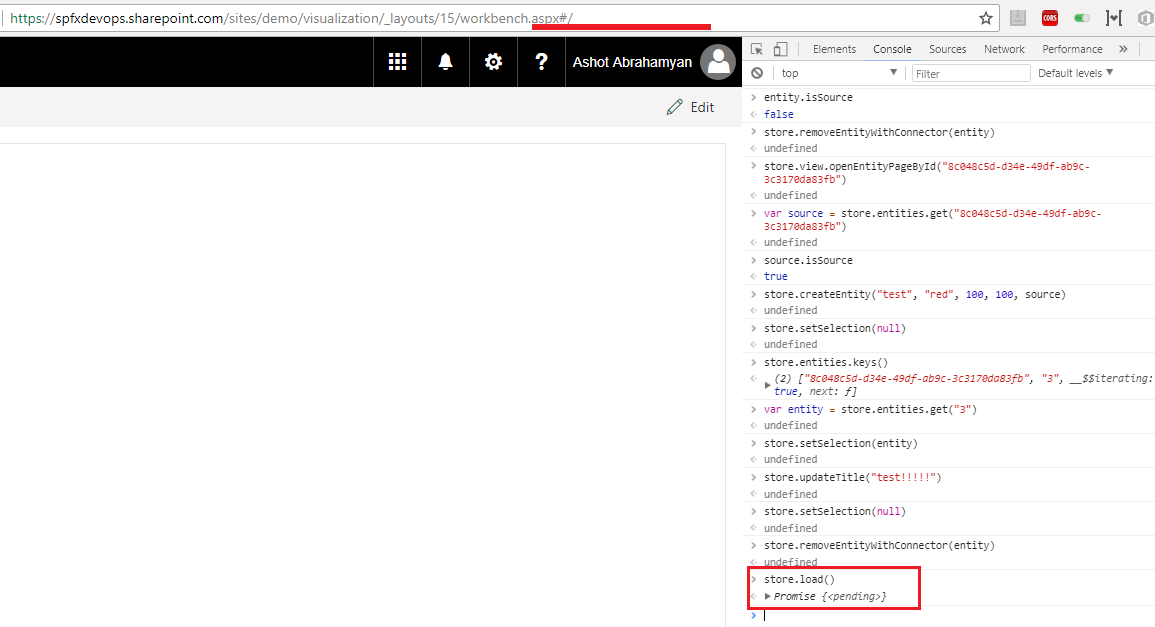
Figure 111
Back to initial page. URL was changed. I ran store.load() directly but you may run store.view.openEntitiesPage() instead.