Astro-Htmx-Alpine.js Online Store
Video Link: https://github.com/Ashot72/Astro-Htmx-Alpine.js-Online-Store
GitHub Repository: https://youtu.be/TFCaattUjUs
Astro https://astro.build/ is an open-source framework. It is focused on performance and content-heavy websites like landing pages
blogs, technical documentation and more.
Htmx https://htmx.org/docs/ is a library that allows you to access modern browser features directly from HTML, rather using JavaScript.
Alpine.js https://alpinejs.dev/ is a minimal framework for composing JavaScript behavior in your markup.
Unlike some other frameworks, Astro is HTML-first, outputs zero JavaScript by default, and supports both static site generation (SSG) and
server-side rendering (SSR).
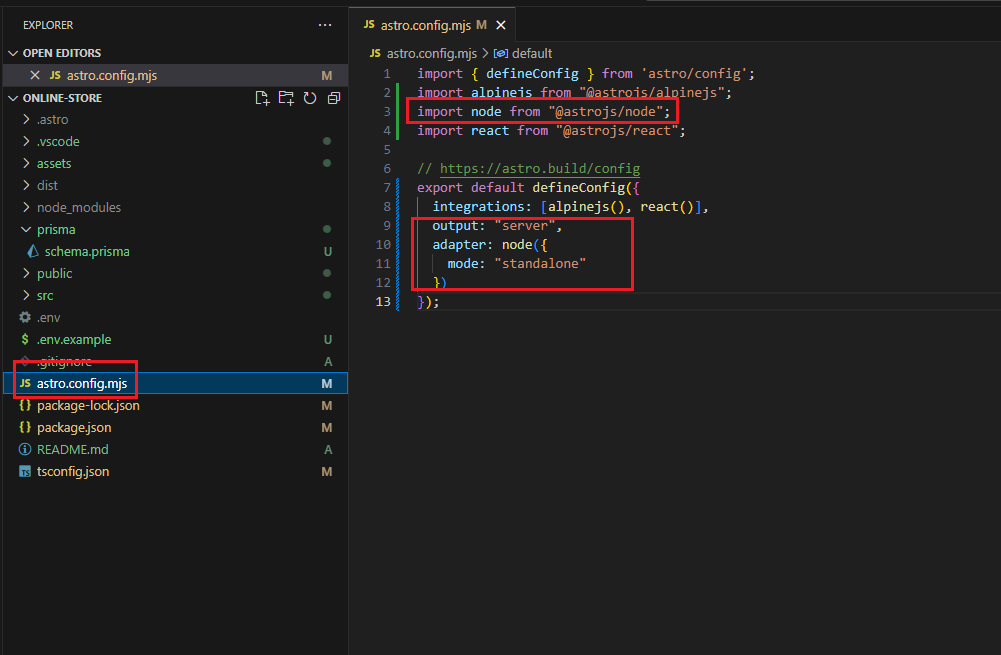
Figure 1
In our project, we use server-side rendering with Node.js integration. You can read more about it at https://docs.astro.build/en/guides/integrations-guide/node/
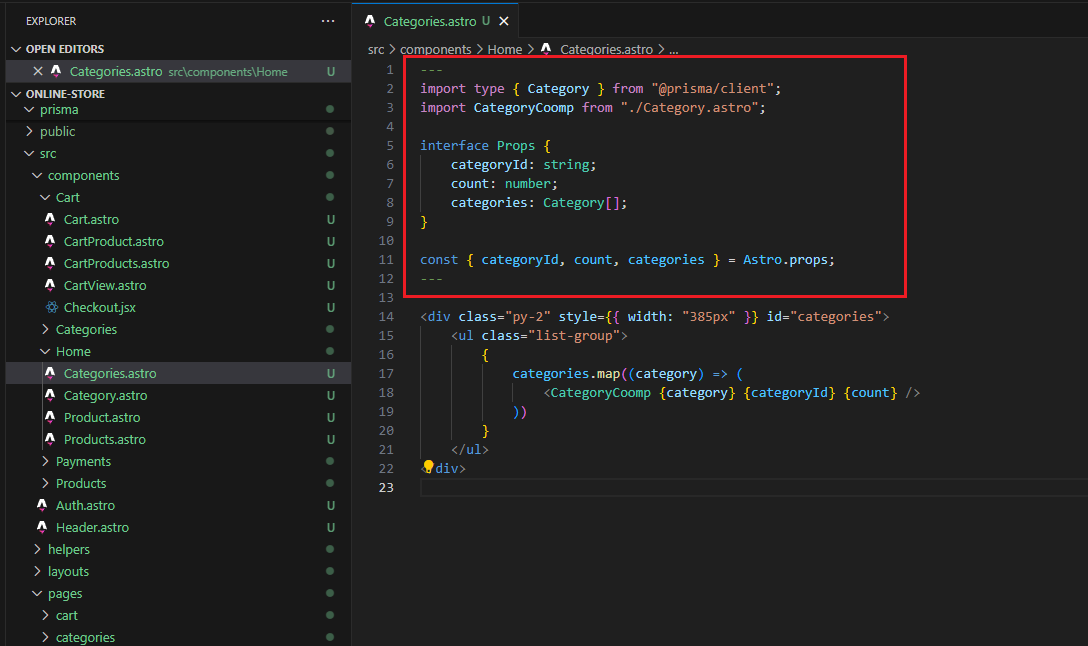
Figure 2
Astro components are similar to Svelte: JavaScript, HTML, and CSS are clearly separated. It does not use JSX.
Inside three dashes, we write the Astro component in JavaScript, and everything here will be run on the server.
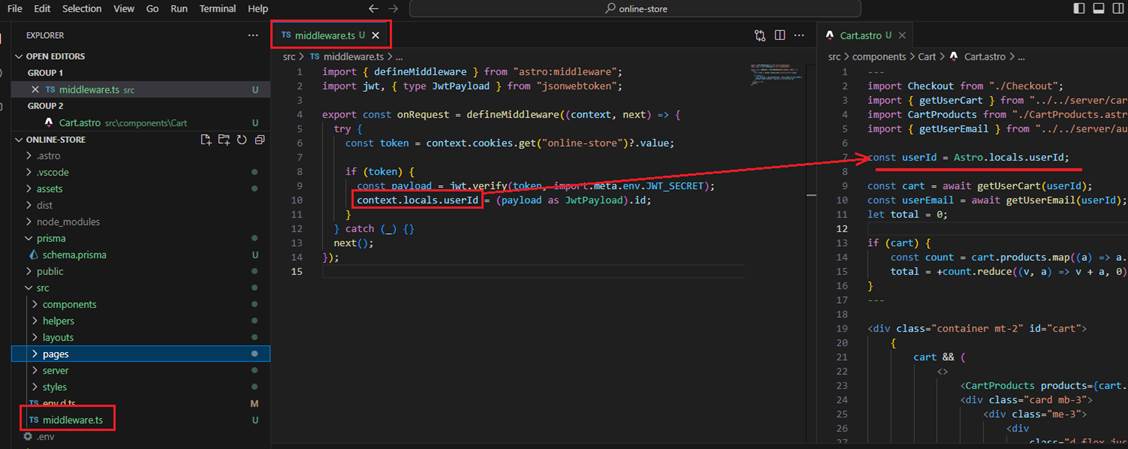
Figure 3
For authentication, we use Astro middleware, which allows us to intercept requests and responses and inject behaviors
dynamically every time a page or endpoint is about to be rendered.
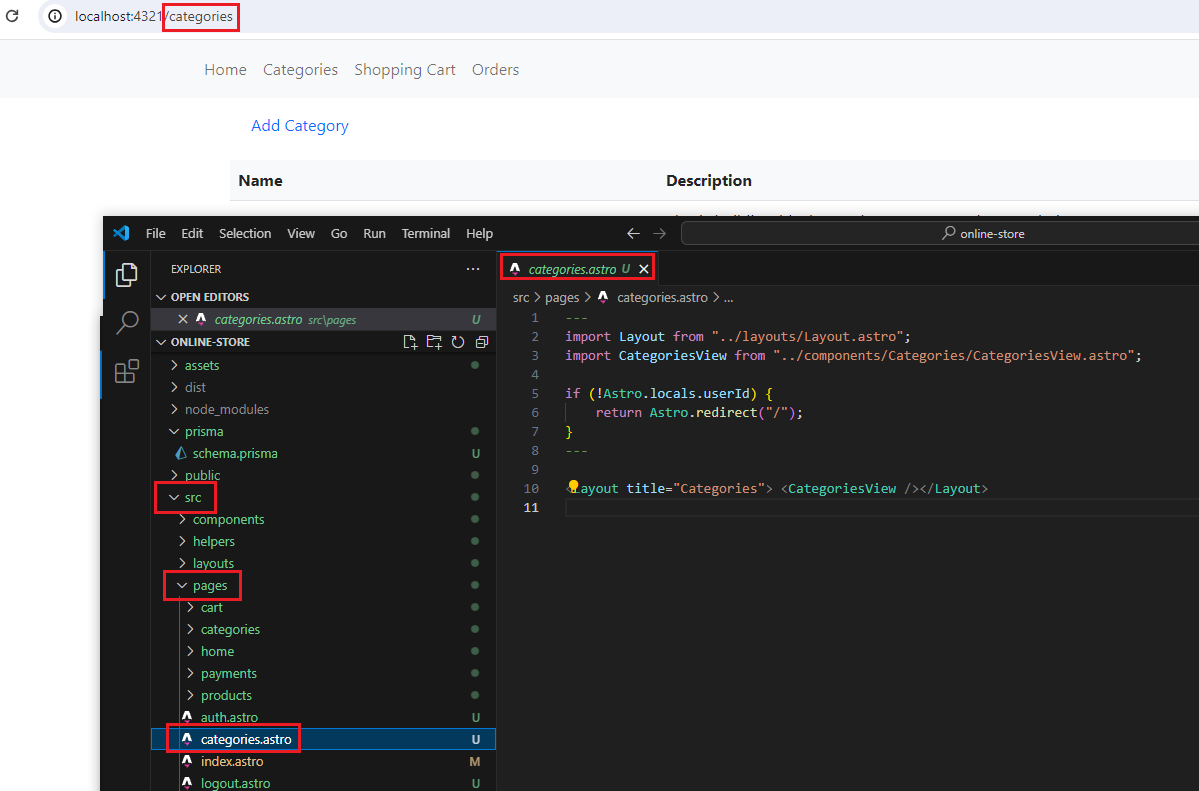
Figure 4
Astro uses file-based routing to generate your build URLs based on the file layout of your project's src/pages directory.
We will use Htmx with Astro, and the main concept behind Htmx is the ability to send AJAX requests directly from HTML.
This is possible thanks to attributes such as hx-get, hx-post, etc.
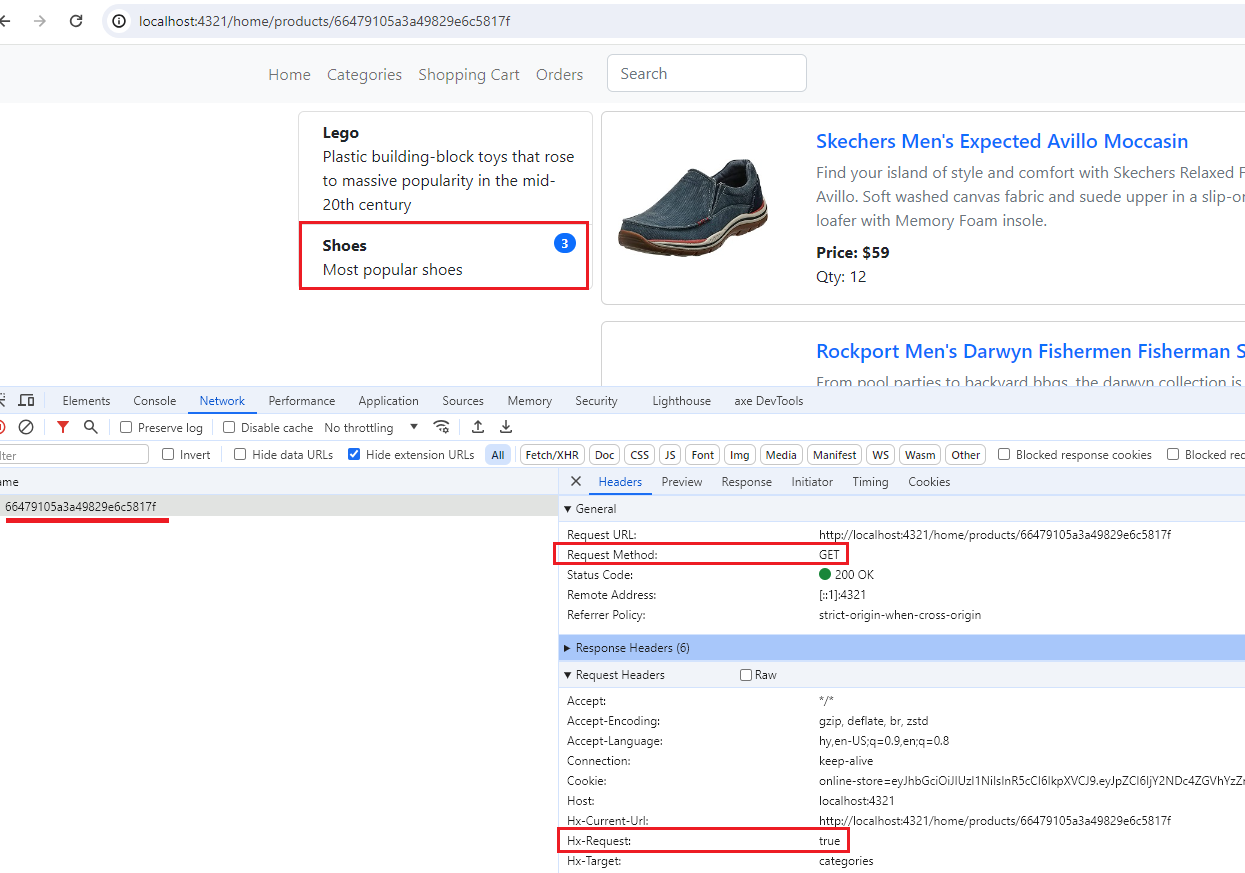
Figure 5
Let's click on the second category. You will see that a GET request is sent, and an Hx-Request header with the value of true which means that an Htmx request is sent.
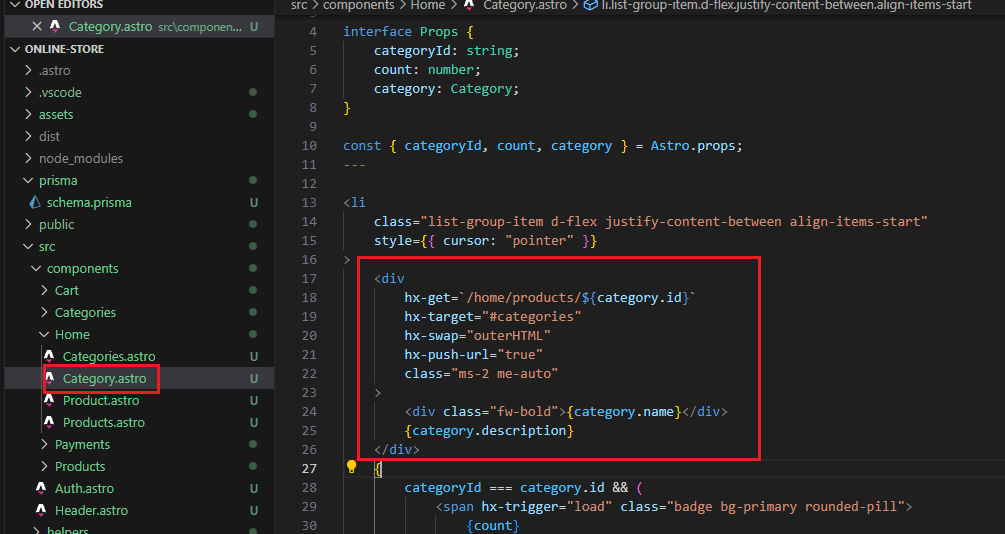
Figure 6
This is the category div we clicked. Let's understand what is going on.
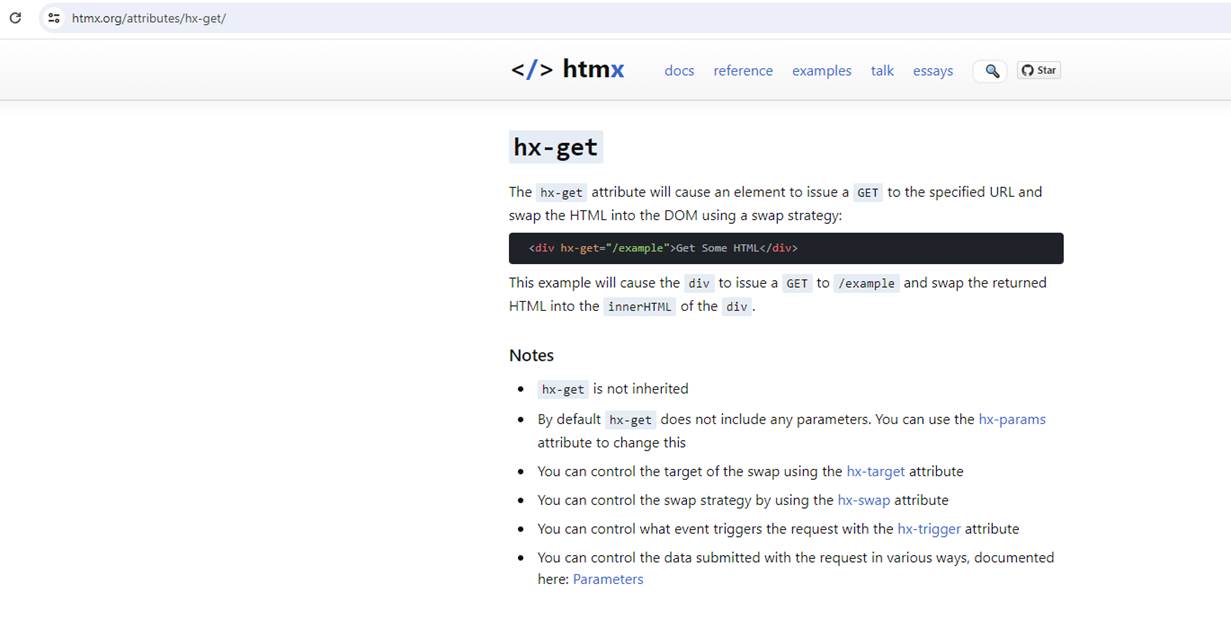
Figure 7
hx-get attribute will cause an element to issue a GET to the specified URL and swap the HTML into the DOM using a swap strategy that we are going to explore.

Figure 8
Before understanding the response, let's see why we have two cases returned.
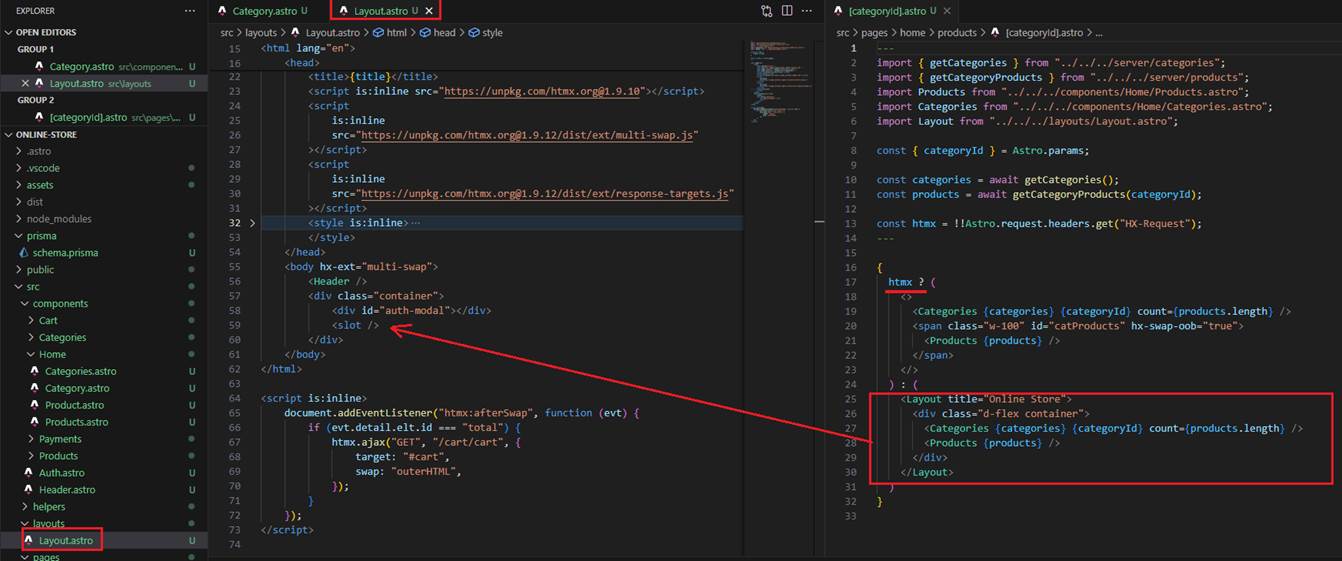
Figure 9
Layouts are Astro components used to provide a reusable UI structure, such as a page template. A typical Astro layout component provides Astro with a page shell
(including <html>, <head>, and <body> tags) and a <slot /> to specify individual page content that should be injected. You will notice that when an Htmx response is not sent,
we include the response in the layout.
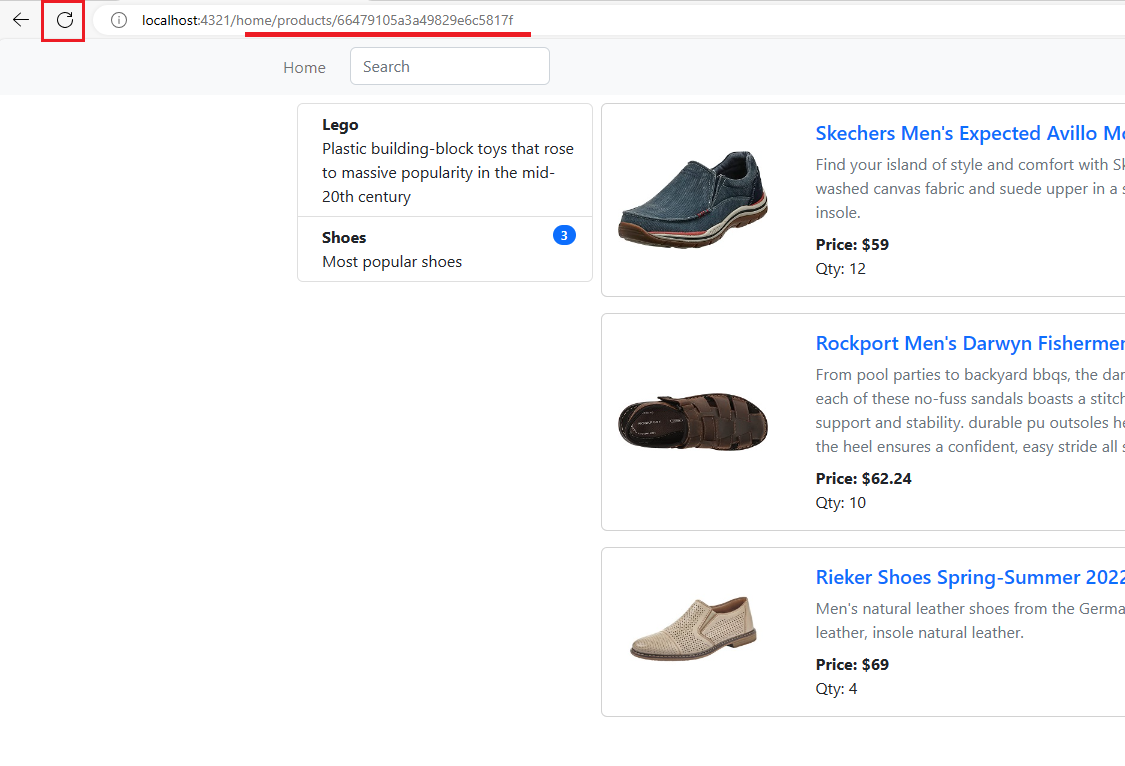
Figure 10
This happens when you are on the page and directly refresh it. In this case, we have to embed the response inside the layout.
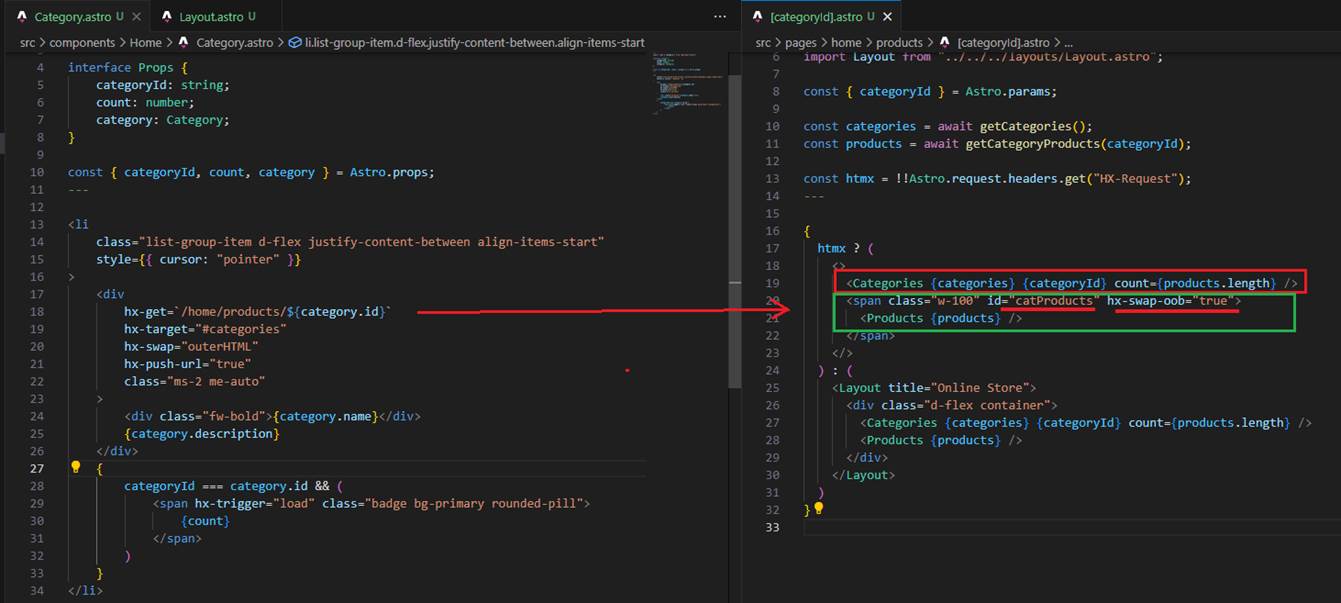
Figure 11
Let's consider the case (Figure 5) when you click on the second category and receive the response. You see that the response is composed of two parts.
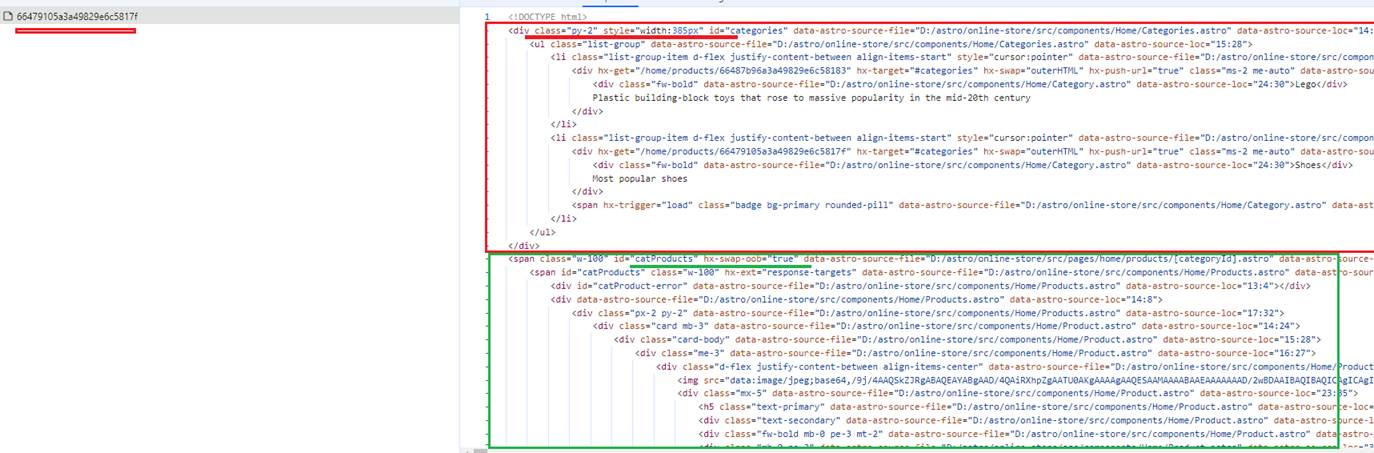
Figure 12
Actually, we can inspect and see that we received an HTML response composed of two parts. In the first part we received online store categories. The first part consists
of the online store categories that we received.
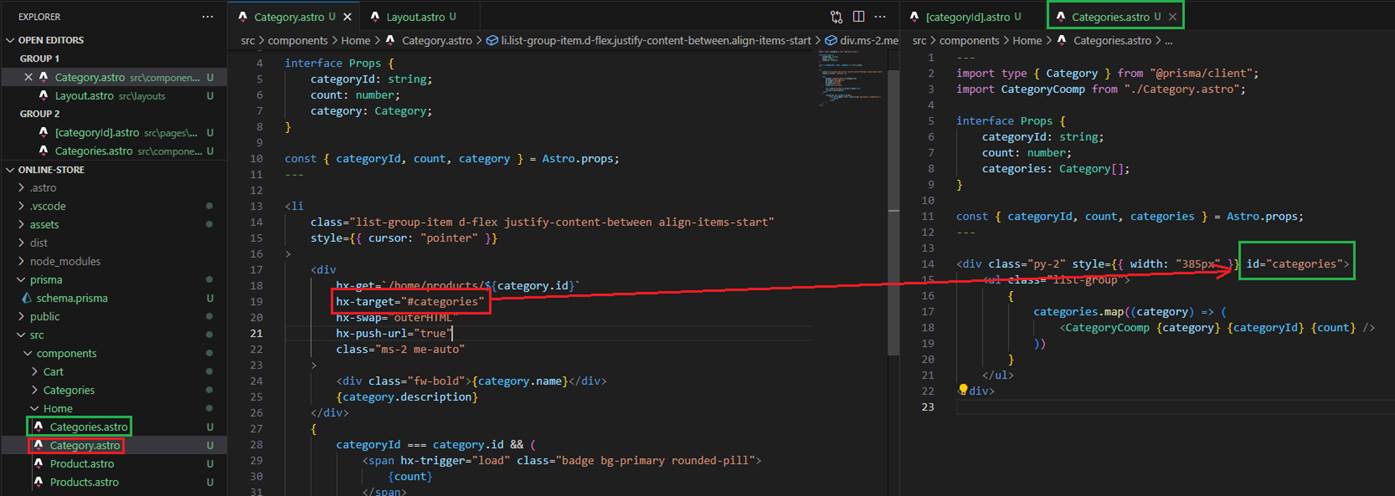
Figure 13
The next attribute is the hx-target.
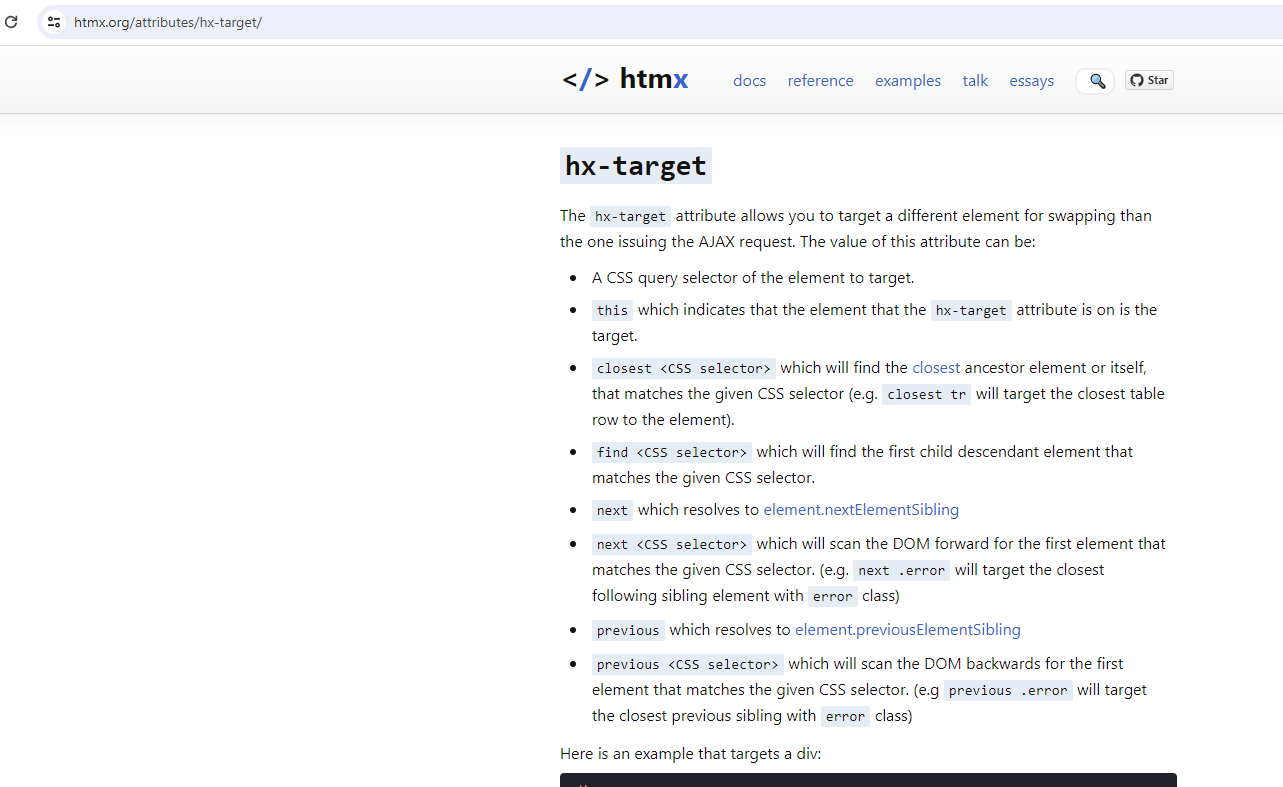
Figure 14
The hx-target attribute allows you to target a different element for swapping than the one issuing the AJAX request.
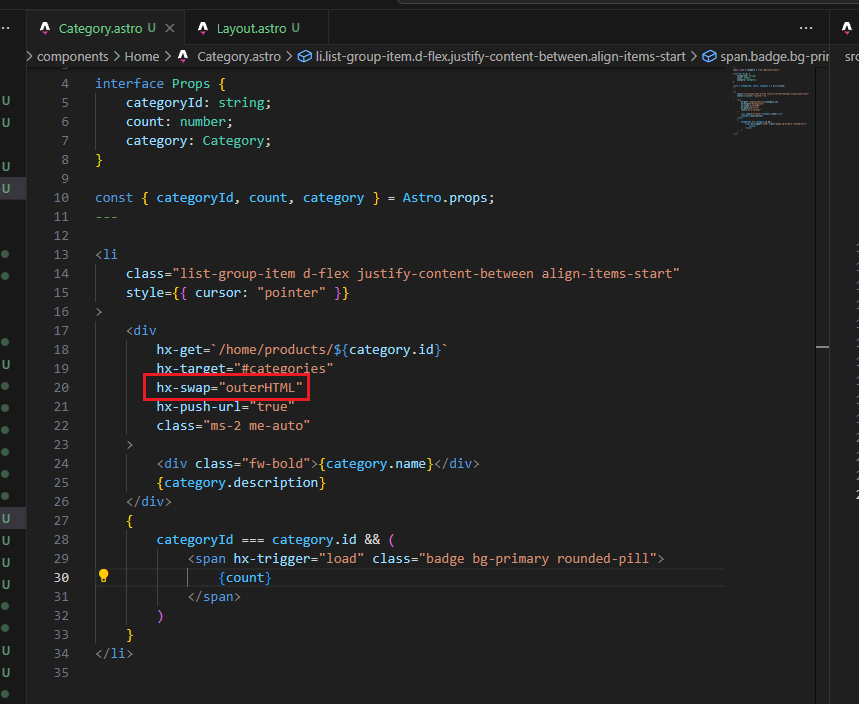
Figure 15
Then the hx-swap is use with the outerHTML.
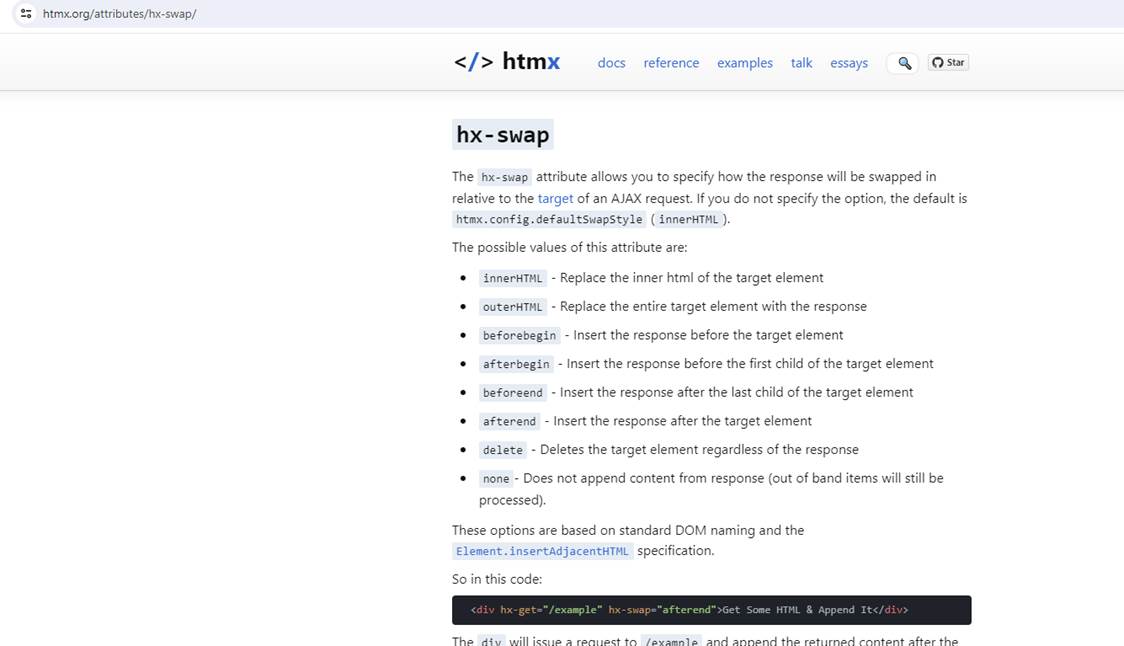
Figure 16
The hx-swap attribute allows us to specify how the response will be swapped in relative to the target f an Ajax request.
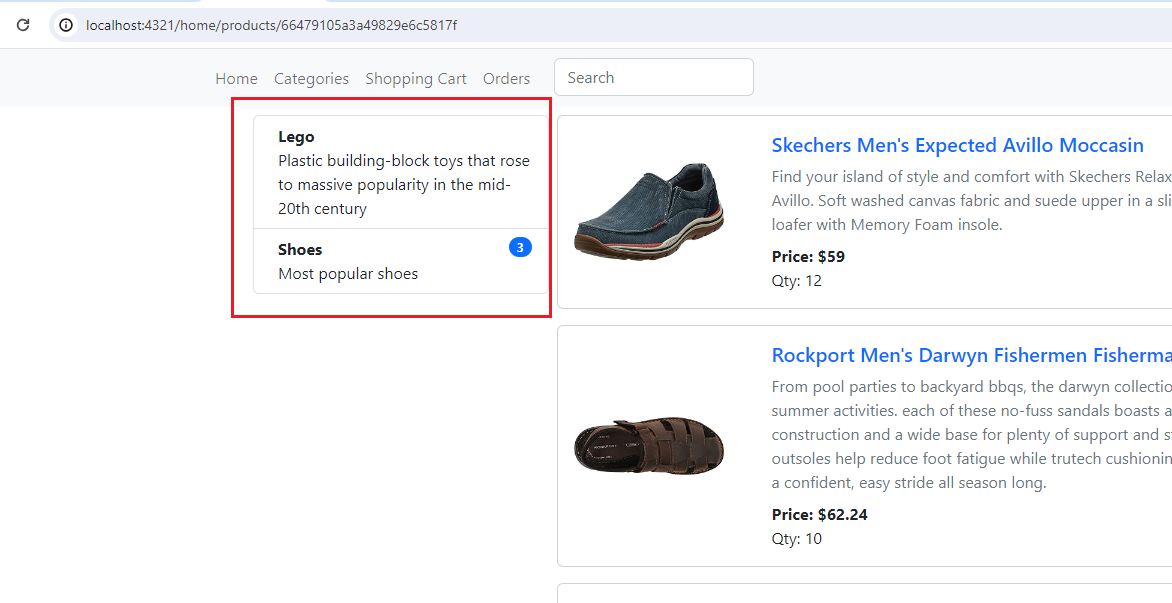
Figure 17
What we did so far is receive the categories HTML and render it in the respective section.
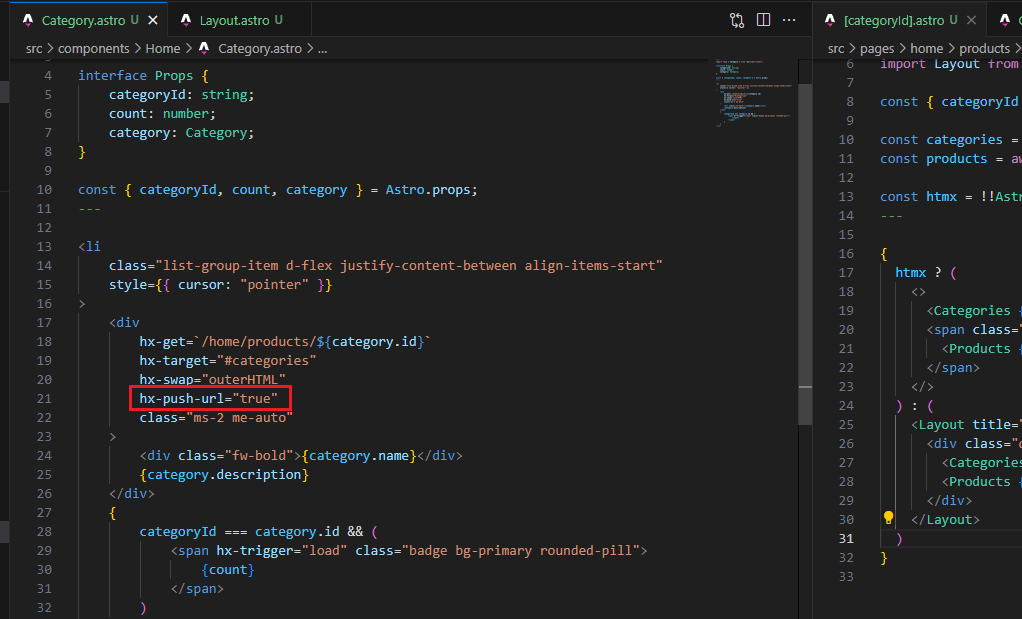
Figure 18
The lats htmx attribute is hx-push-url.
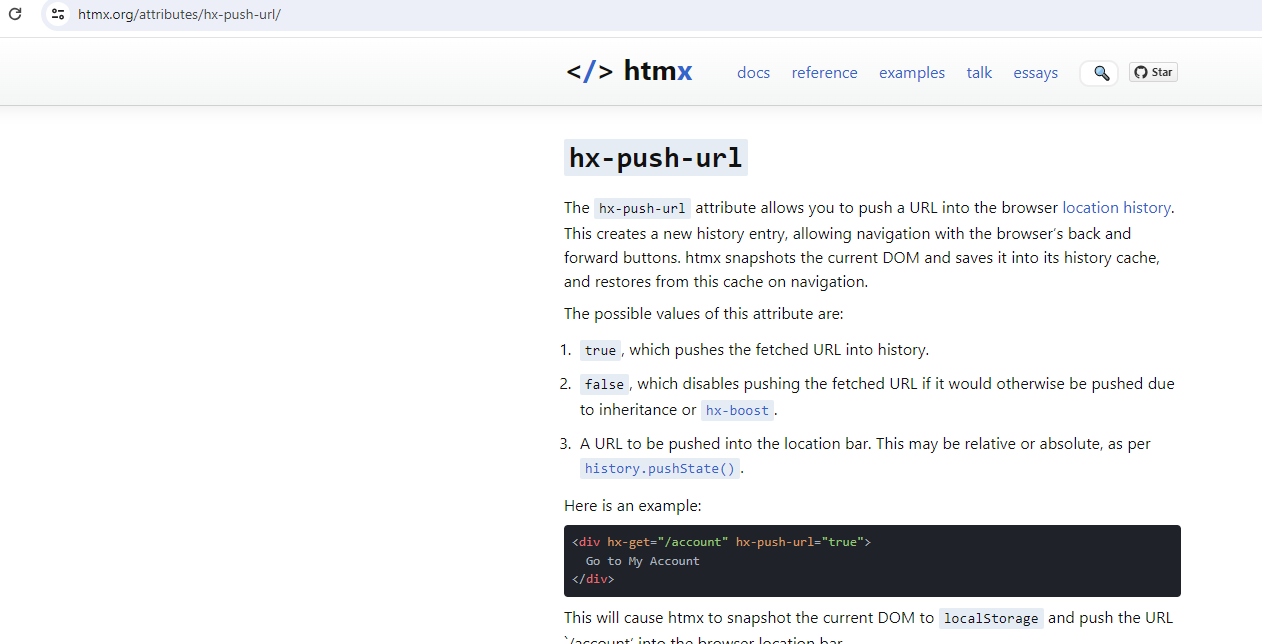
Figure 19
The hx-push-url attribute allows us to push the URL into the browser history. This creates a new history entry, allowing navigation with the browser's back and forward buttons.
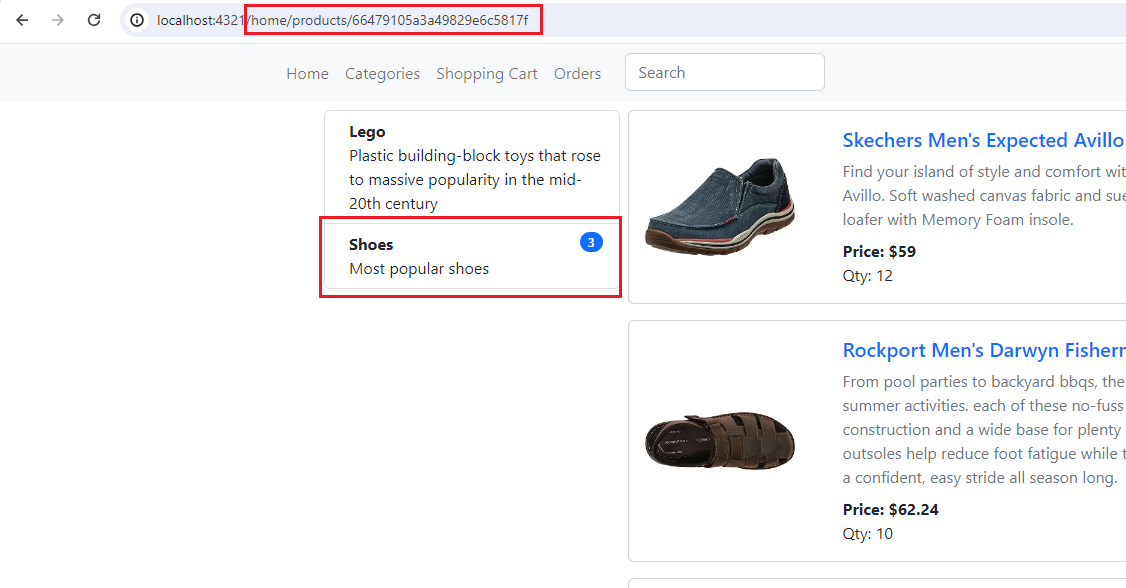
Figure 20
With the hx-push-url attribute, the part in the red rectangle in the URL will be rendered when switching from one category to another, and with the back button,
you will navigate to the previous category. If hx-push-url is not specified, then in the URL, you will always see localhost:4321 when switching from one category to another,
and clicking the back button will not redirect you to the previous category.
The second part we received (Figure 12) is the category products and it has hx-swap-oob attribute.
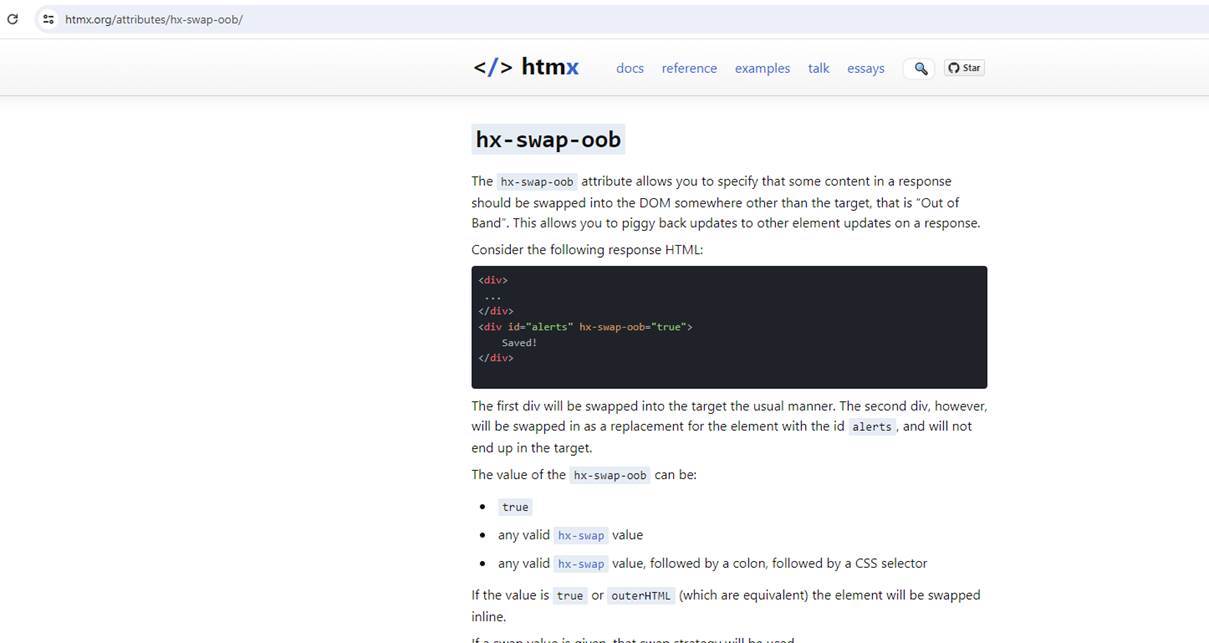
Figure 21
The hx-swap-oob attribute allows us to specify that some content in a response should be swapped into the DOM somewhere other than the target.
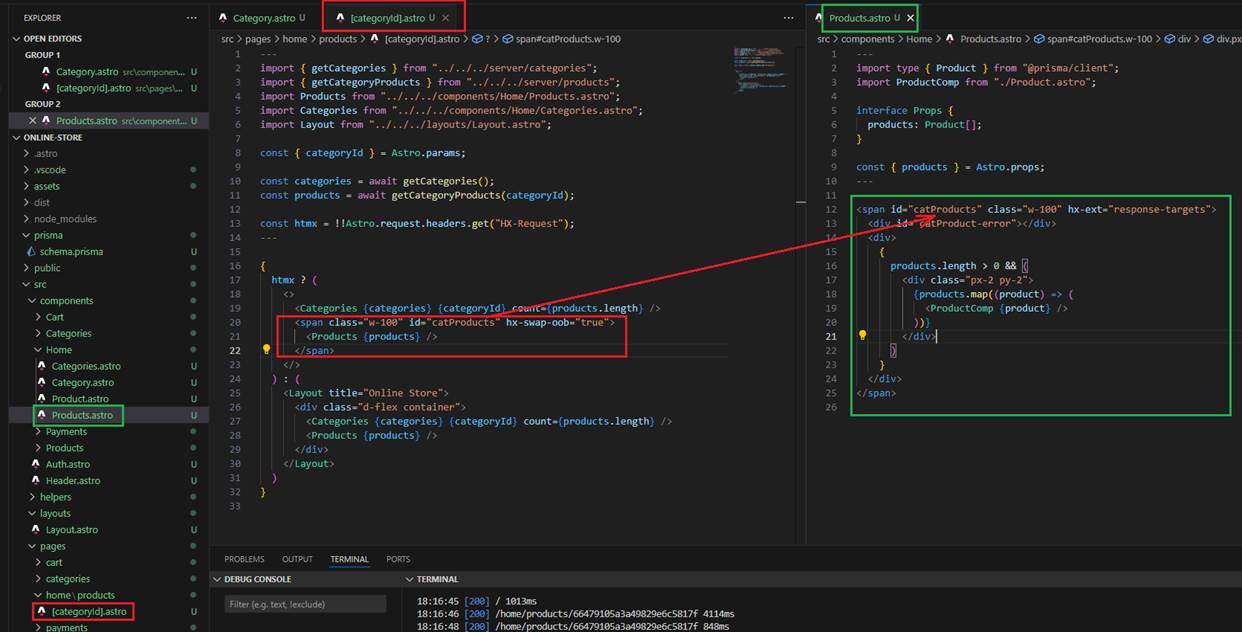
Figure 22
So, with hx-swap-oob, we render the category products in the respective section.
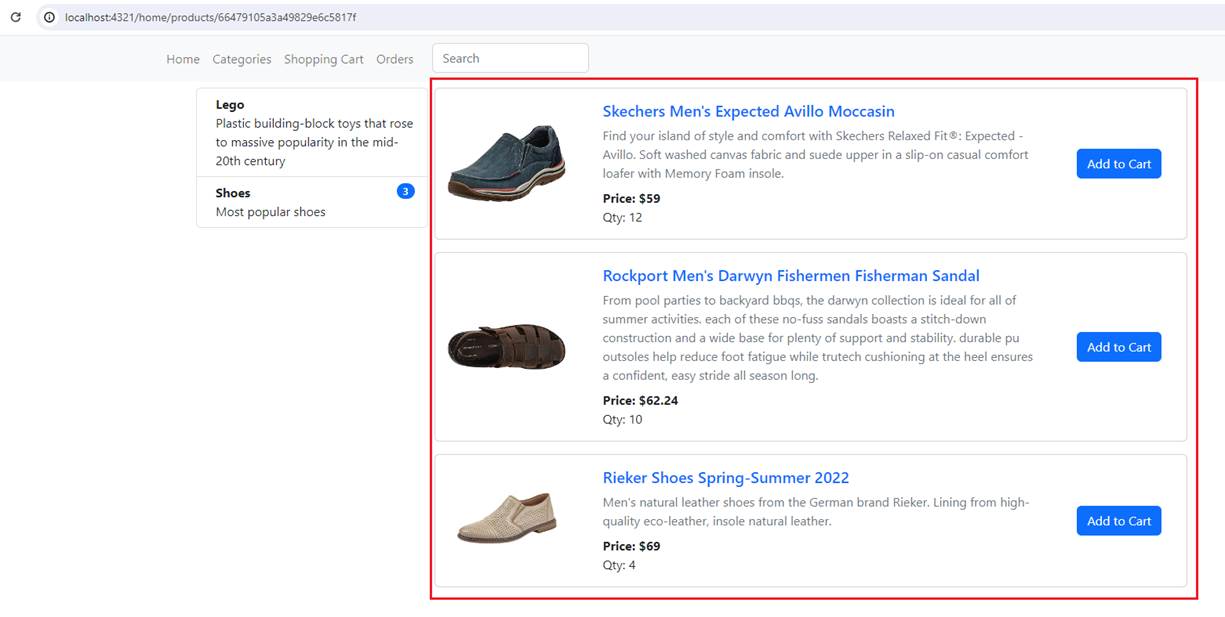
Figure 23
This is the section we rendered via hx-swap-oob.
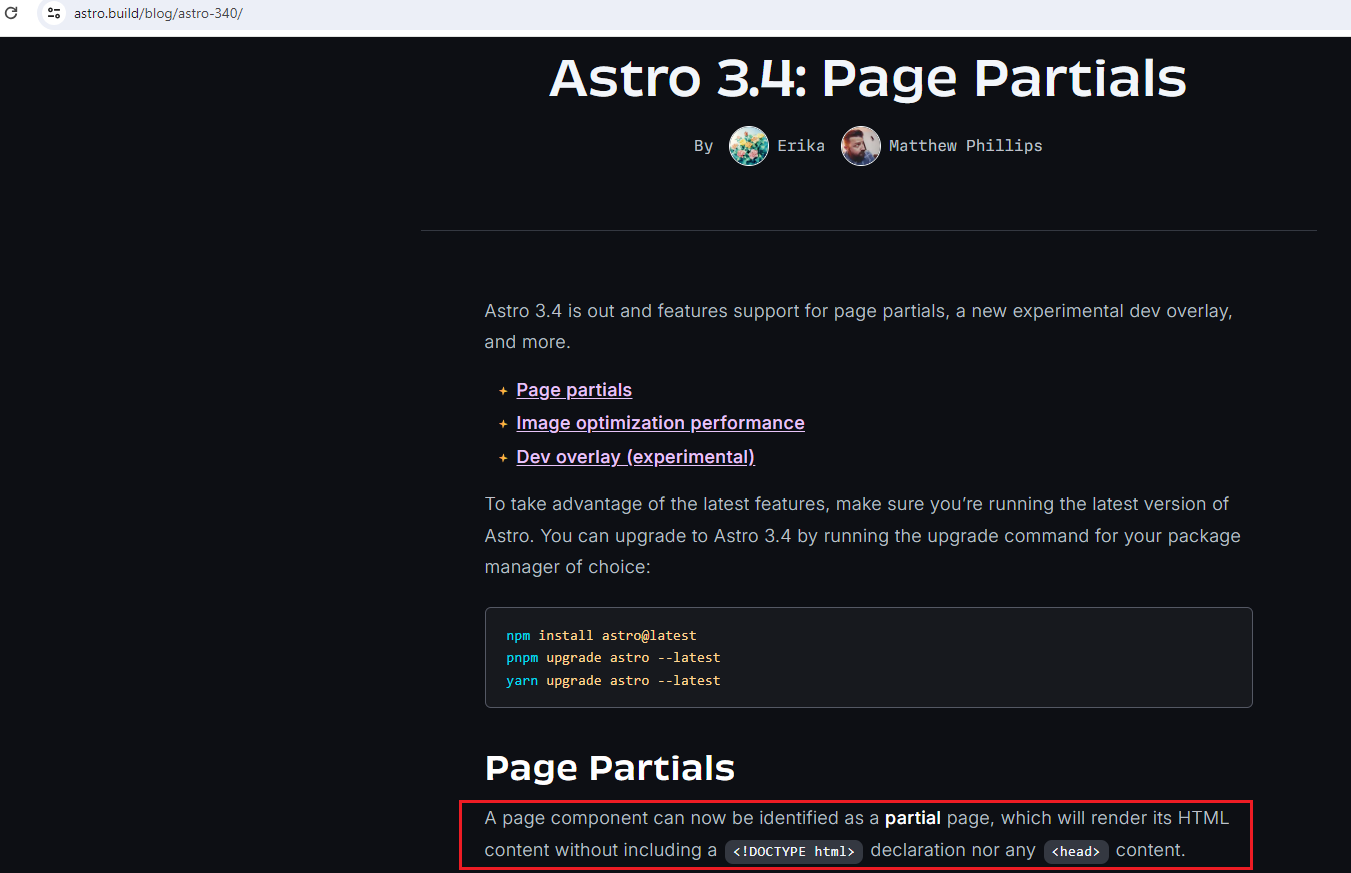
Figure 24
Astro page component can now be identified as a partial page, which will render its HTML content without including a DOCTYPE declaration nor any head content. We mark
any page as a partial by setting the partial option in the component frontmatter export const partial = true
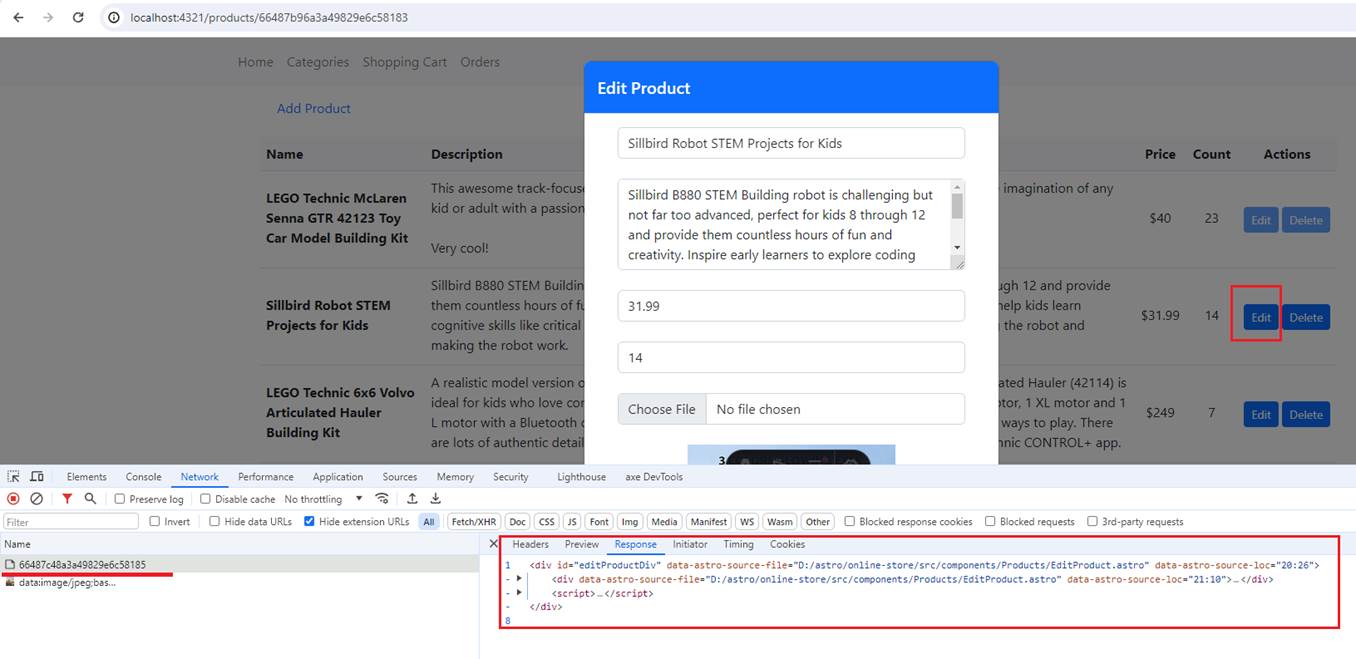
Figure 25
We click on the Edit button and receive the content to render.
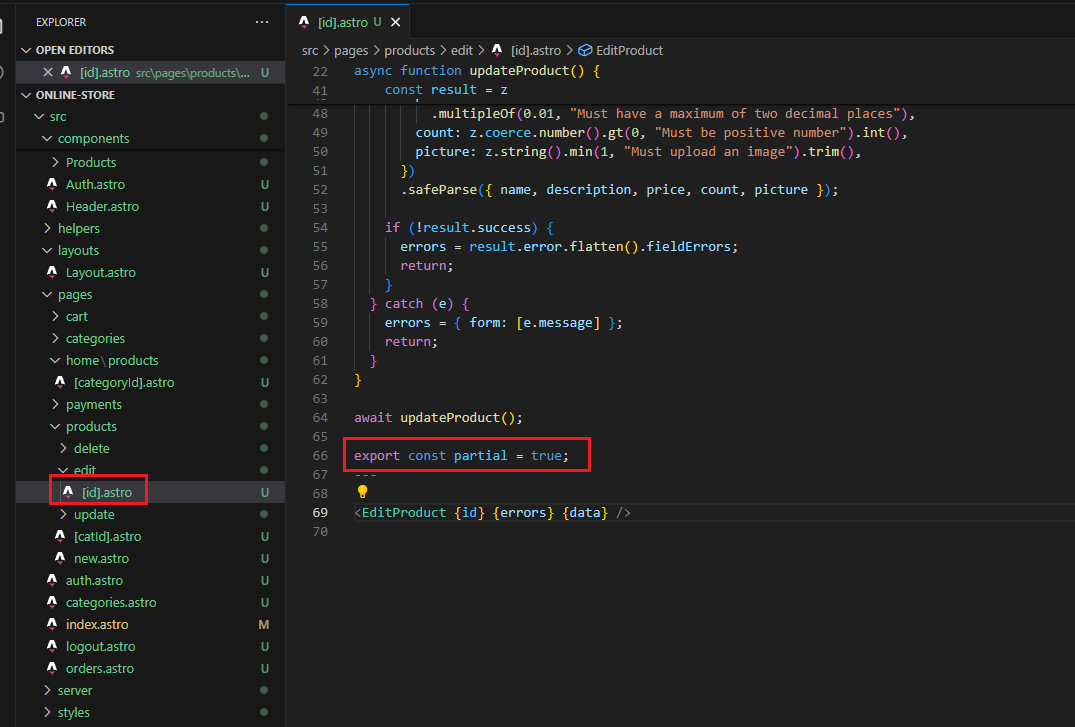
Figure 26
We received the response with partial enabled. Now let's comment it out and try again.

Figure 27
Without the partial, we received extra information that we actually do not need.
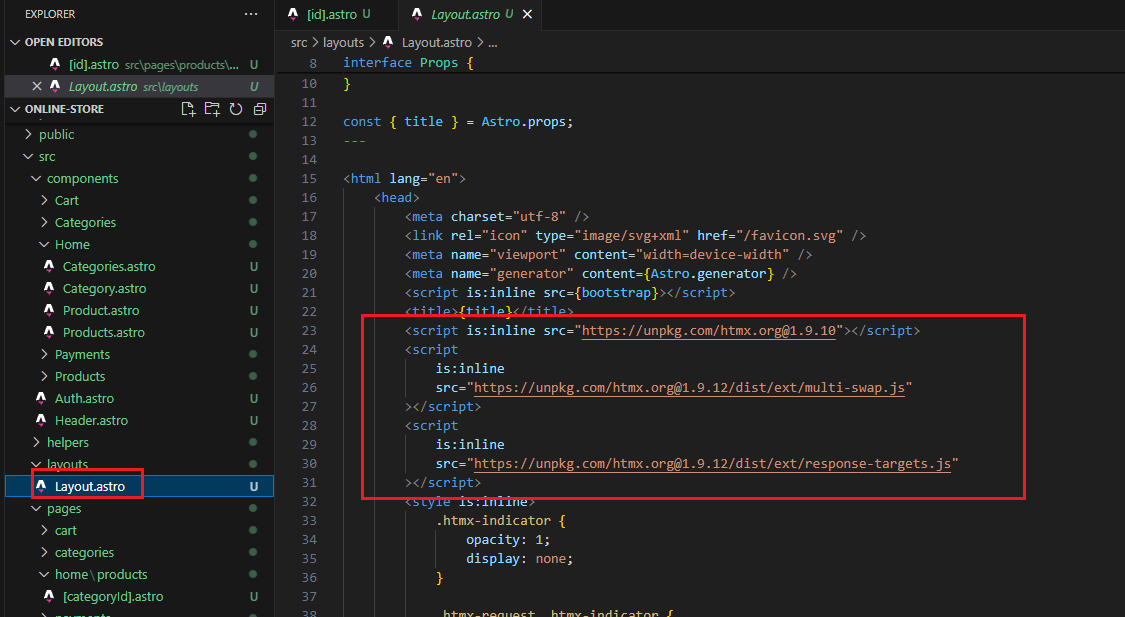
Figure 28
By the way, we included the htmx package and two htmx extensions in the layout. We will discuss the extensions.
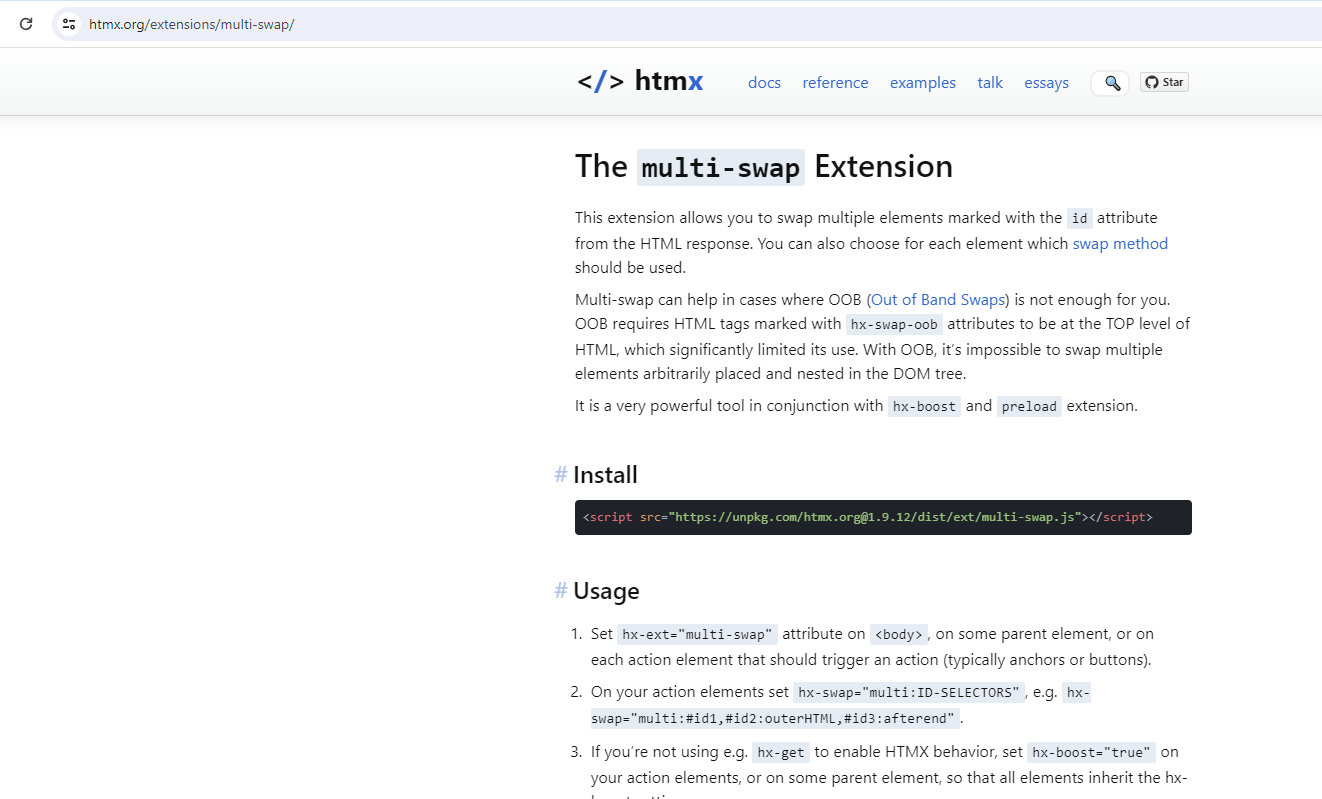
Figure 29
The multi-swap extension allows us to swap multiple elements marked with the id attribute from the HTML response.
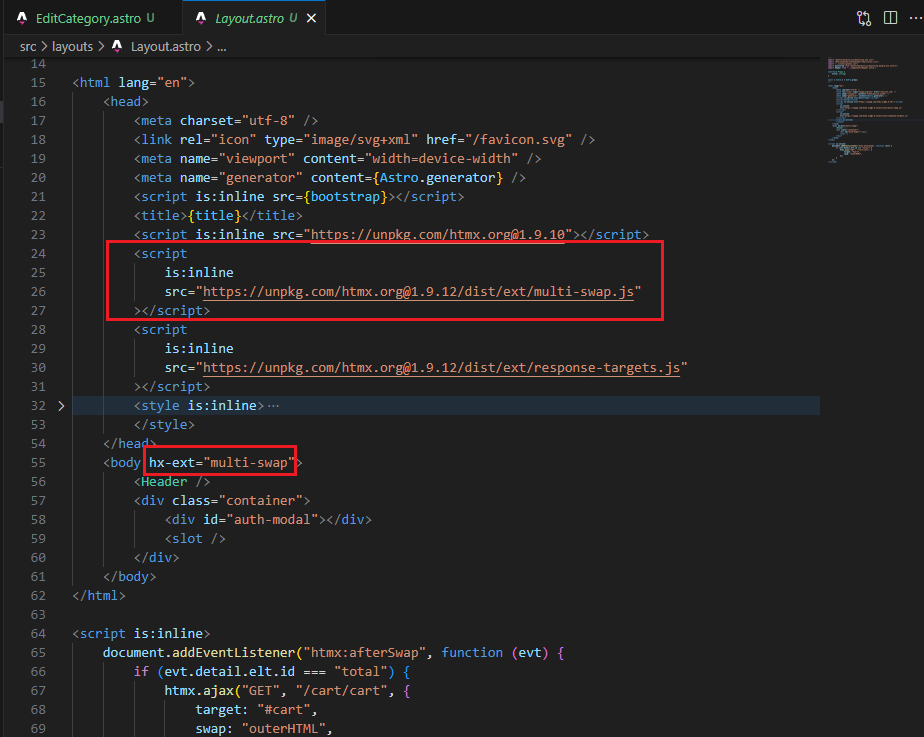
Figure 30
To enable it, we have to install it and set the hx-ext=multi-swap attribute on the body or some parent element.
We use the multi-swap extension in the app because with hx-swap-oob, we cannot achieve the result we want.
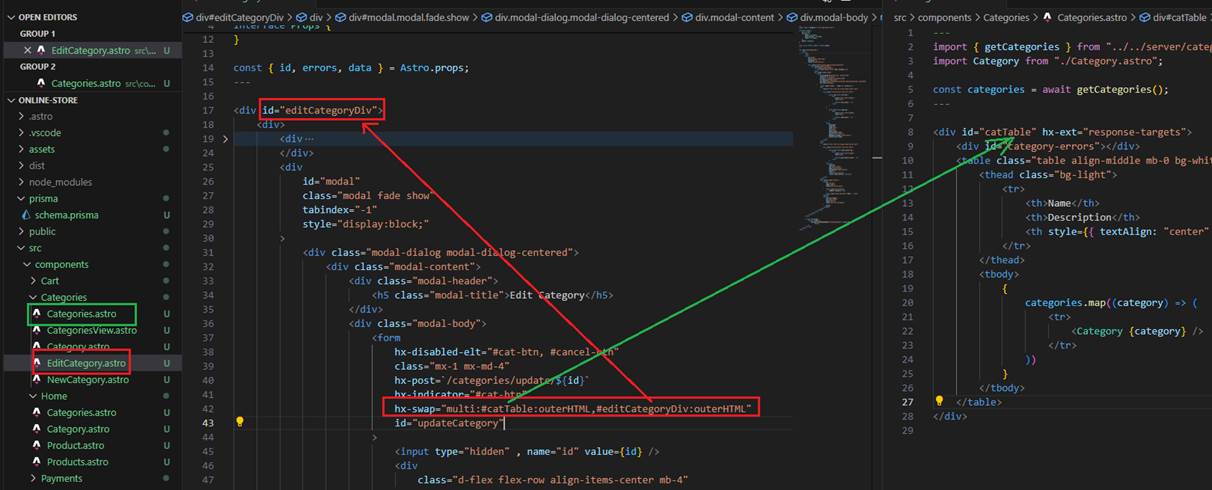
Figure 31
We specified hx-swap on one with catTable target and another one with editCategoryDiv.
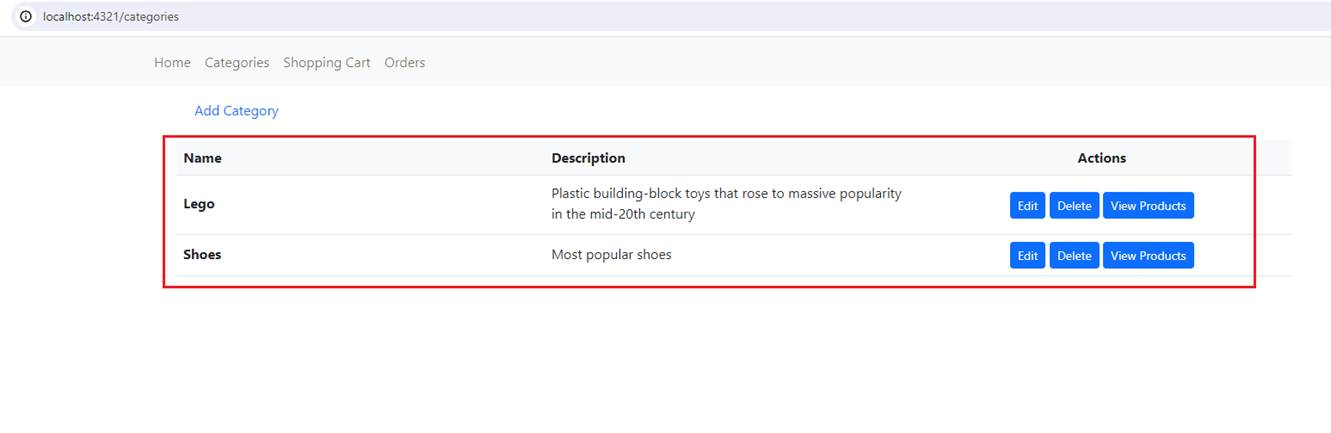
Figure 32
This is the catTable section.
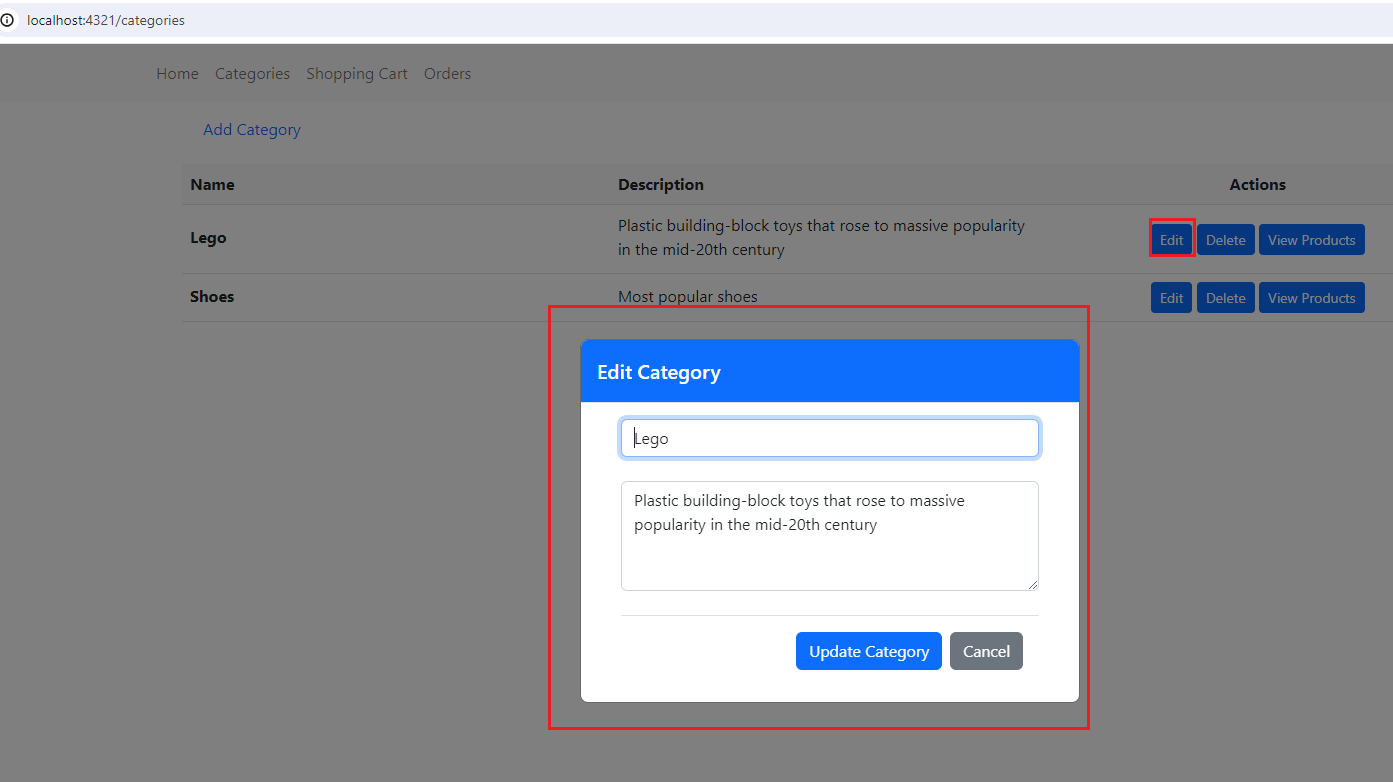
Figure 33
This is the editCategoryDiv section.
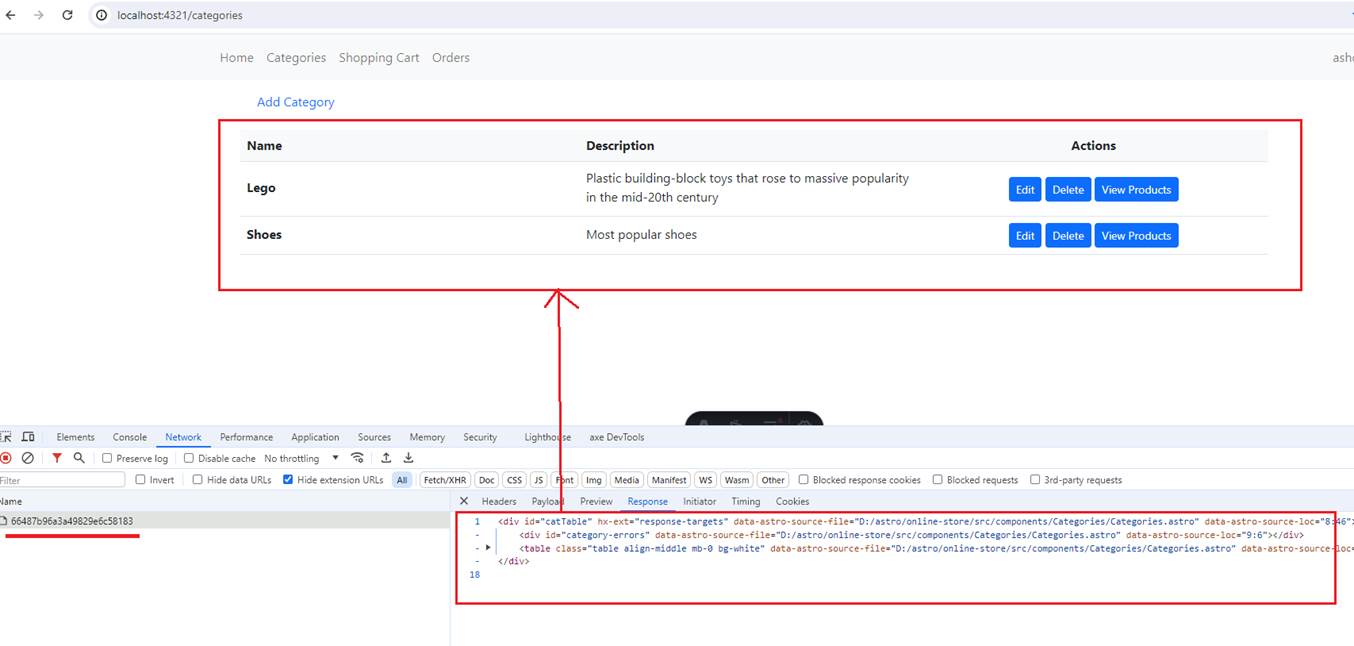
Figure 34
When you click on Update Category (Figure 33) and everything is successful, we swap the response and see the updated category.

Figure 35
In this case, we see that we got a warning that #editCategoryDiv was not found, and it is true, as in the response (Figure 34), there is not an HTML element with that id.
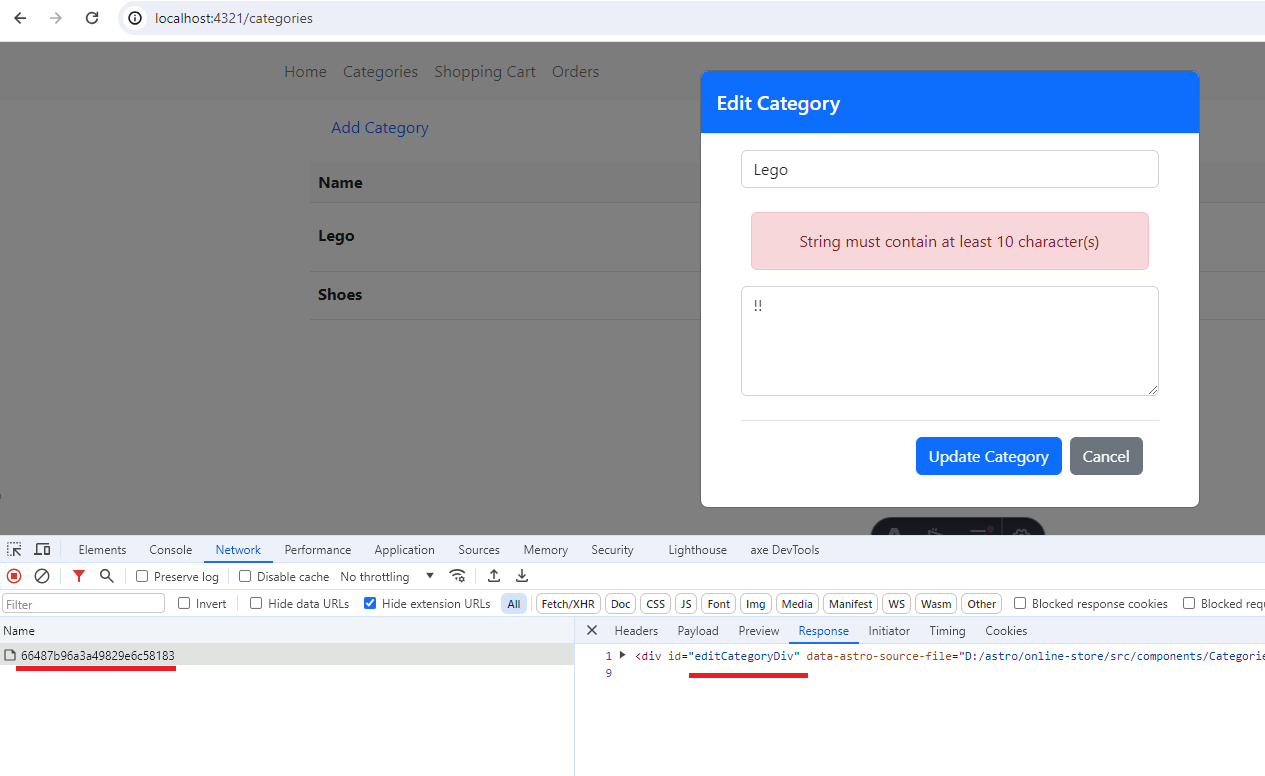
Figure 36
In this case, when we receive a validation error, we return the modal dialog.
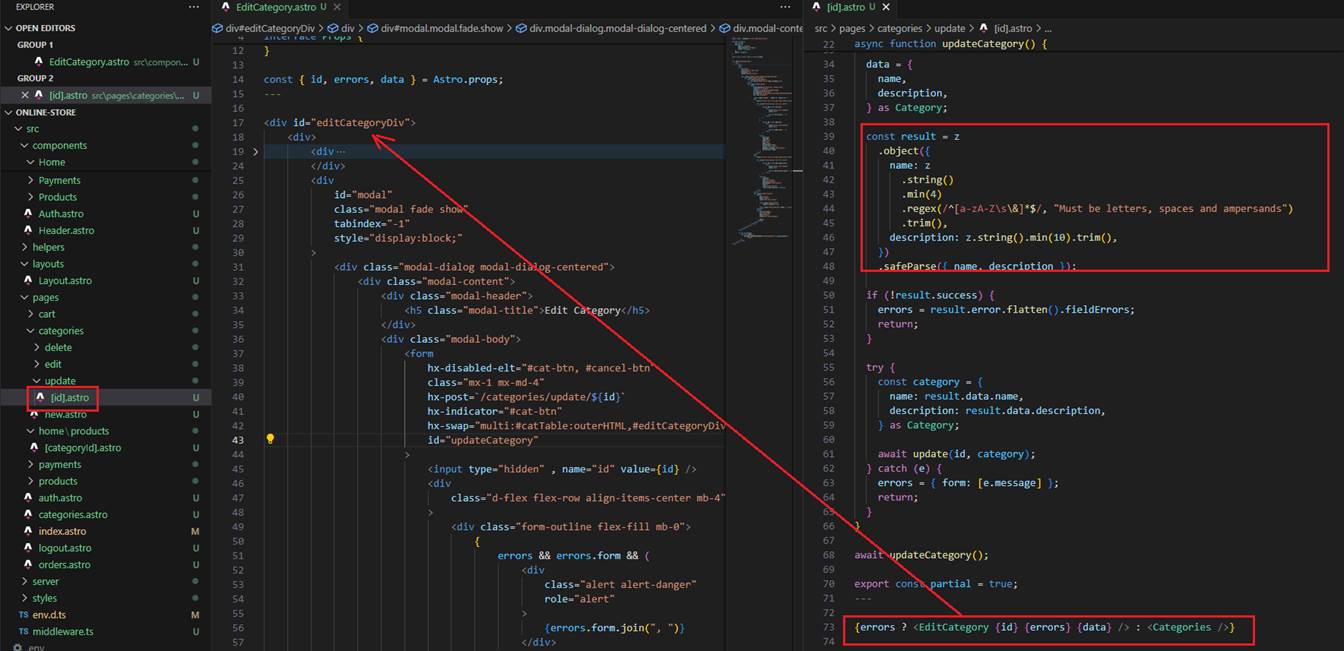
Figure 37
When we encounter a validation error while updating a category, we simply return the same modal dialog, rendering validation errors.
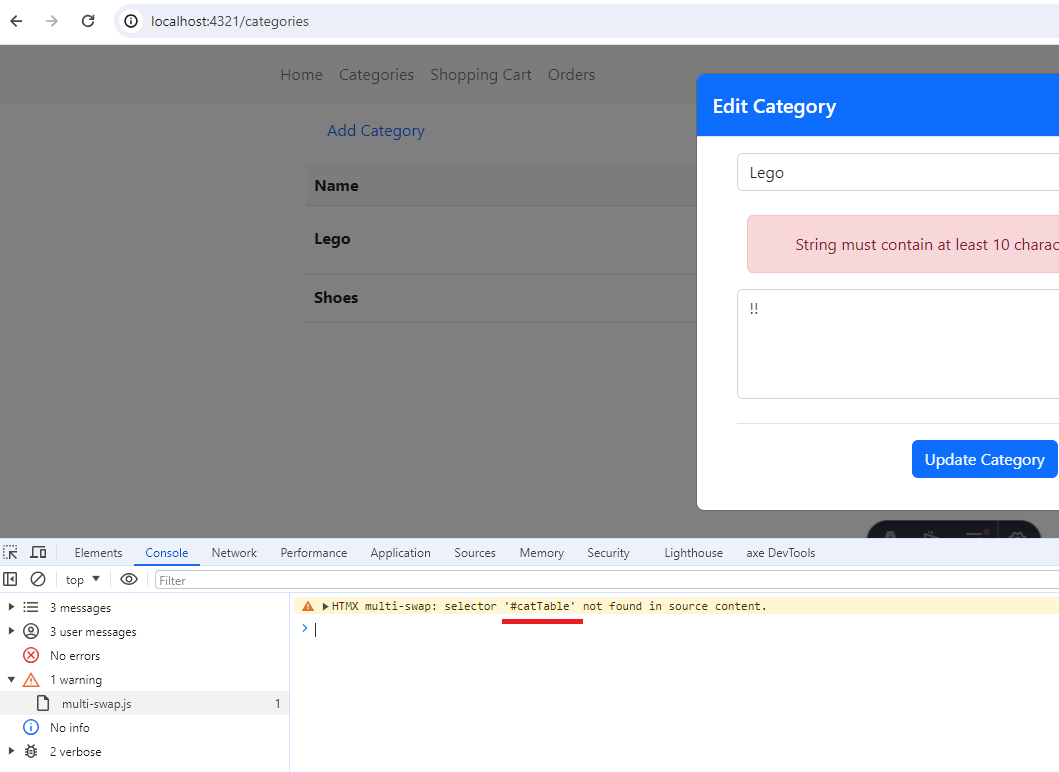
Figure 38
In this case, the #catTable element is not available in the response because there was a validation error, and we did not render the categories list.
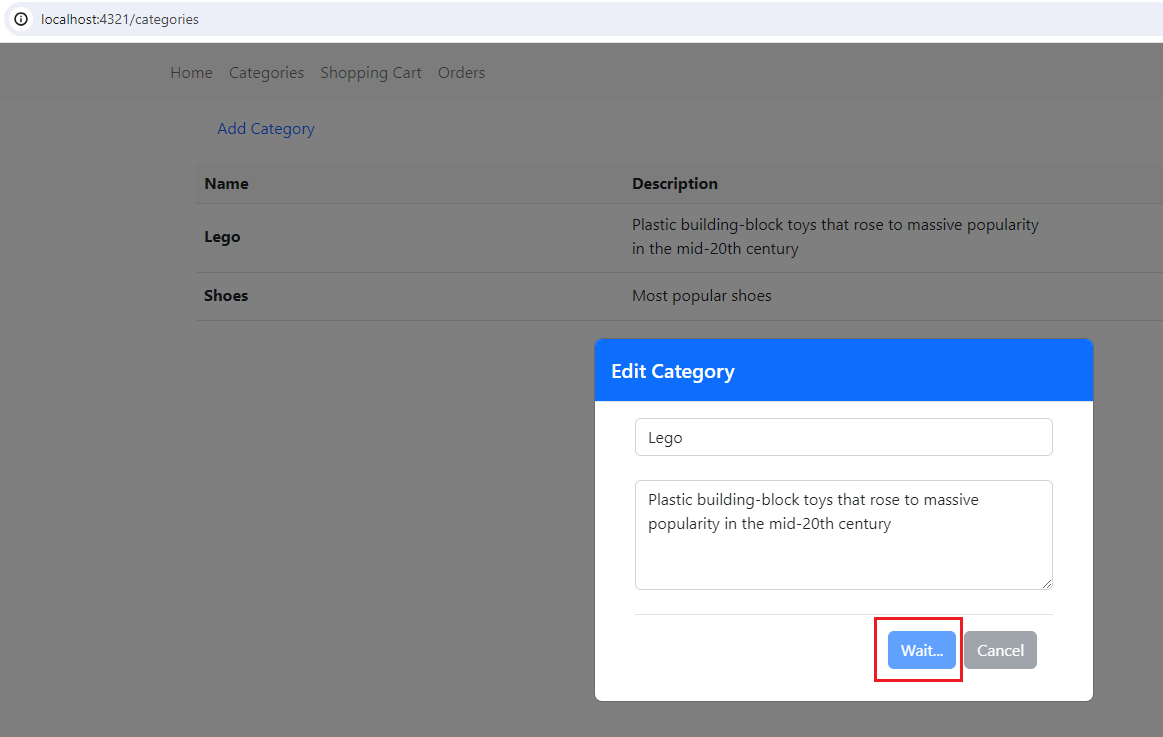
Figure 39
When we click on Update Category, we see that both the Category Update and Cancel buttons are disabled, and also Update Category changes to Wait.

Figure 40
The hx-disabled-elt attribute from htmx is used.
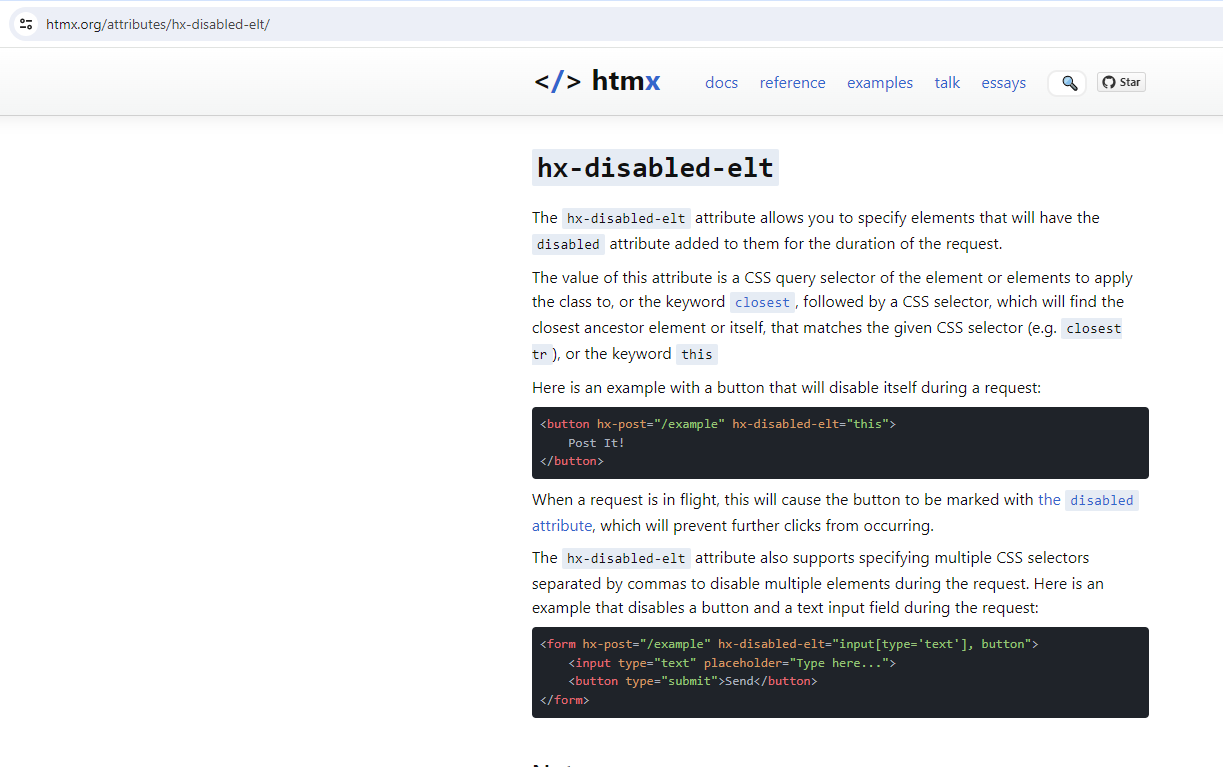
Figure 41
The hx-disabled-elt attribute allows us to specify elements that will have the disabled attribute added to them for the duration of the request.
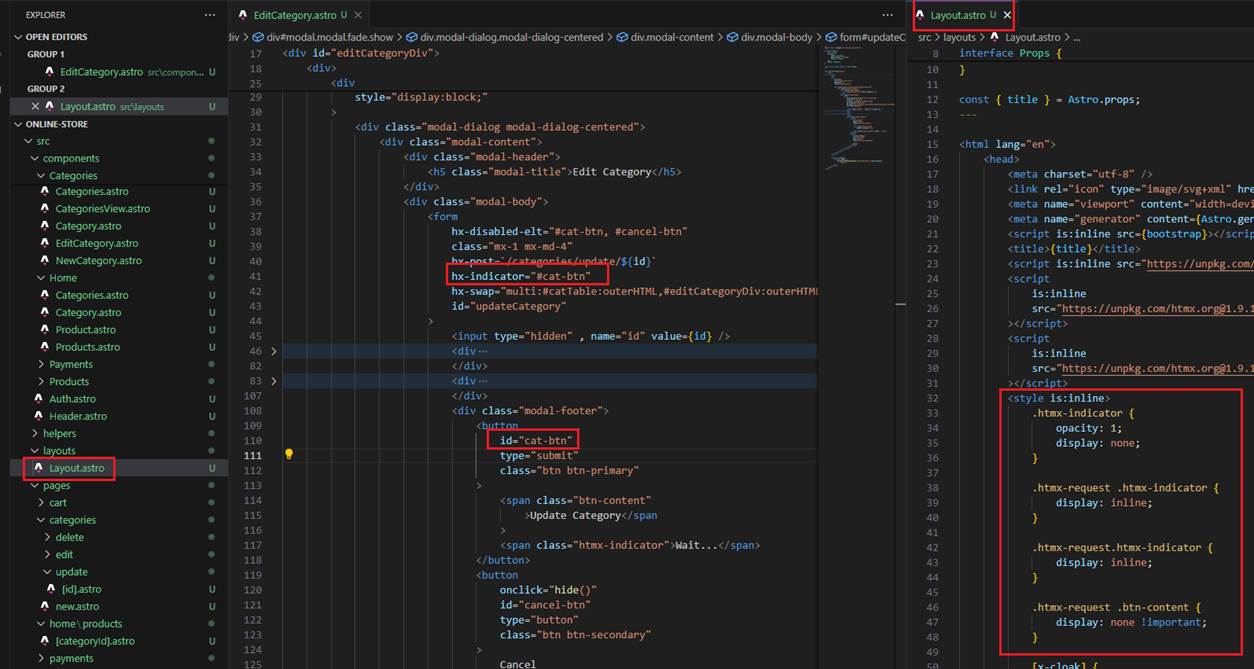
Figure 42
The hx-indicator attribute from htmx is used.
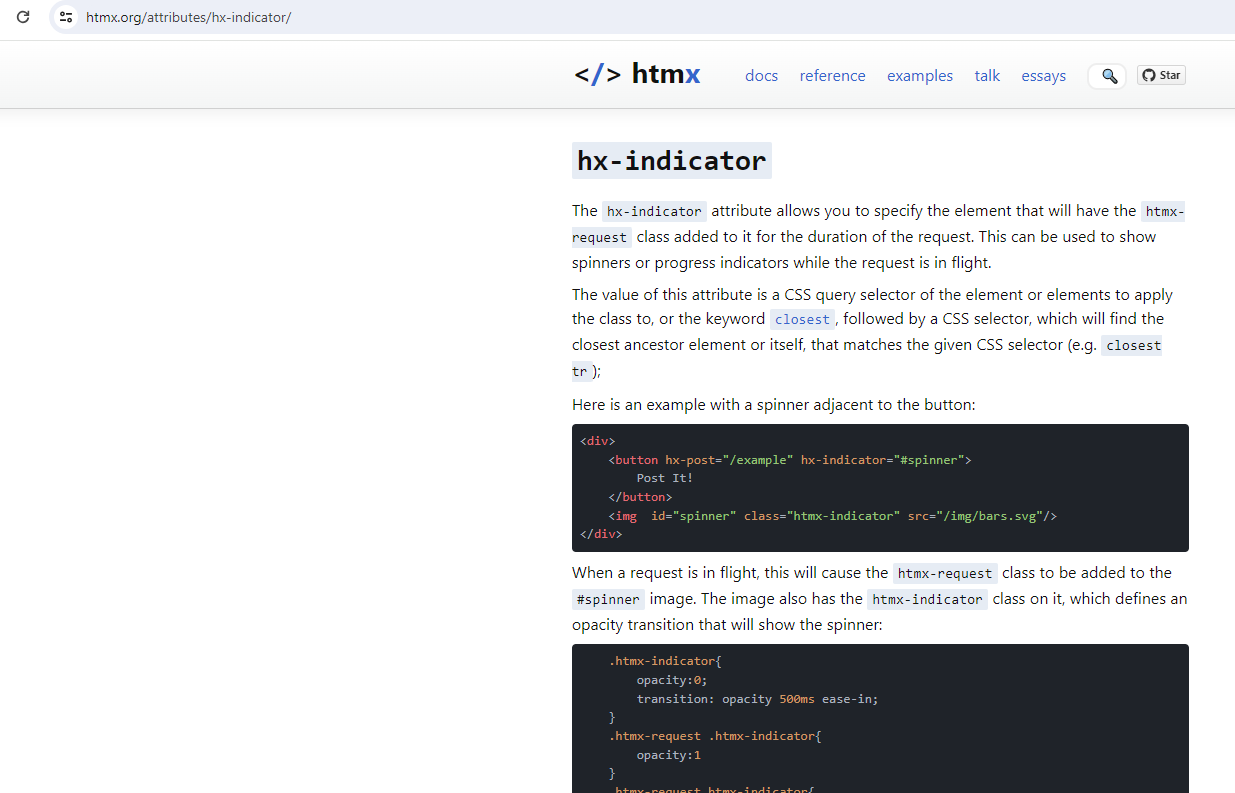
Figure 43
The hx-indicator attribute allows us to specify the element that will have the htmx-request class added to it for the duration of the request.
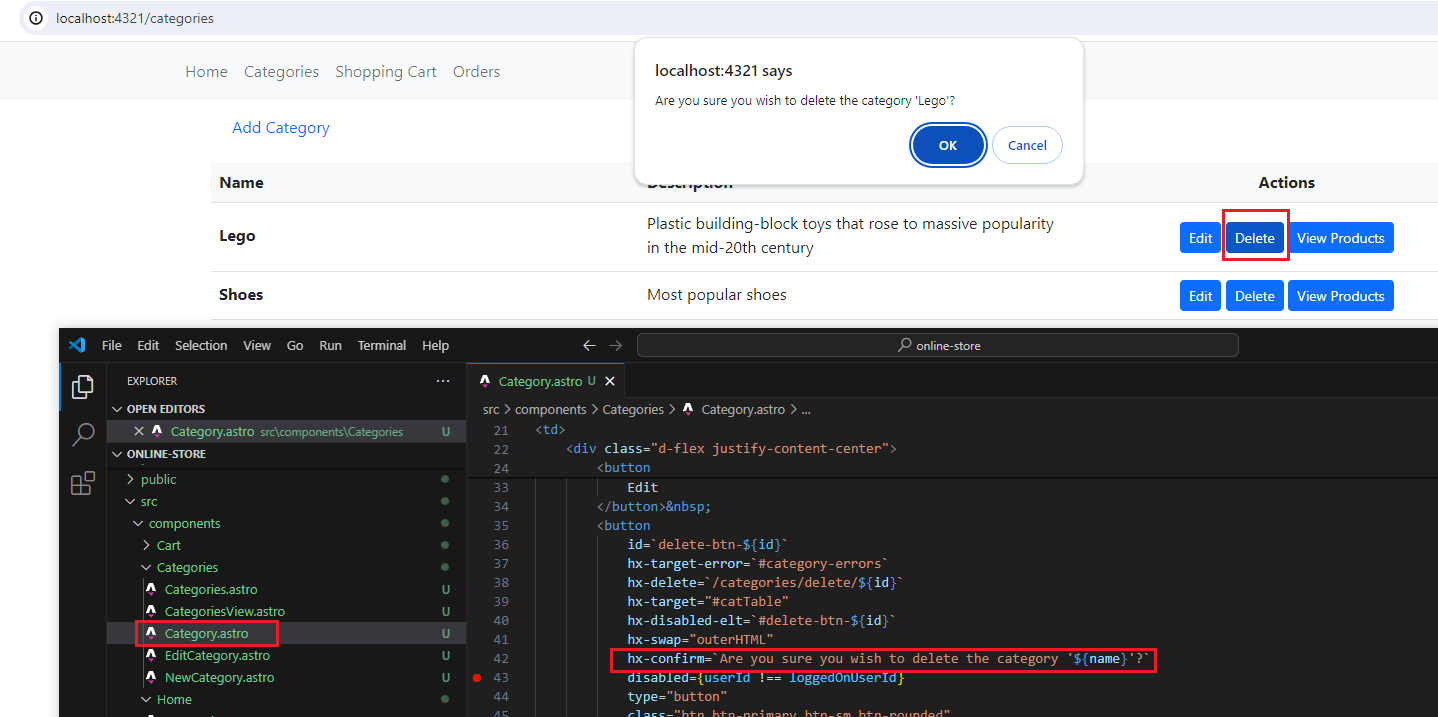
Figure 44
Another htmx attribute that we used is hx-confirm when attempting to delete a category.

Figure 45
The hx-confirm attribute allows us to confirm an action before issuing a request. This can be useful in cases where the action is destructive and you want to ensure that the user really
wants to do it.
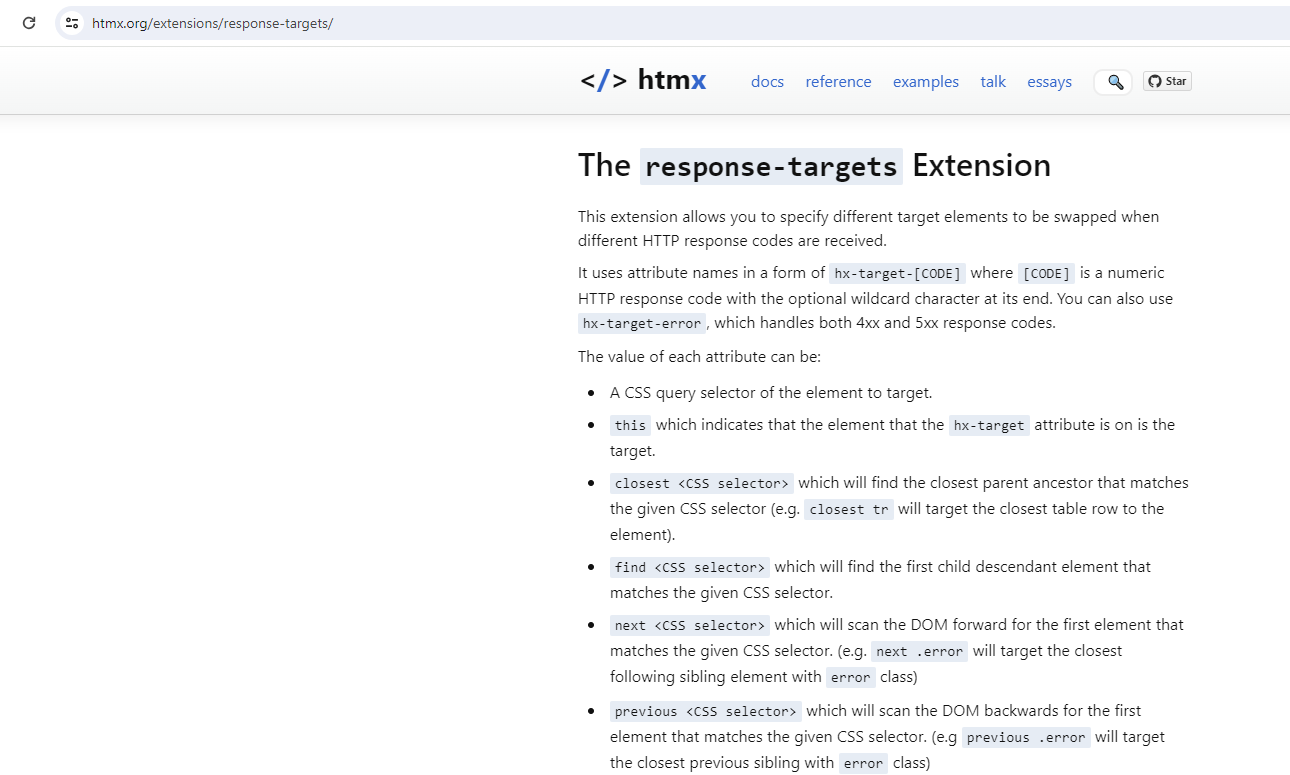
Figure 46
Another extension that we used in our app is response-targets. It allows us to specify different target elements to be swapped when different HTTP response codes are received.
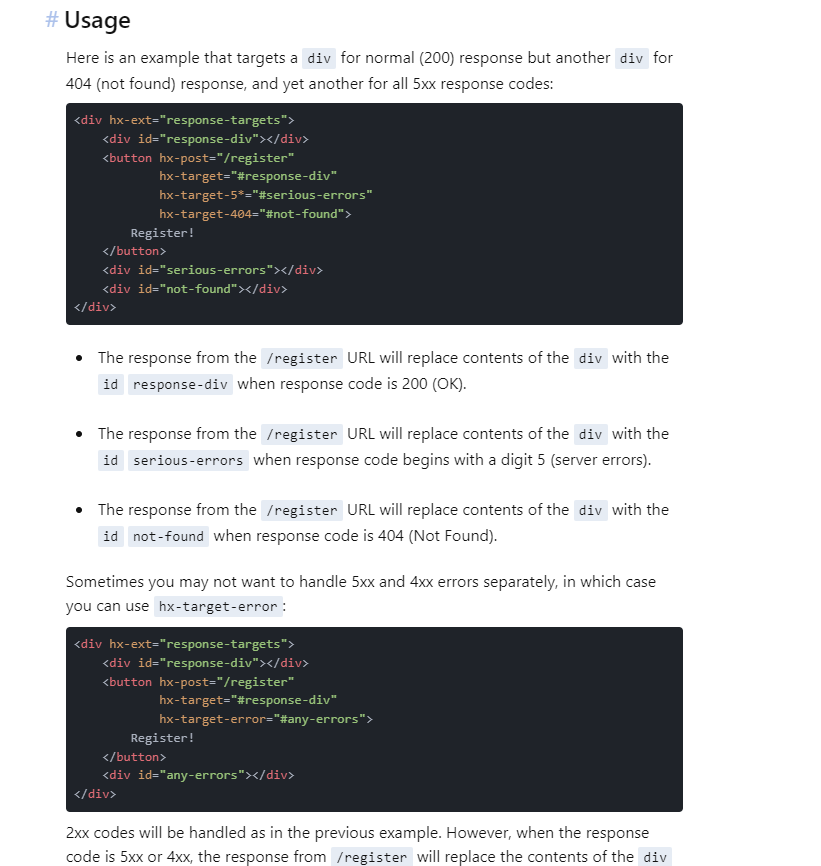
Figure 47
Here is an example of its usage.
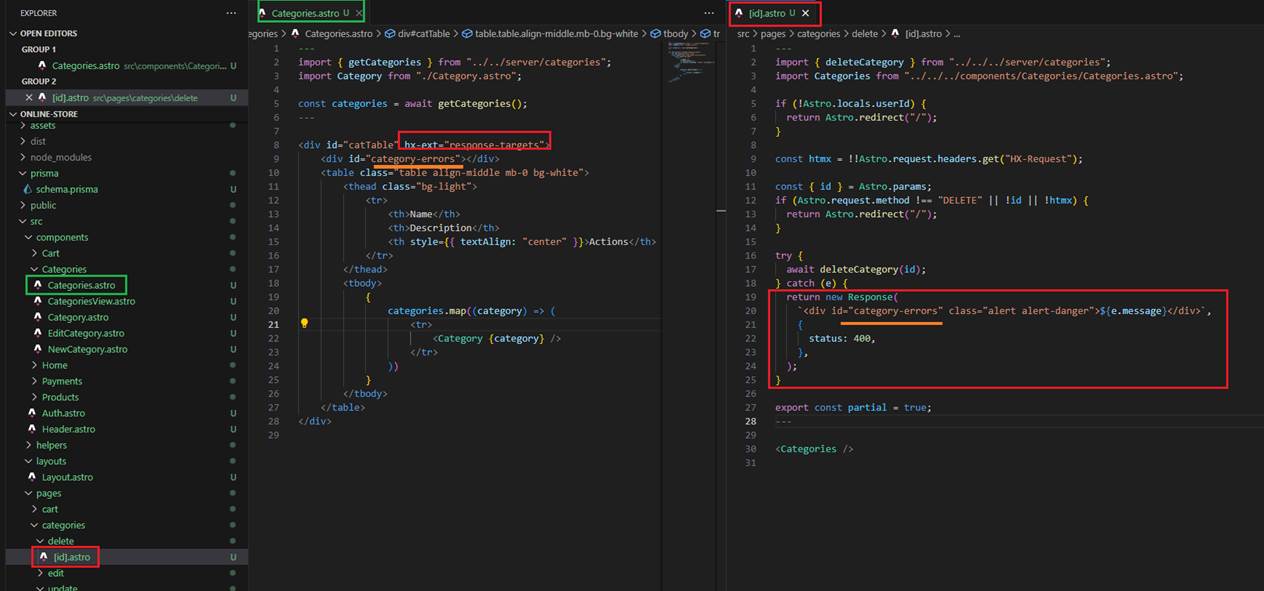
Figure 48
Suppose we delete a category and receive a category deletion exception. We return a 400 response from the code and should render it on the page.
First, we register it on the category div component with hx-ext=response-targets.
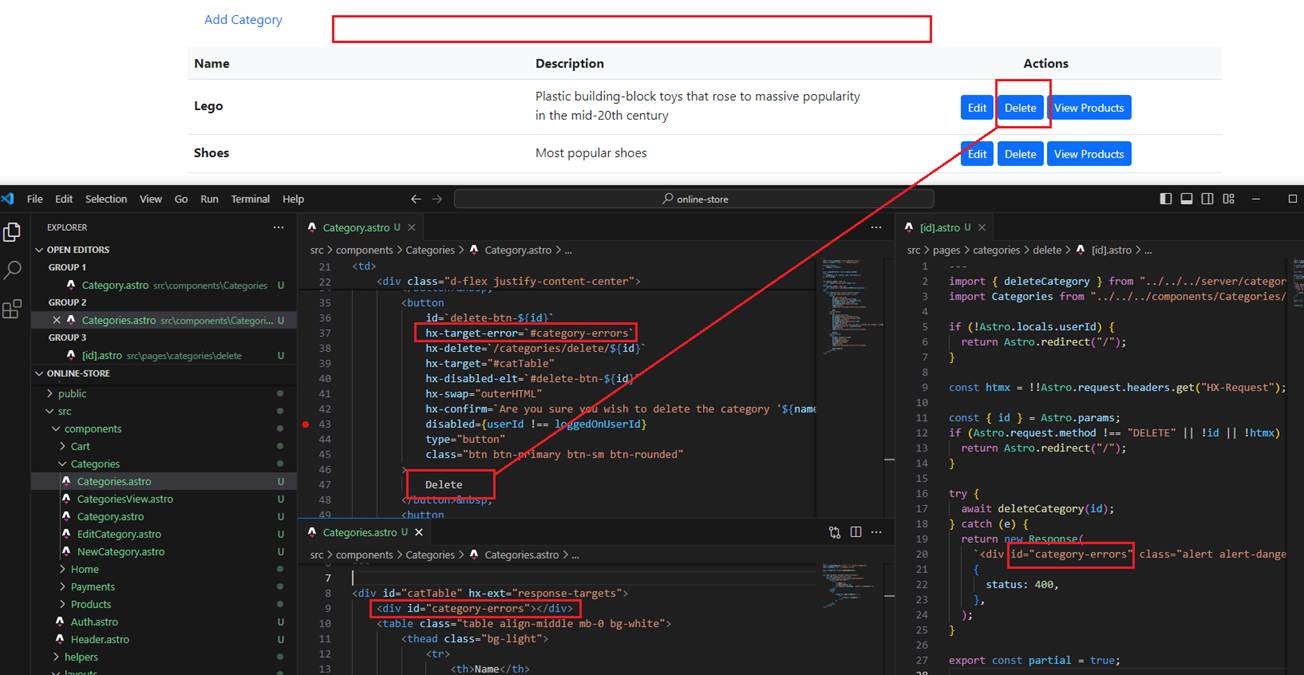
Figure 49
When we click on a category Delete button and receive an error, we should render the error above the category list.
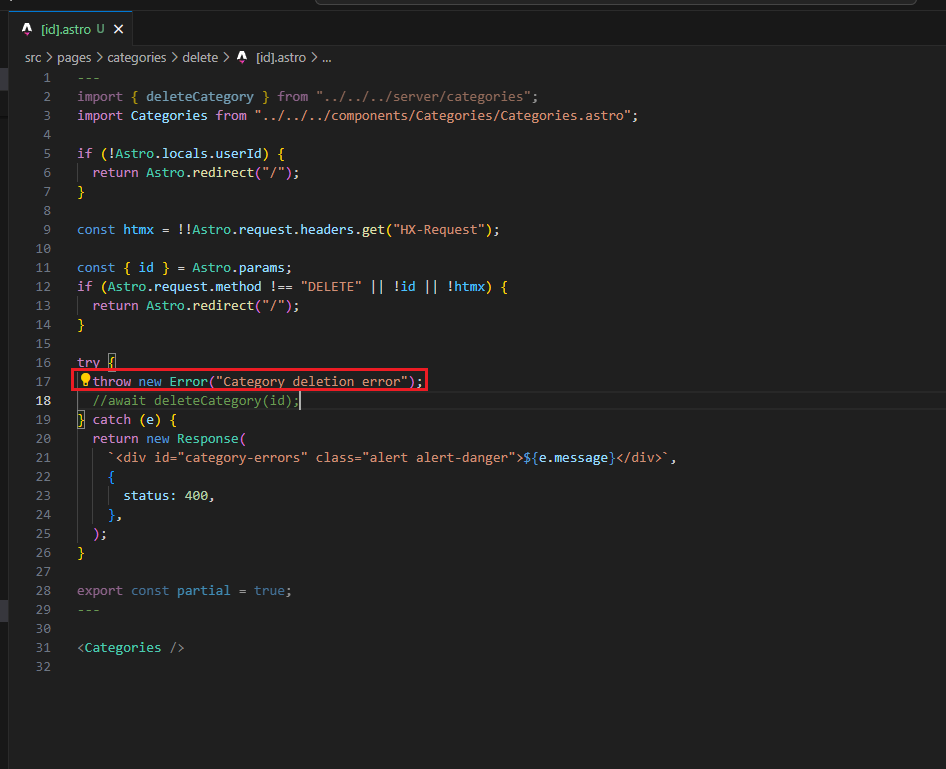
Figure 50
Let's test it by throwing an error.
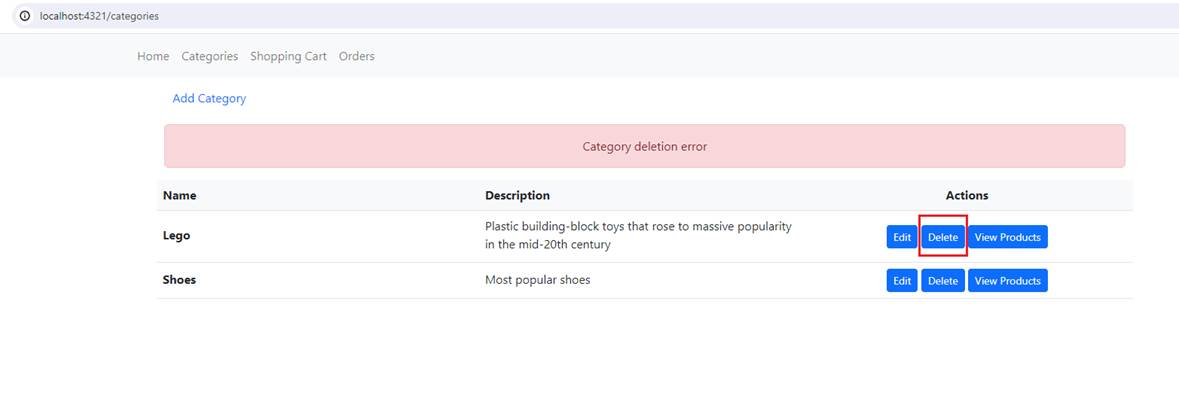
Figure 51
Category deletion error.
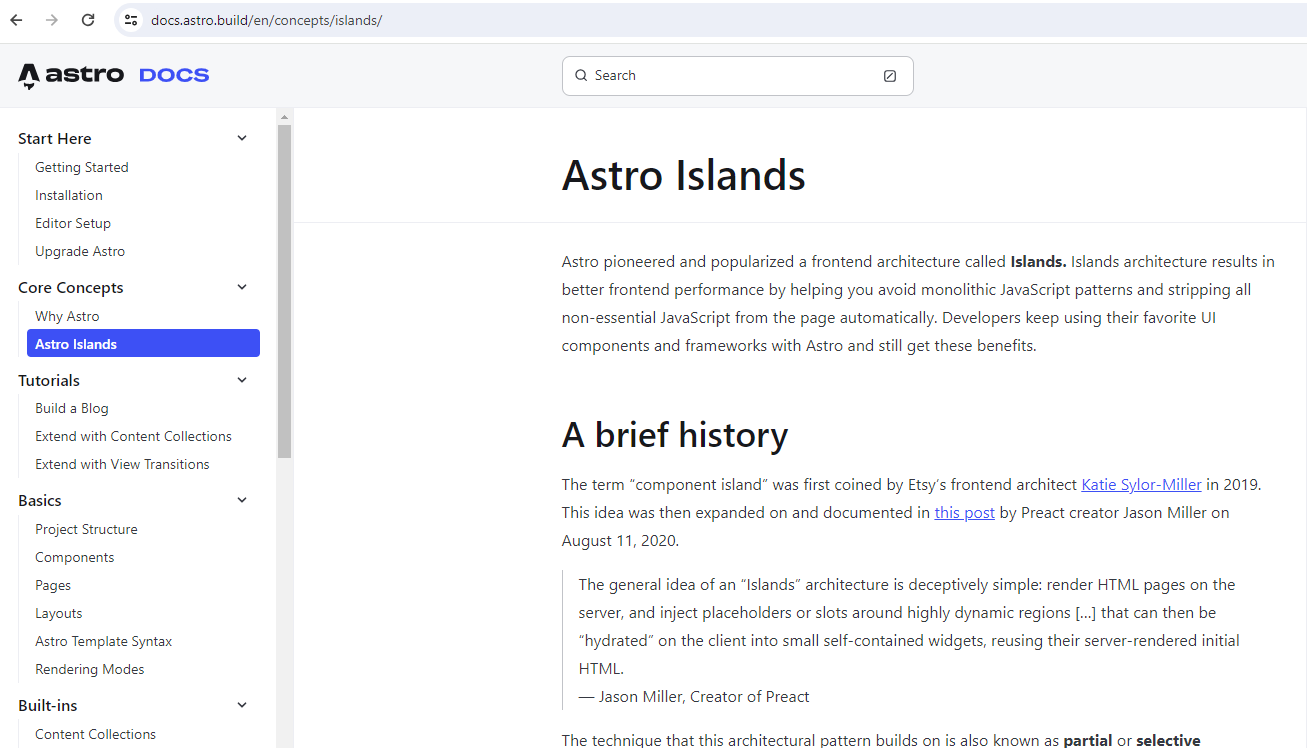
Figure 52
https://docs.astro.build/en/concepts/islands/
Because Astro outputs zero JavaScript by default, the bundle size does not increase for each new framework. Each component gets server-rendered and turned into static HTML.
If you want interactivity, you need to add the client:load directive, and then the framework's runtime will be loaded client-side. This is an implementation of what's called island architecture.
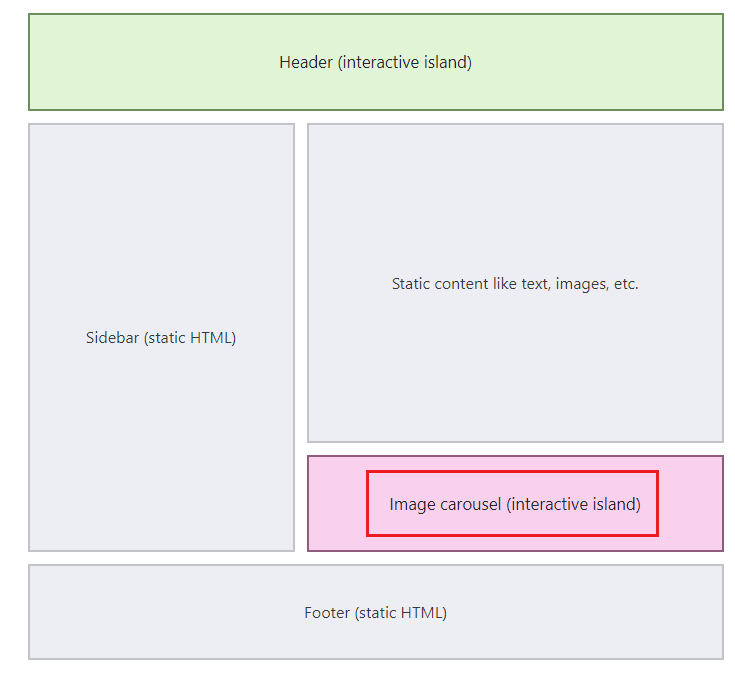
Figure 53
The idea of island architecture is to build websites that are static-first, and restrict interactivity (and the JavaScript associated with it) to specific parts. These parts are
isolated islands and loaded after the main content, which remains static.
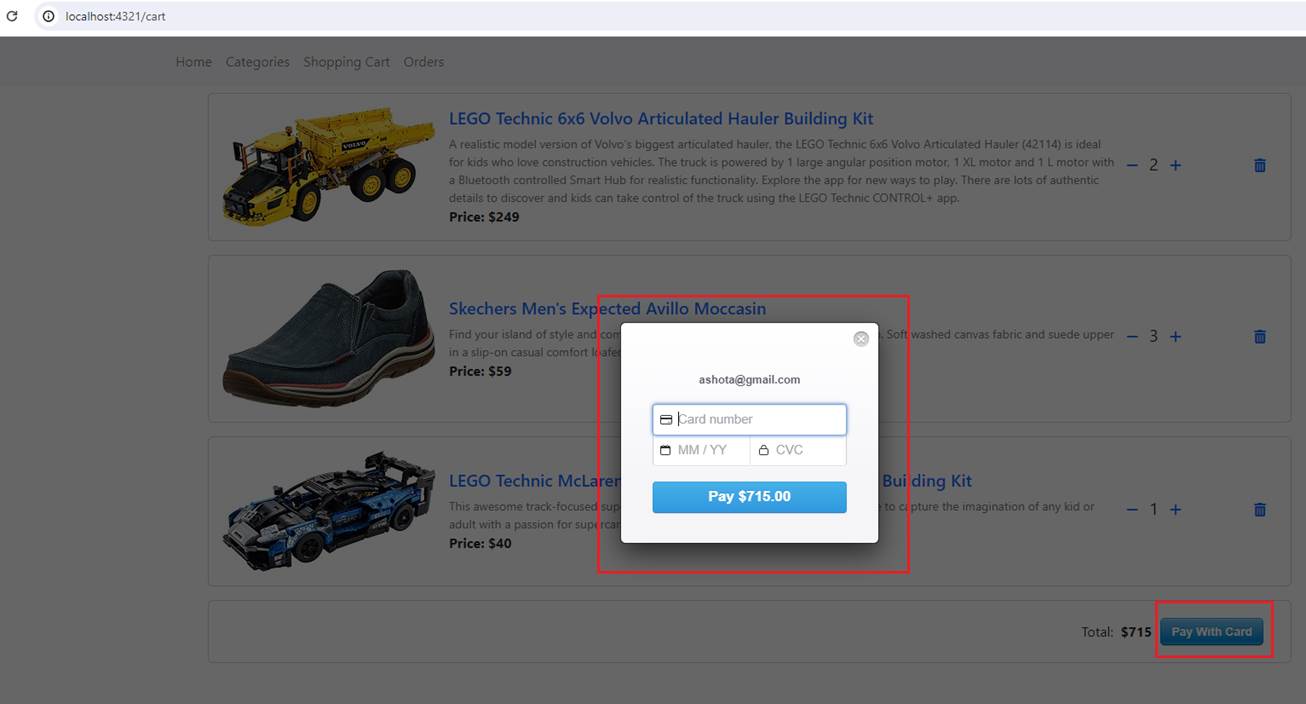
Figure 54
In our app we use StripeCheckout react component.

Figure 55
What we need first is to integrate React into Astro https://docs.astro.build/en/guides/integrations-guide/react/

Figure 56
You see that we have a Checkout.jsx React component, which is called by the Cart.astro component and uses the client:only="react" directive.
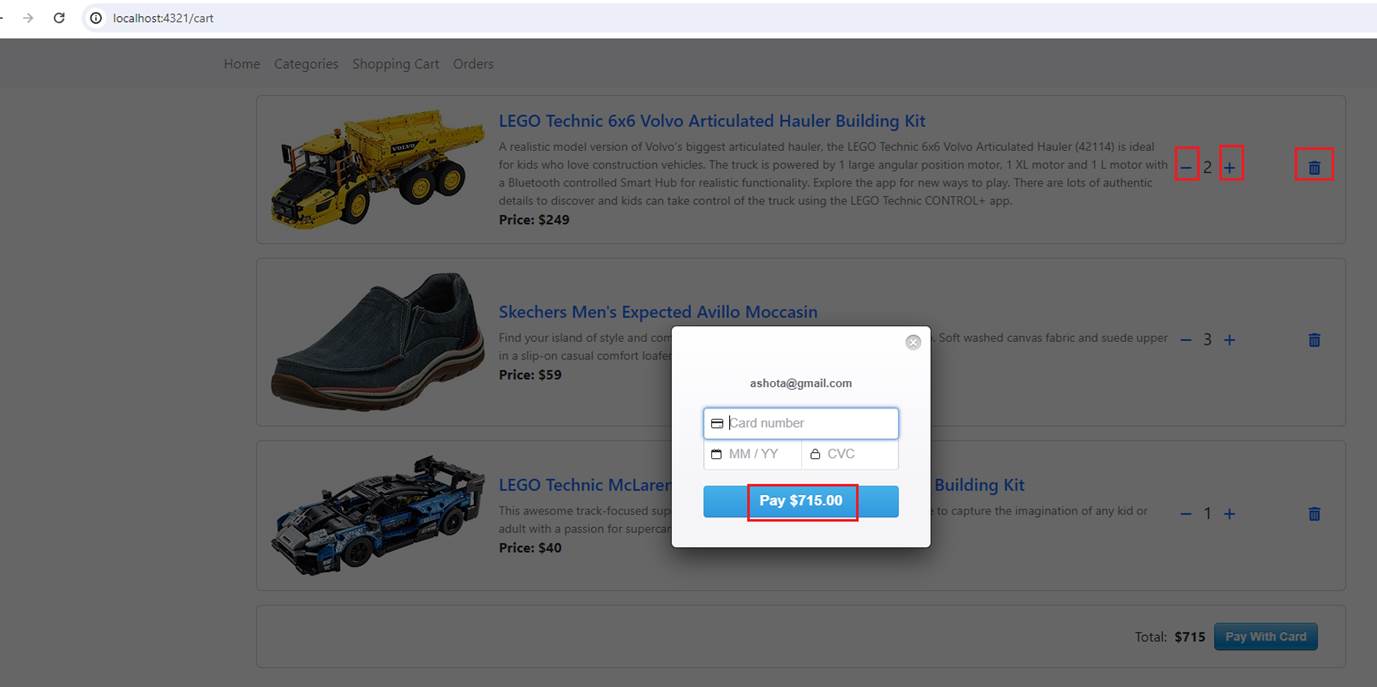
Figure 57
There is a point I would like to discuss related to a cart item's incrementation, decrementation, deletion, and the total value rendered on the Stripe payment dialog.
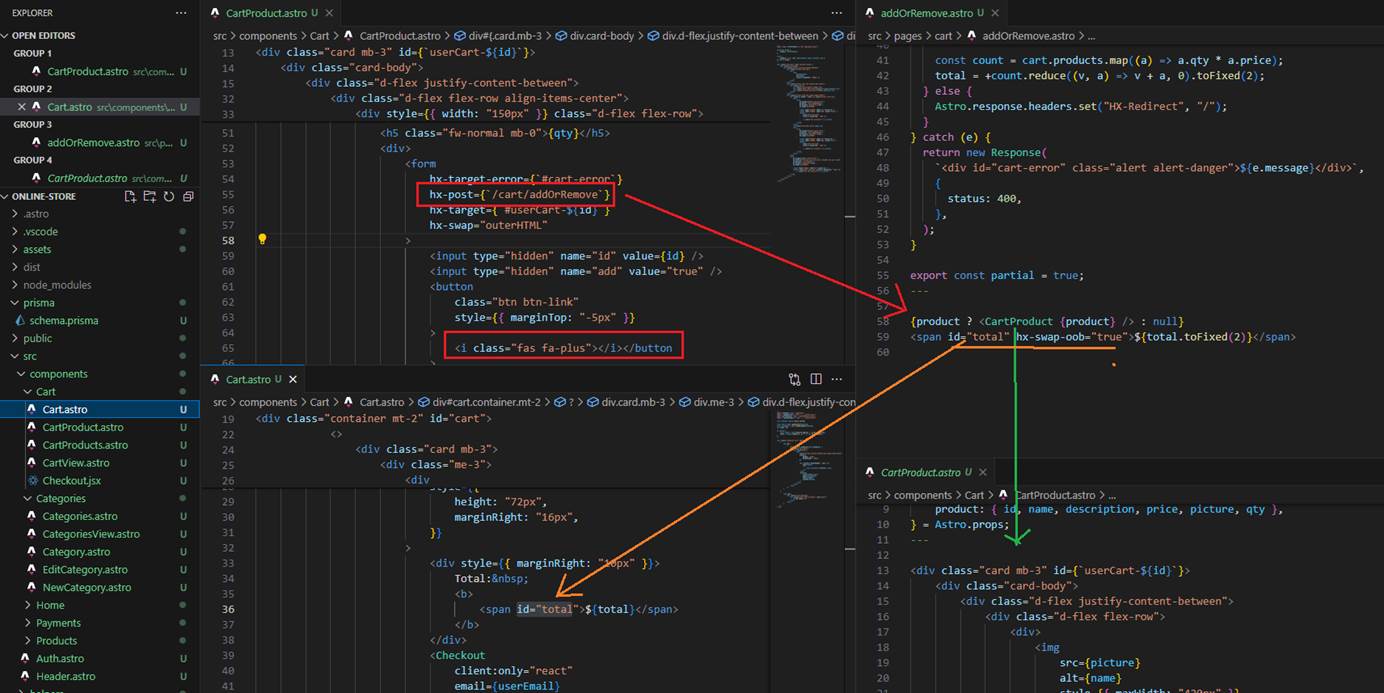
Figure 58
Say you click on increment (plus icon) (Figure 57) and want to increment the item count. By clicking it, we send a request to the /cart/addOrRemove endpoint. The response is composed
of two sections. First, we update the cart section (not all the carts), then we update the total via hx-out-oob.
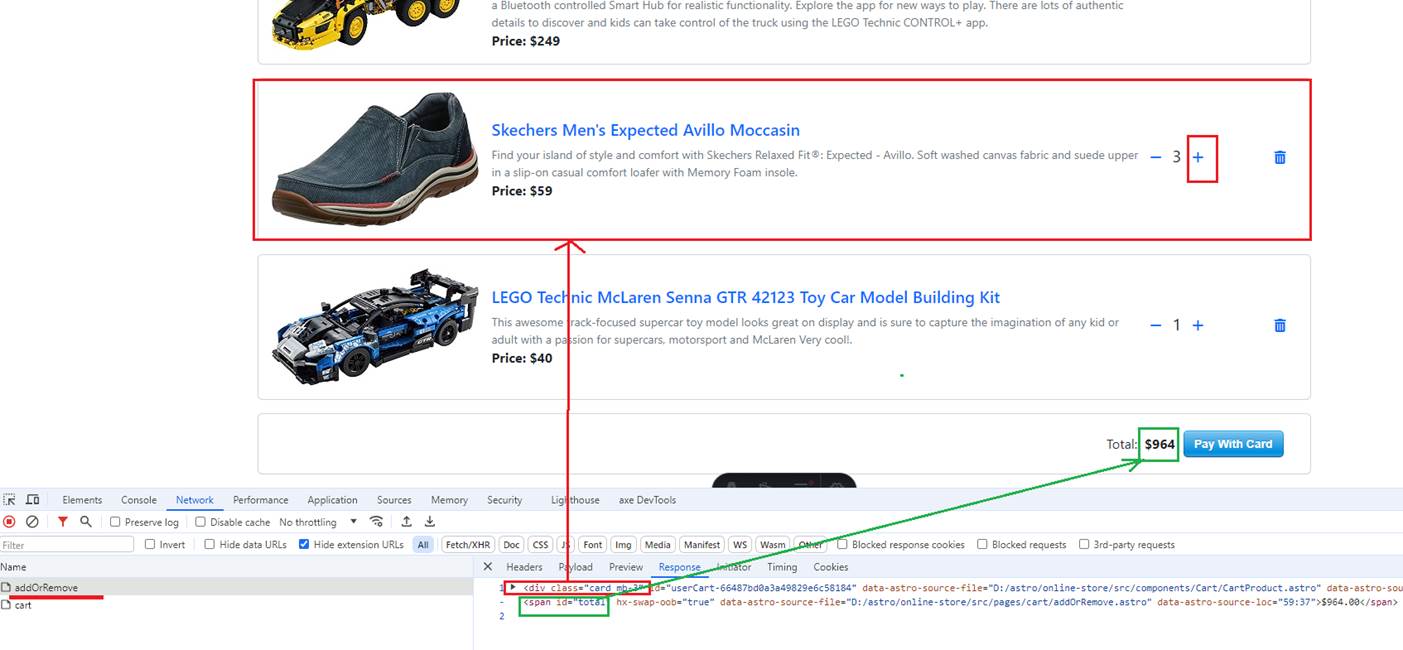
Figure 59
After clicking the increment (+) icon, we received a response containing two parts. We update the cart sections and the total value, but there is an issue here.

Figure 60
The reason is that when you perform an action (increment, decrement), you will see the total value changed, but the value on the dialog will still be the old one. It will not change.
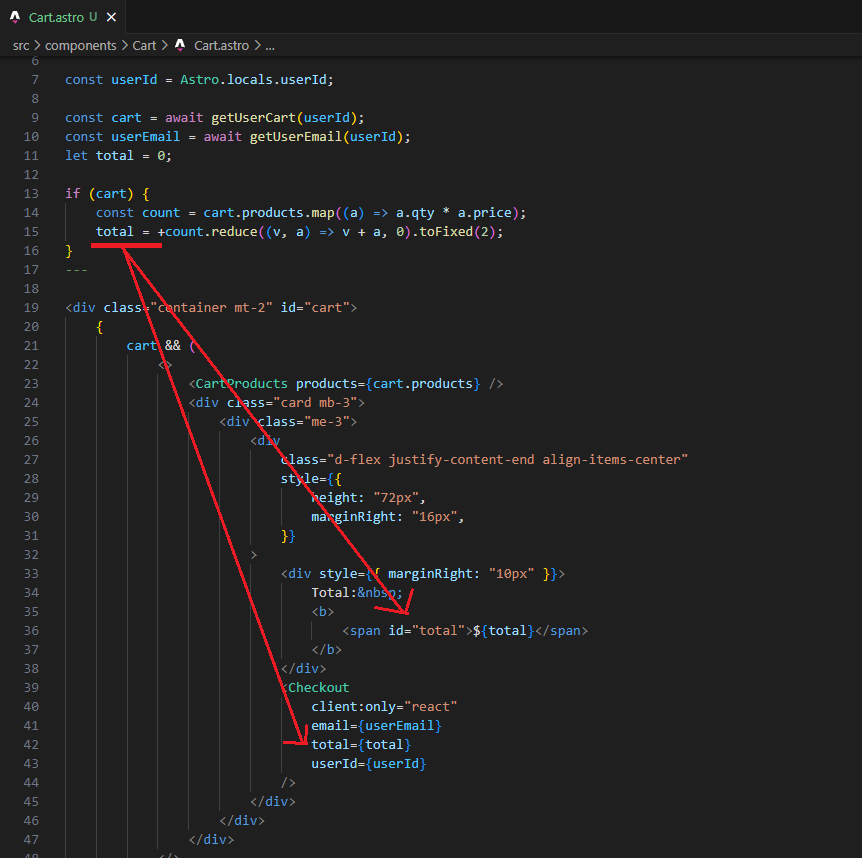
Figure 61
When you navigate to the cart page, for example, by selecting a product, then Cart.astro is called, and the total value is rendered both on the page and set as a value to the Checkout
(StripeCheckout) React component.
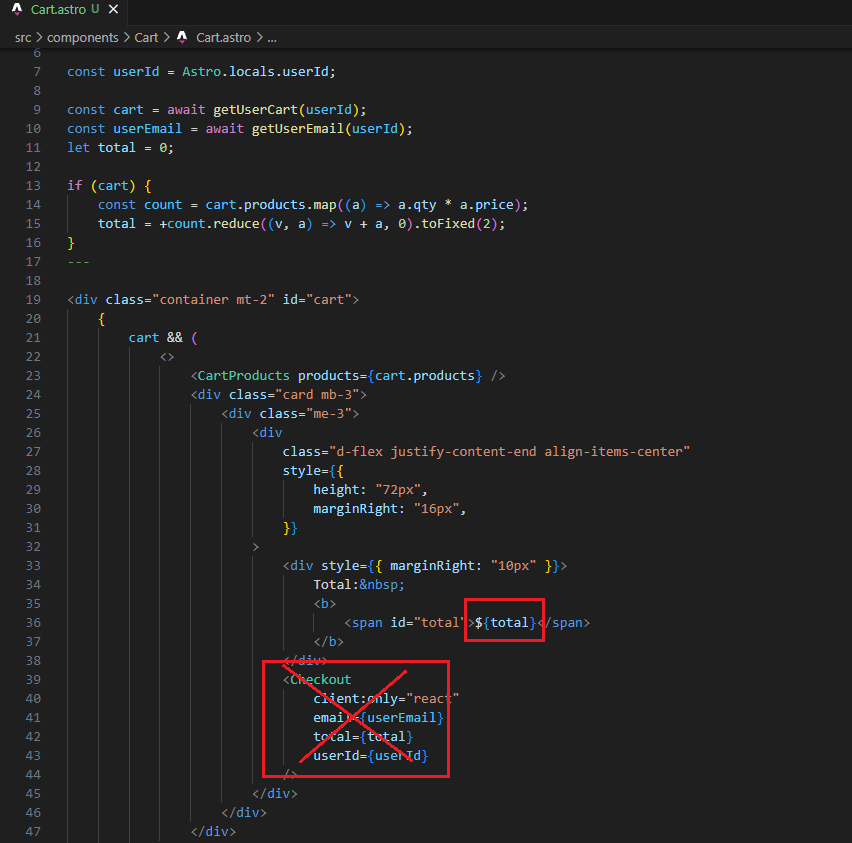
Figure 62
But when you click on an increment (+) button, the total value is changed via hx-swap-oob attribute and rendered, but it is not updated in the Checkout control, so you see the old value on the Pay dialog.
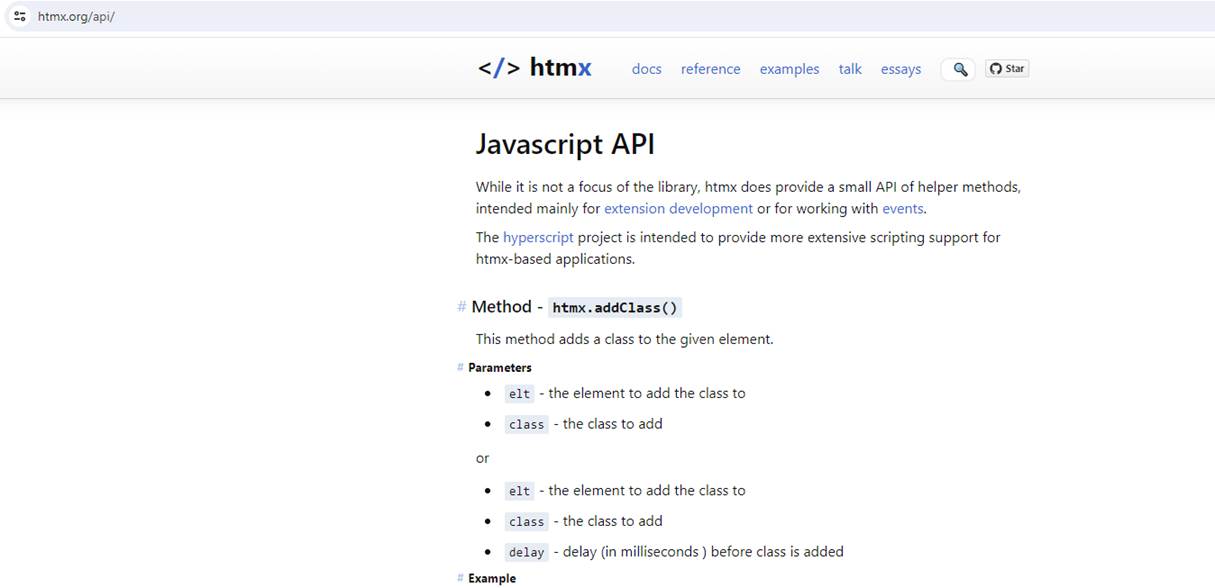
Figure 53
Htmx supports JavaScript API.
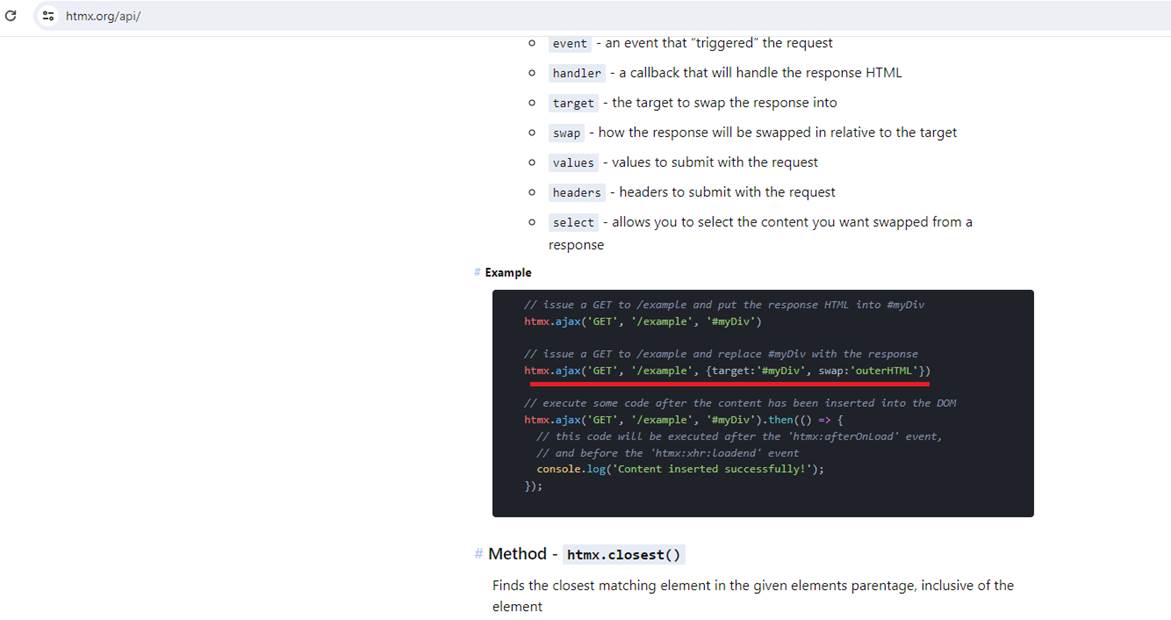
Figure 54
We can make an Ajax request.
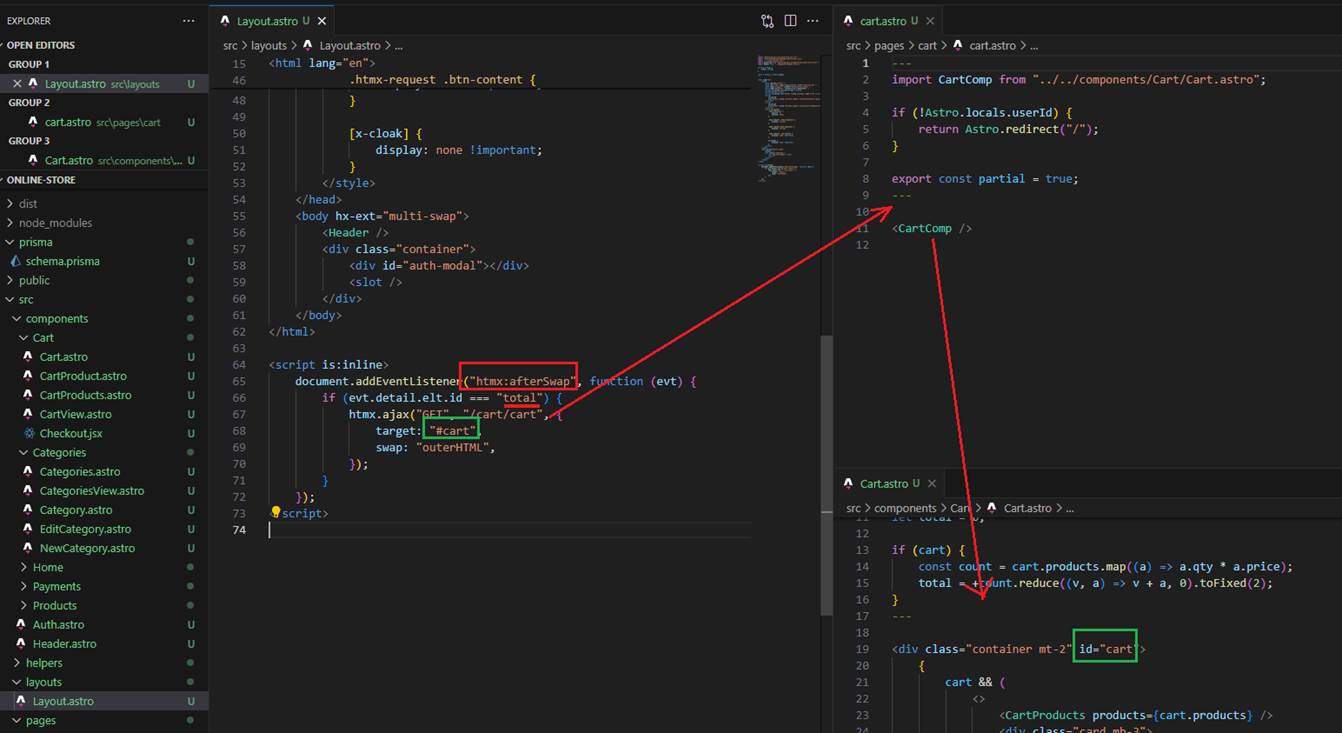
Figure 55
After we swap the total value, we make a call to the /cart/cart endpoint and render the entire cart section to obtain the latest total value.
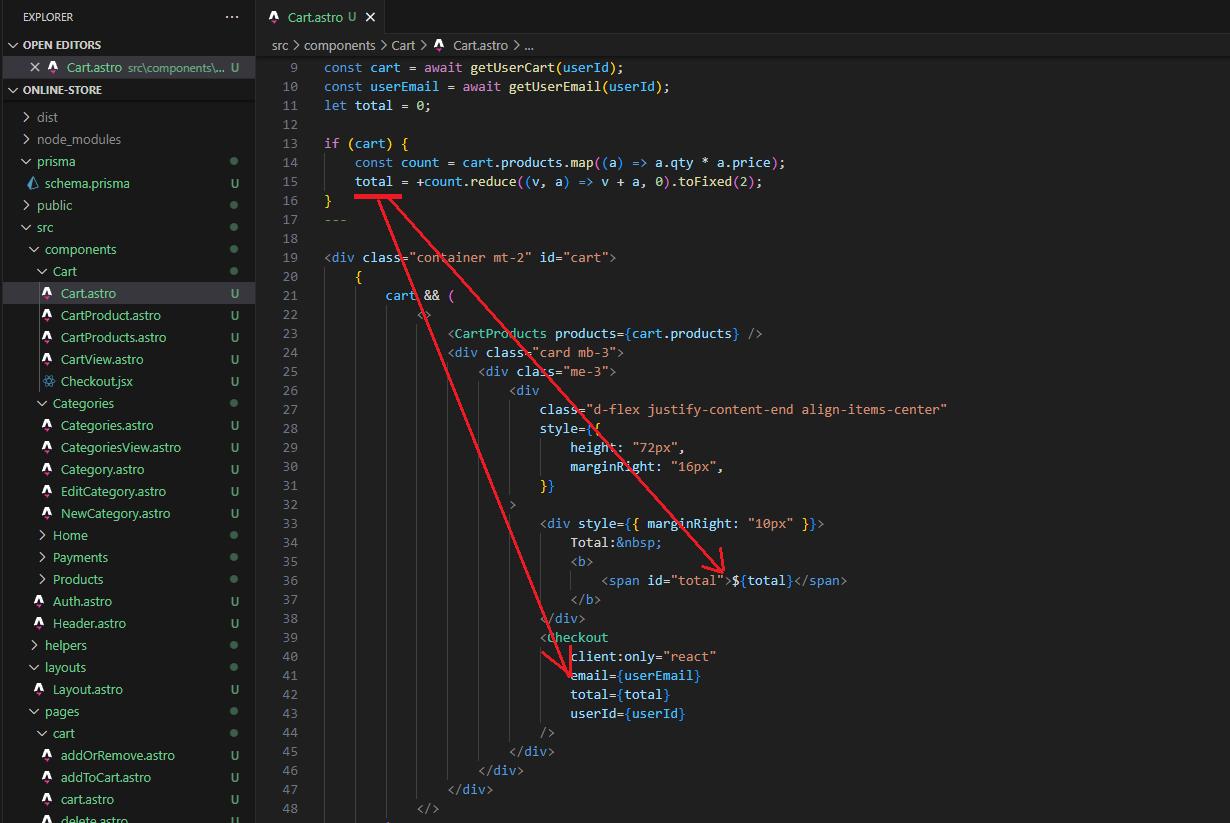
Figure 66
Now when the Cart.astro is rendered we will have the latest total value in both places.
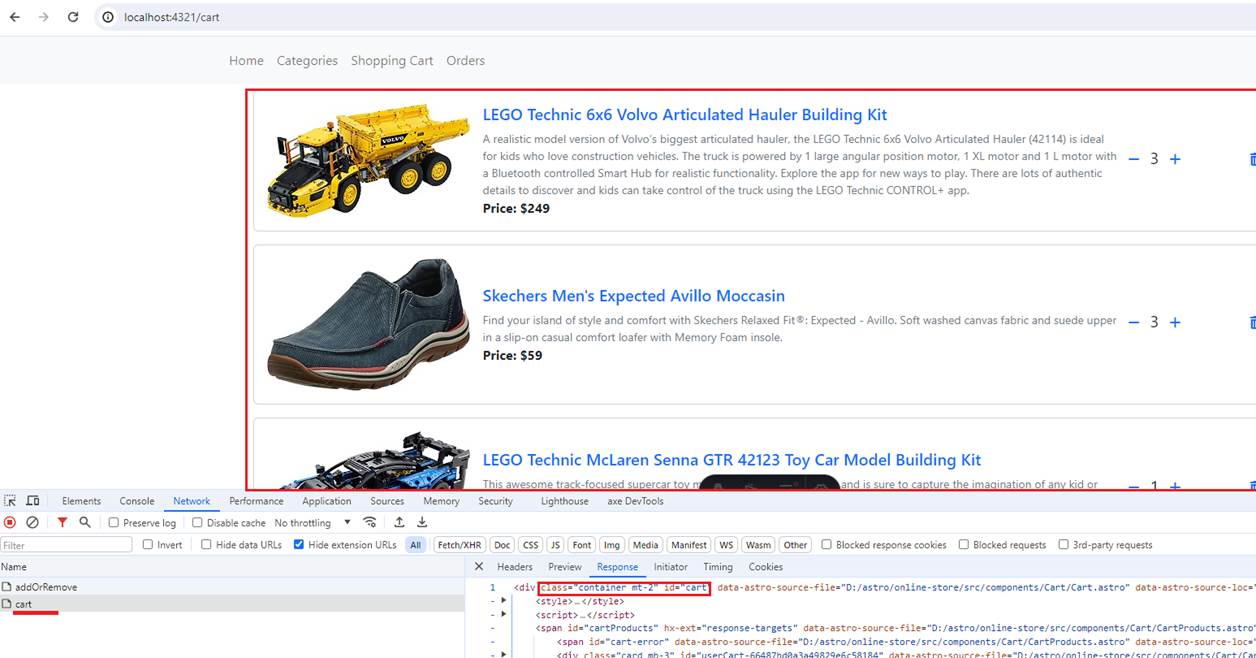
Figure 67
Here, the second request to the cart endpoint is made via the Htmx JavaScript API after the first addOrRemove request, and the cart section is rendered, so the Pay dialog
has the latest total value.
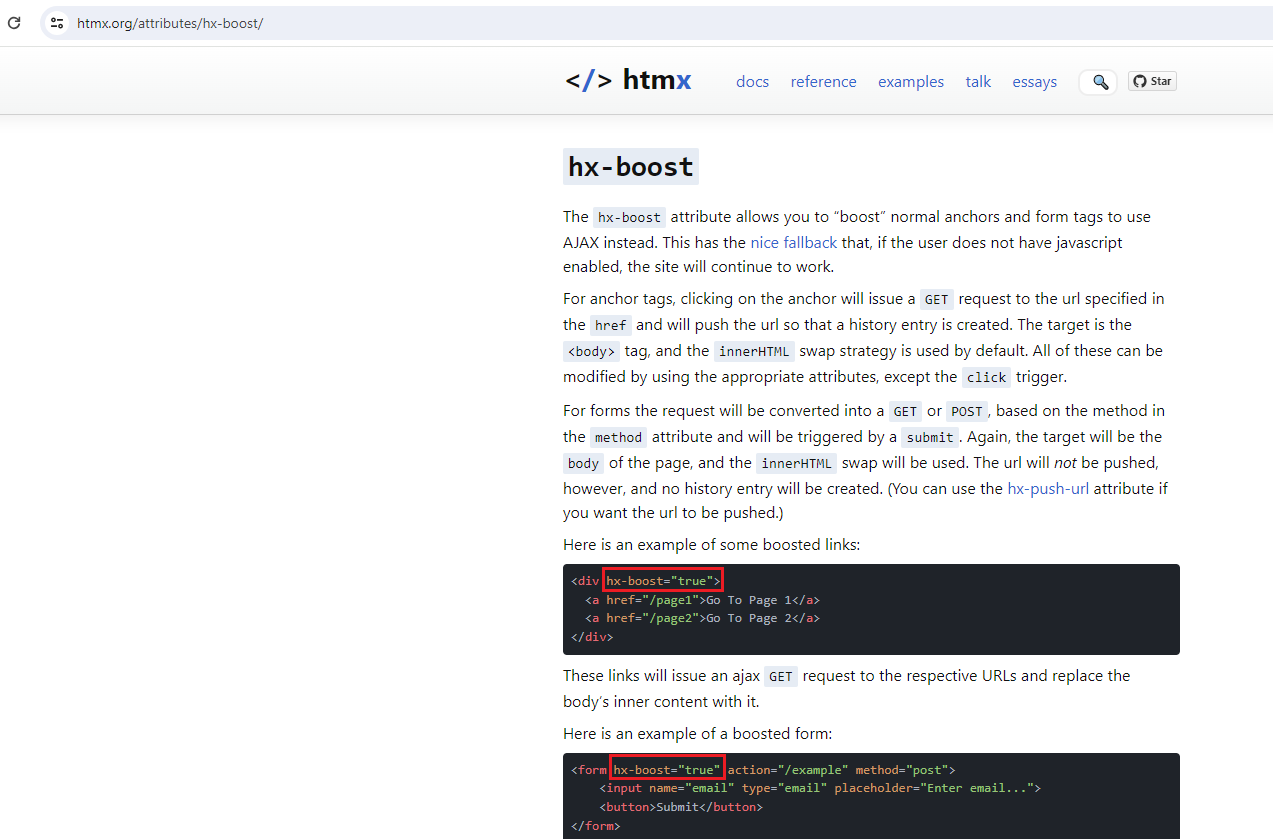
Figure 68
The hx-boost attribute allows us to boost normal anchors and form tags to use AJAX request.
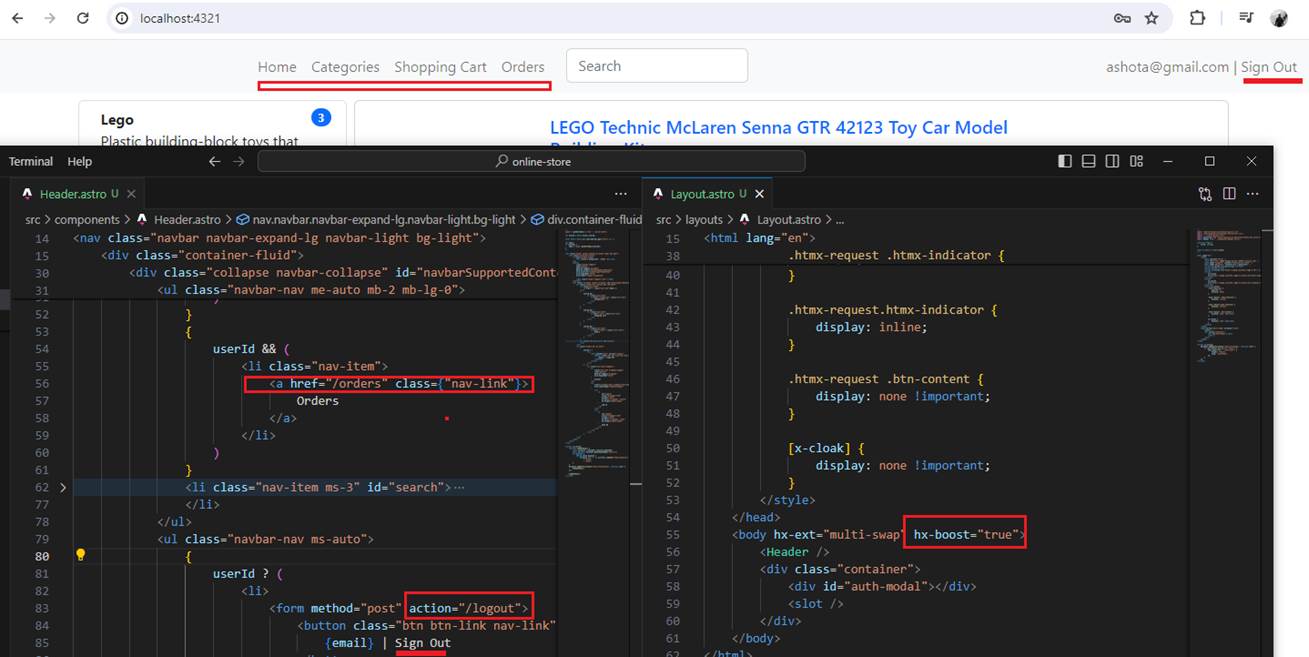
Figure 69
We specified hx-boost attribute on the body tag and all anchors with href attribute and form that uses action attribute will boost.
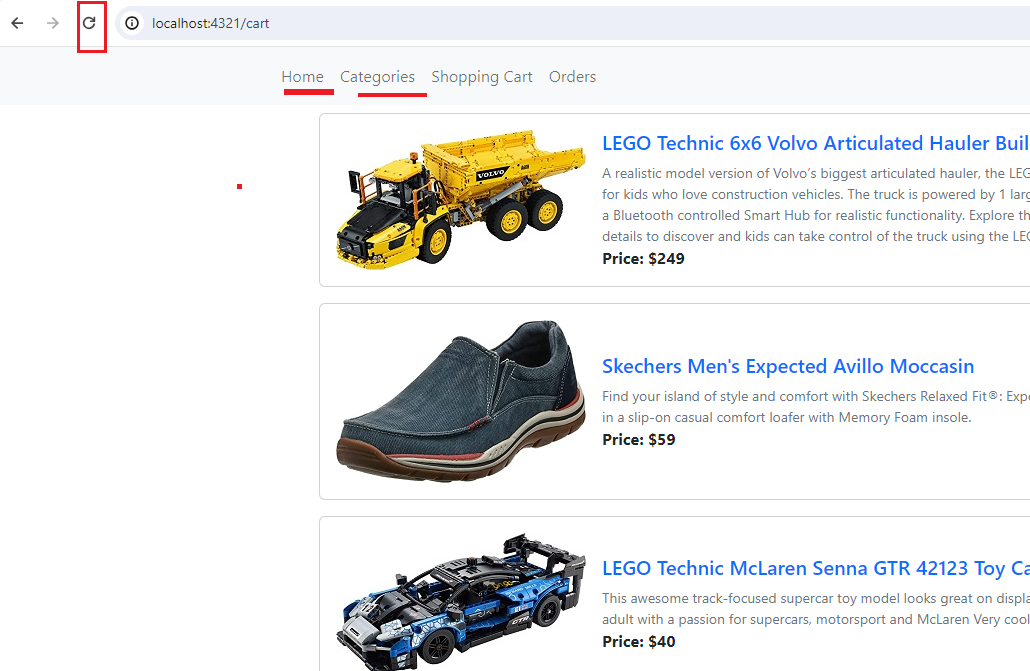
Figure 70
If we do not specify hx-boost attribute and navigate form one link to another or Sign Out we will see the loading icon refreshing but with the hx-boost it works kind
of Single Page App (SPA) and it updates the content SPA like and no page refresh will take place.
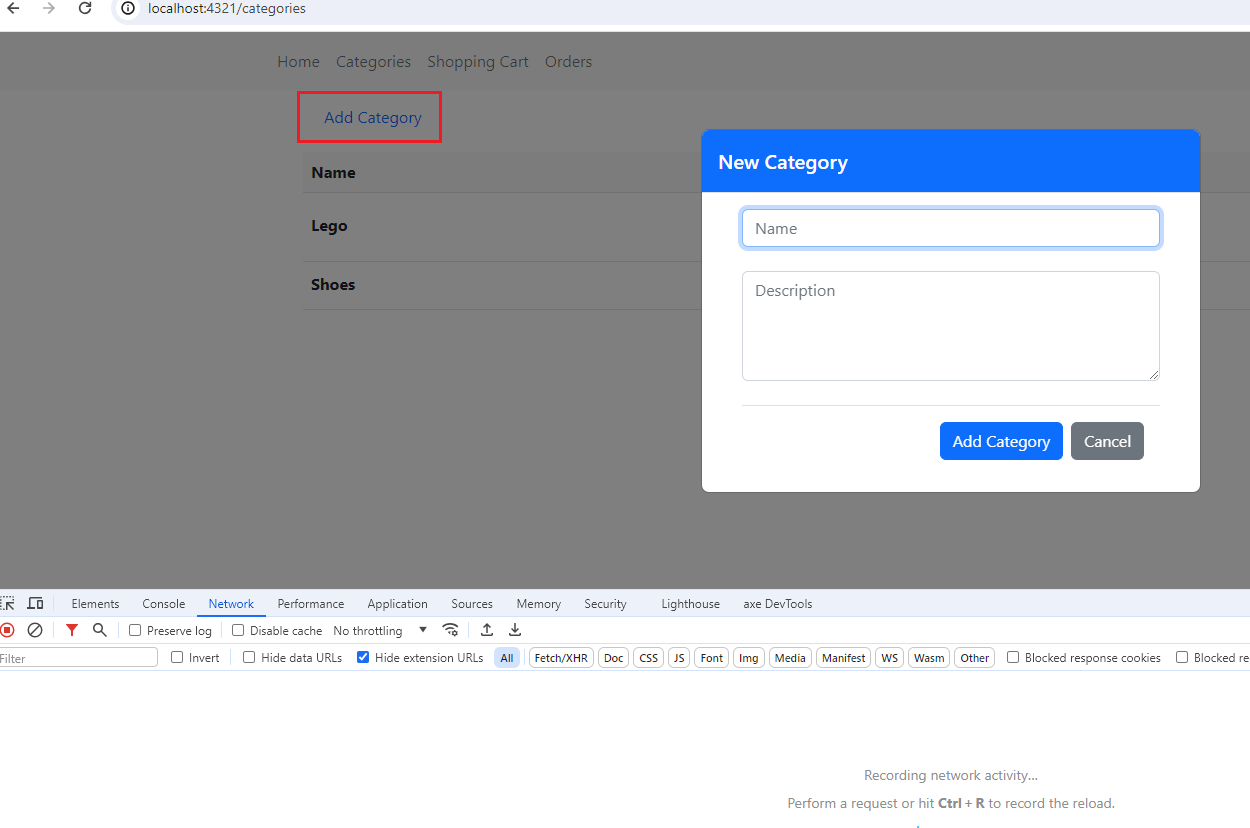
Figure 71
When we click on the Add Category link, a modal dialog opens, but you can see that no network request is made.
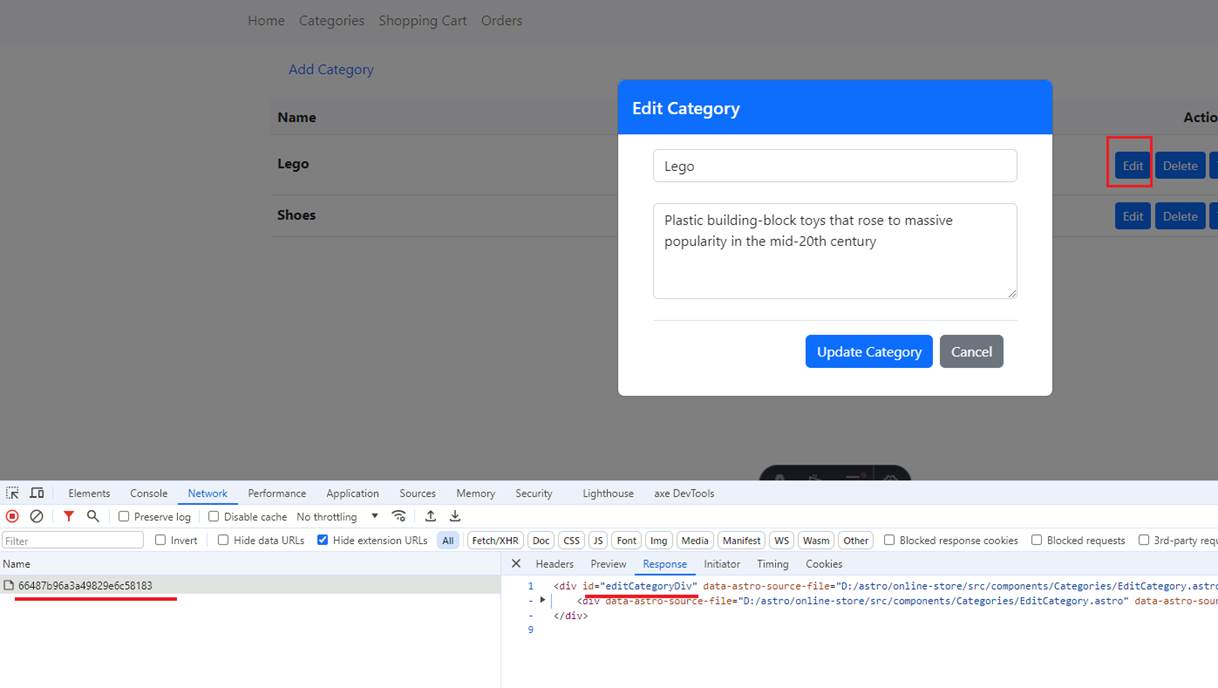
Figure 72
In the case of Edit Category, we make an Htmx request to bring up the modal dialog.
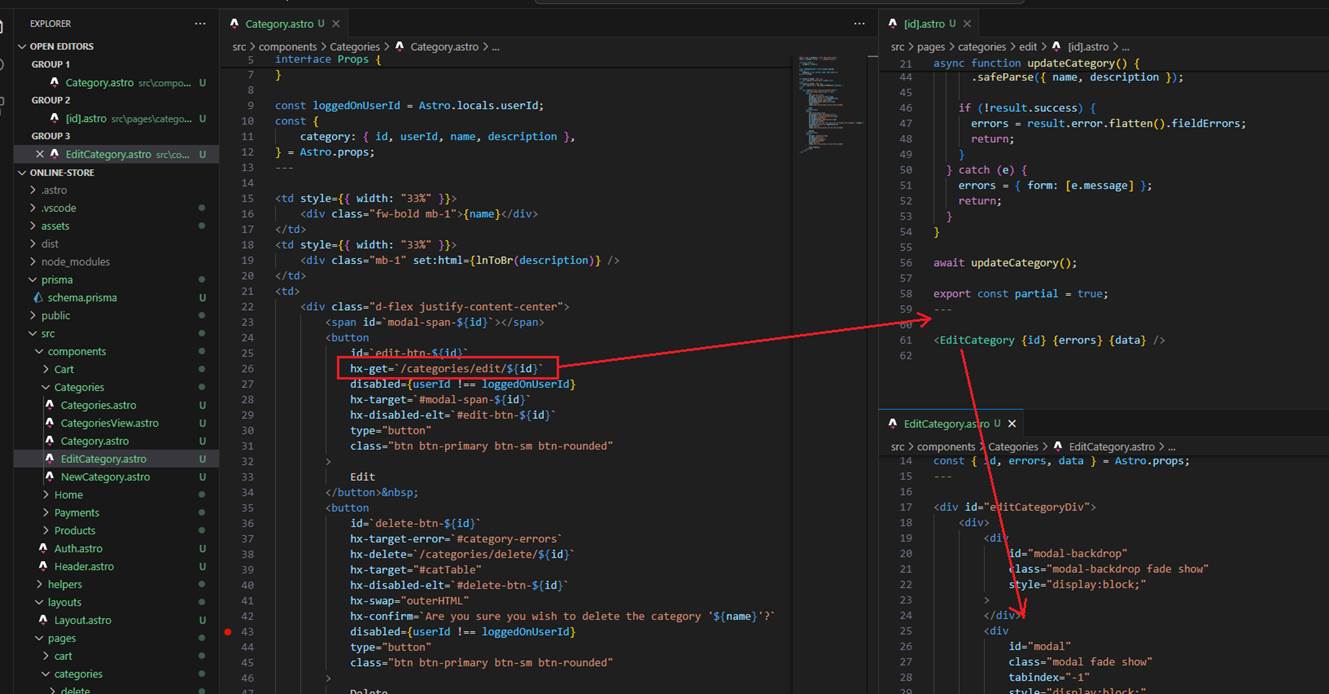
Figure 73
By clicking the Edit button (Figure 72), we call the /categories/edit/id endpoint and get the modal dialog to render.
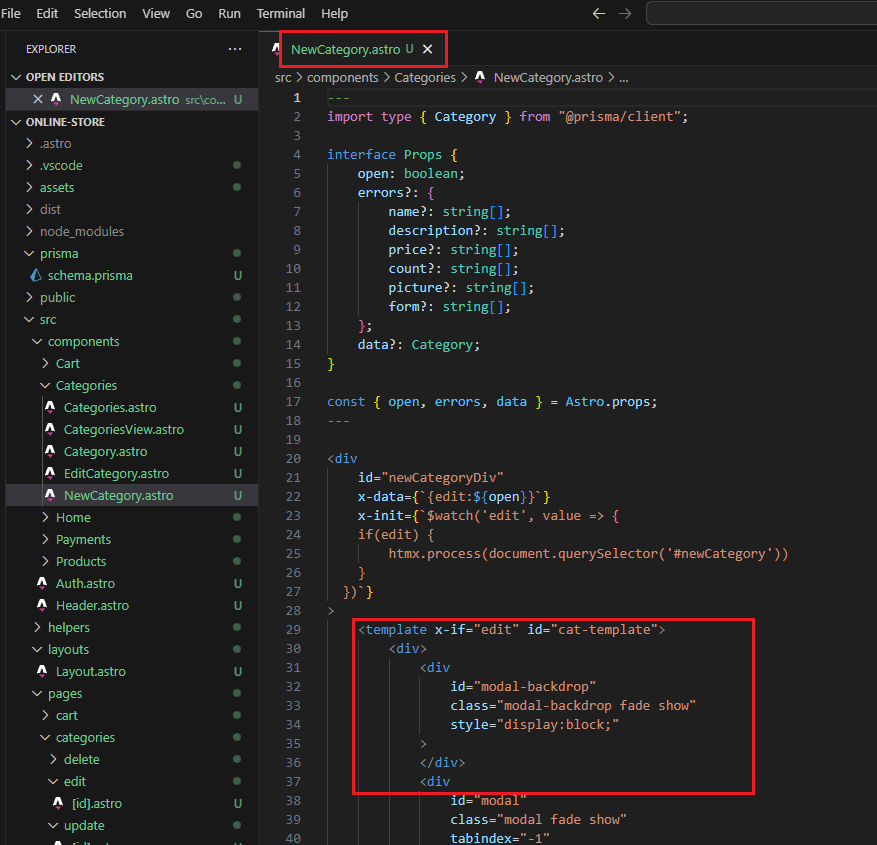
Figure 74
The reason we can display the dialog without making a request is that we have the modal dialog code inside the NewCategory.astro file and show it using Alpine.js.
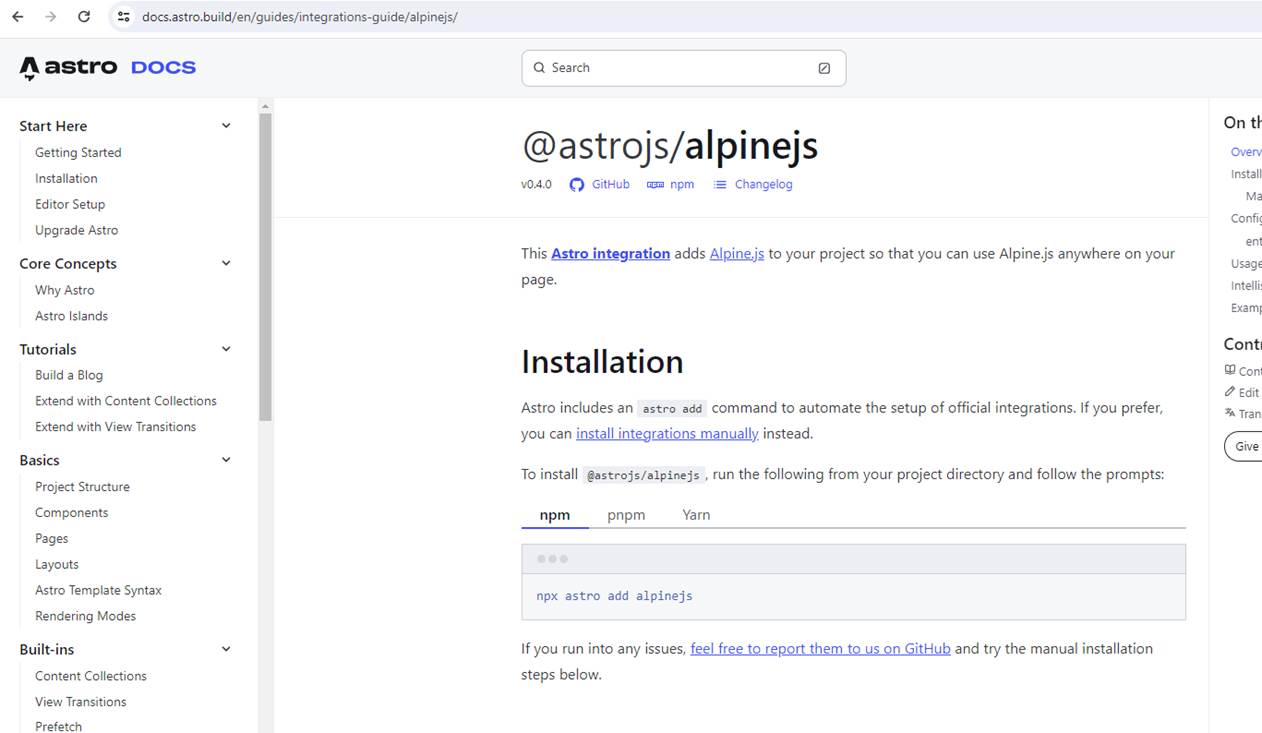
Figure 75
First, we have to integrate Alpine.js into Astro. https://docs.astro.build/en/guides/integrations-guide/alpinejs/
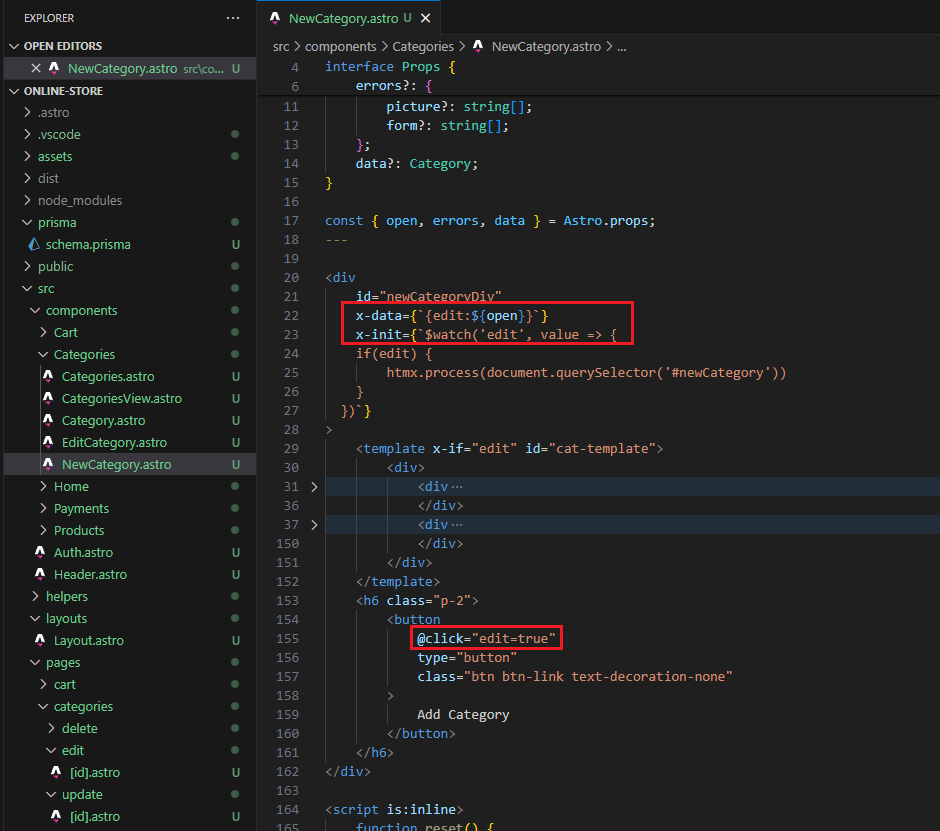
Figure 76
Alpine.js is a rugged, minimal tool for composing behavior directly in your markup. Think of it like jQuery for the modern web.
The x-data defines a chunk of HTML as an Alpine component and provides the reactive data for that component to reference.
The x-init directive allows you to hook into the initialization phase of any element in Alpine.js
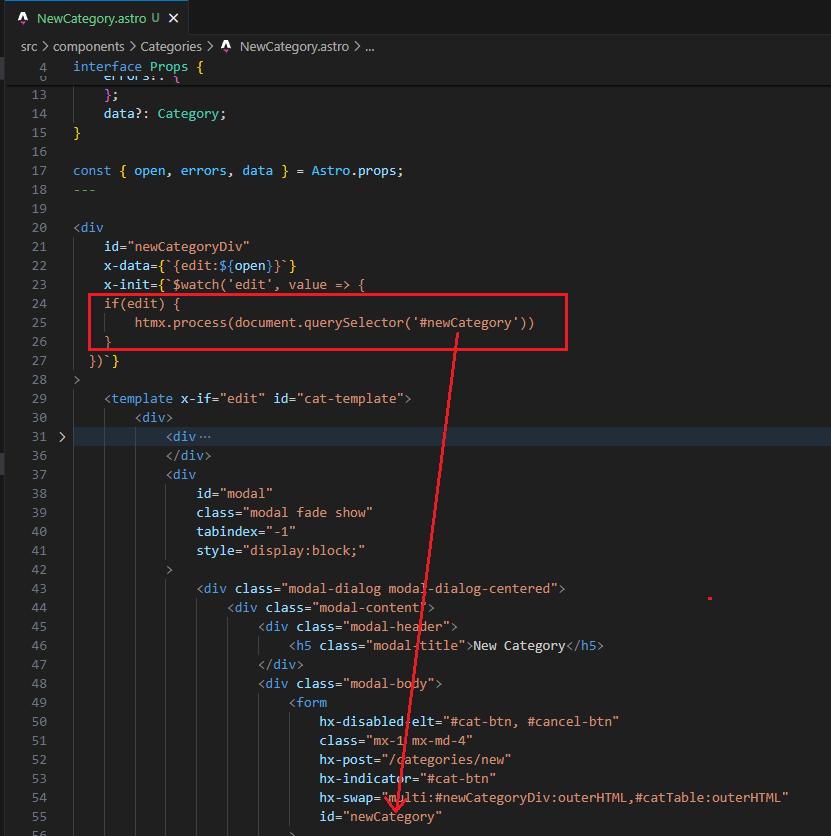
Figure 77
Note, each time we open the modal, in the x-init we call htmx.process, pointing to the form Id.
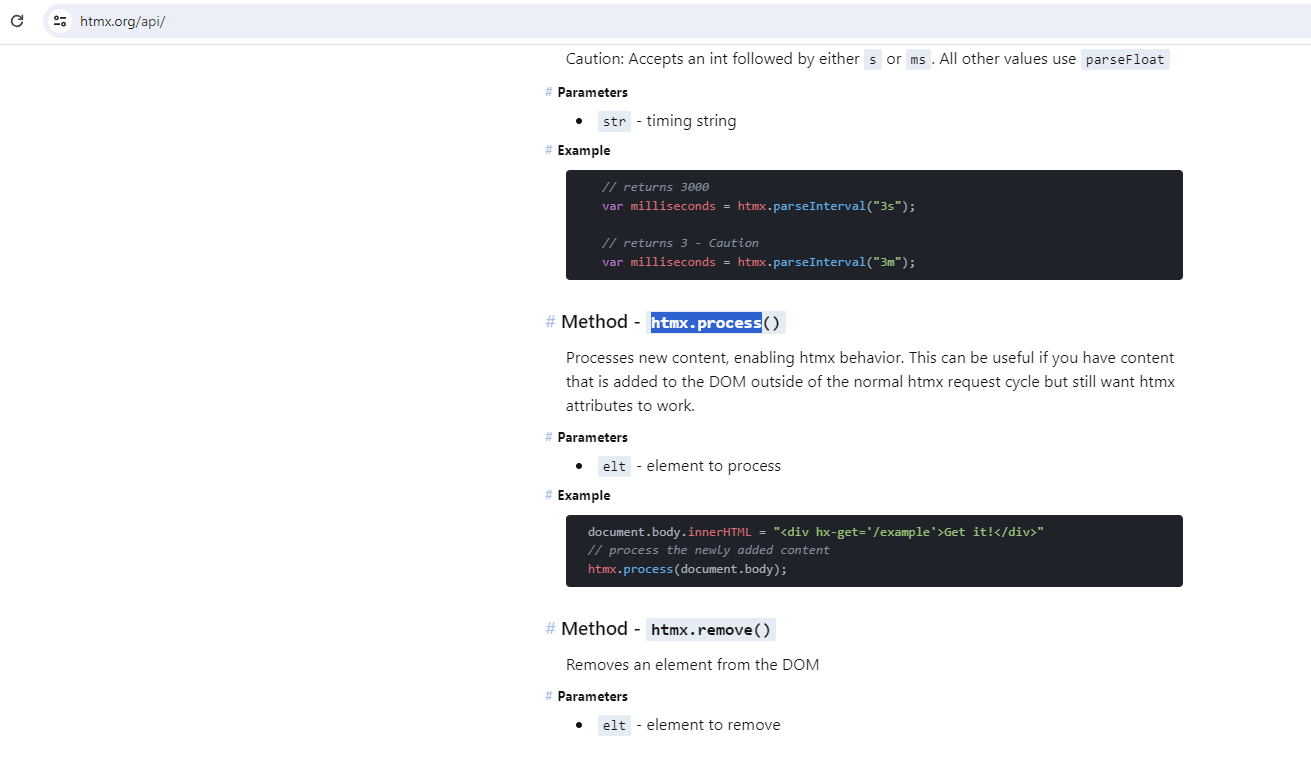
Figure 78
Unlike on the server, the client-side code will execute after the page has loaded and therefore after Htmx has checked for known attributes.
Therefore, whenever we dynamically set or change Htmx attributes with the help of client-side JavaScript code, Htmx will ignore those attributes,
or to be precise, it simply will not detect them. You must make Htmx aware of those attributes, and we can do that by calling htmx.process().
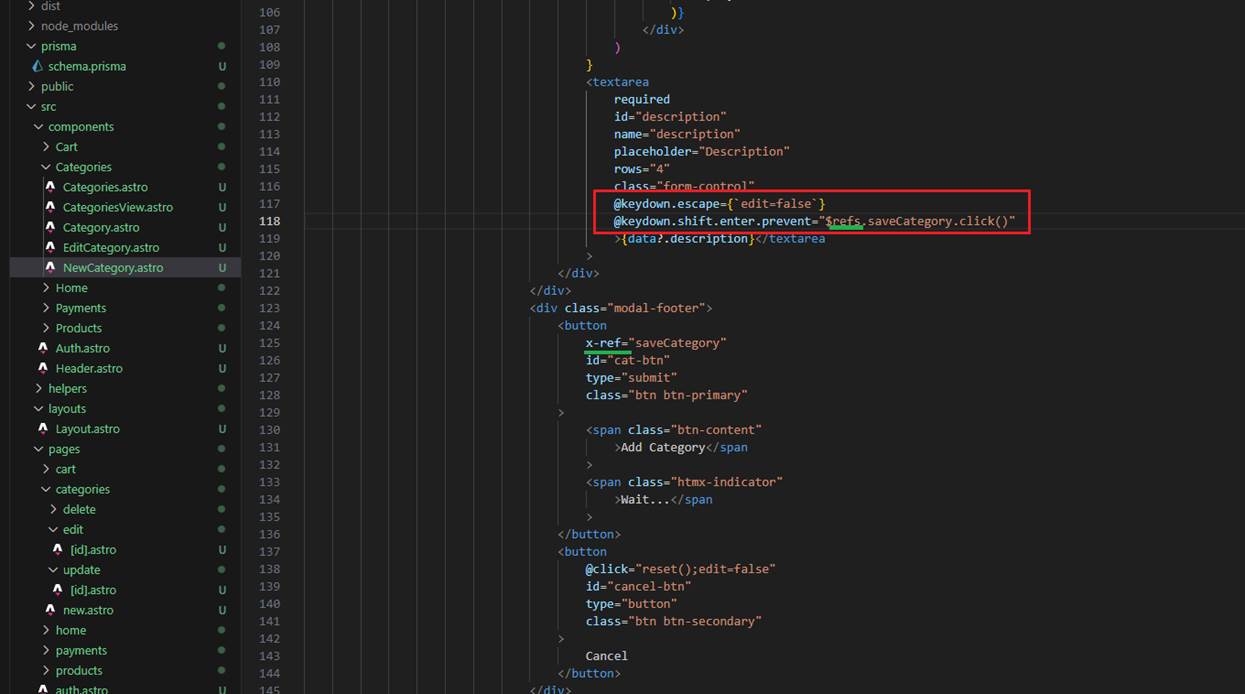
Figure 79
With the help of Alpine.js keydown events, modifiers, and refs, we can, for example, add a category by hitting Shift+Enter.
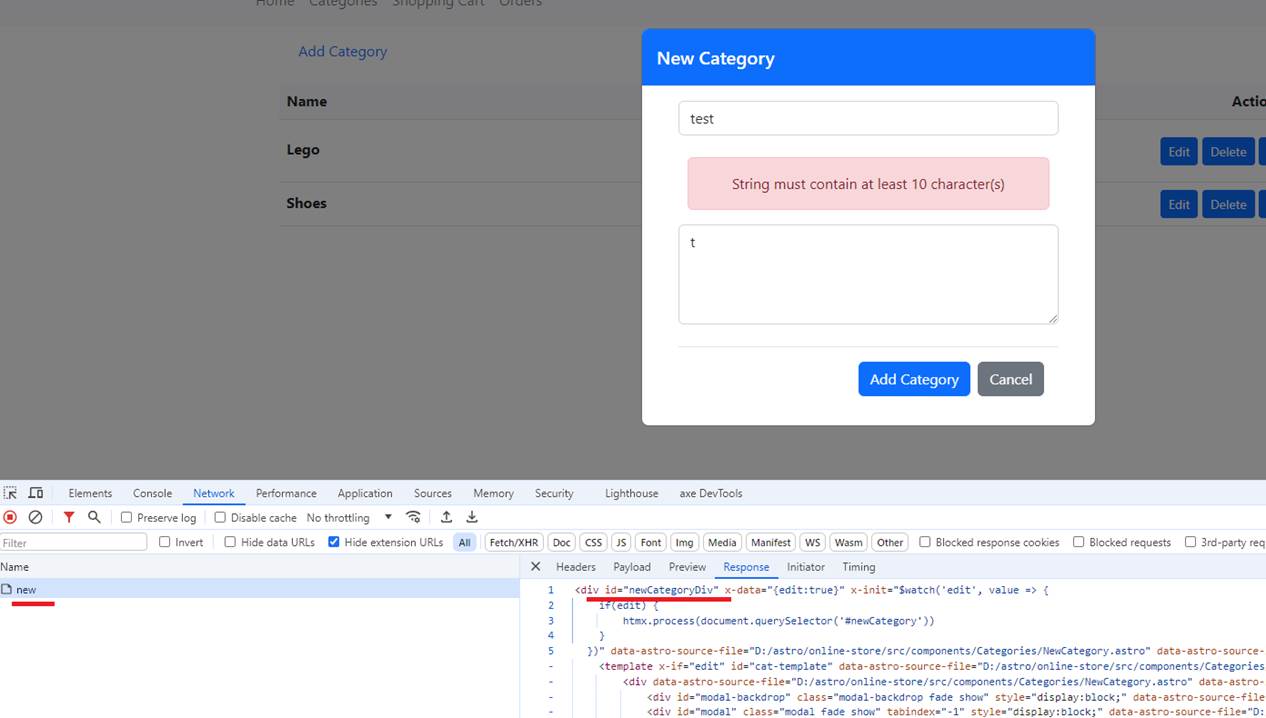
Figure 80
When we get a validation error, we just render the Add Category modal with validation errors by swapping it
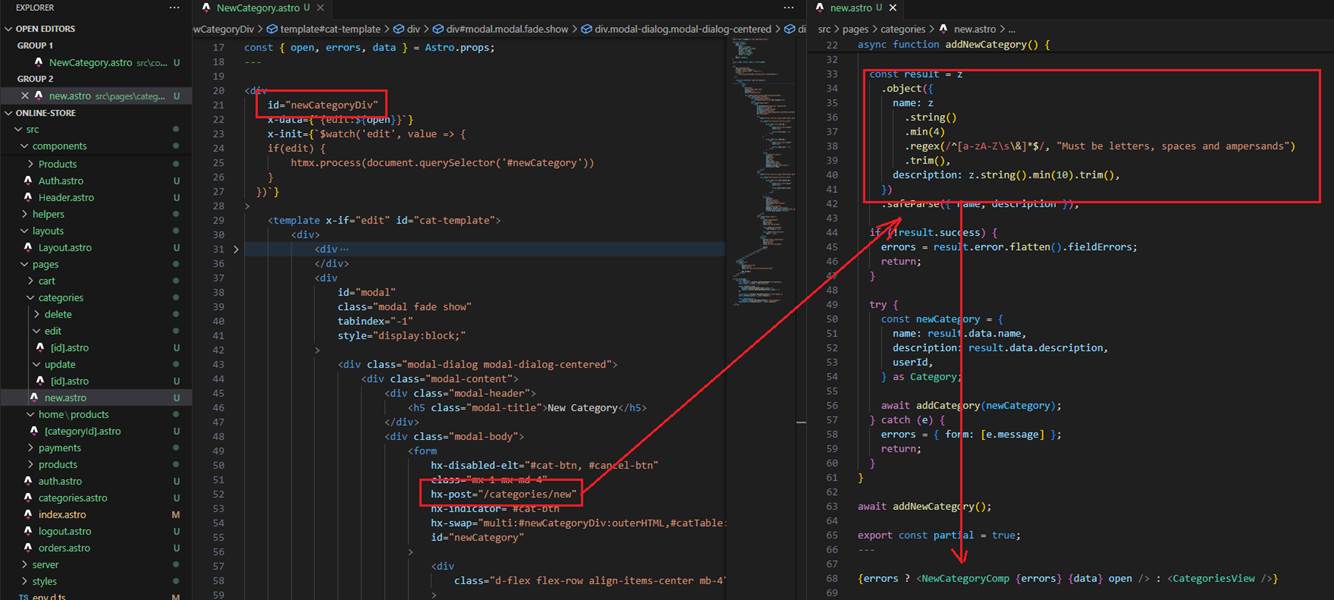
Figure 81
When clicking Add Category, we call the /categories/new endpoint, and if there is a validation error, we display the modal with the validation errors.
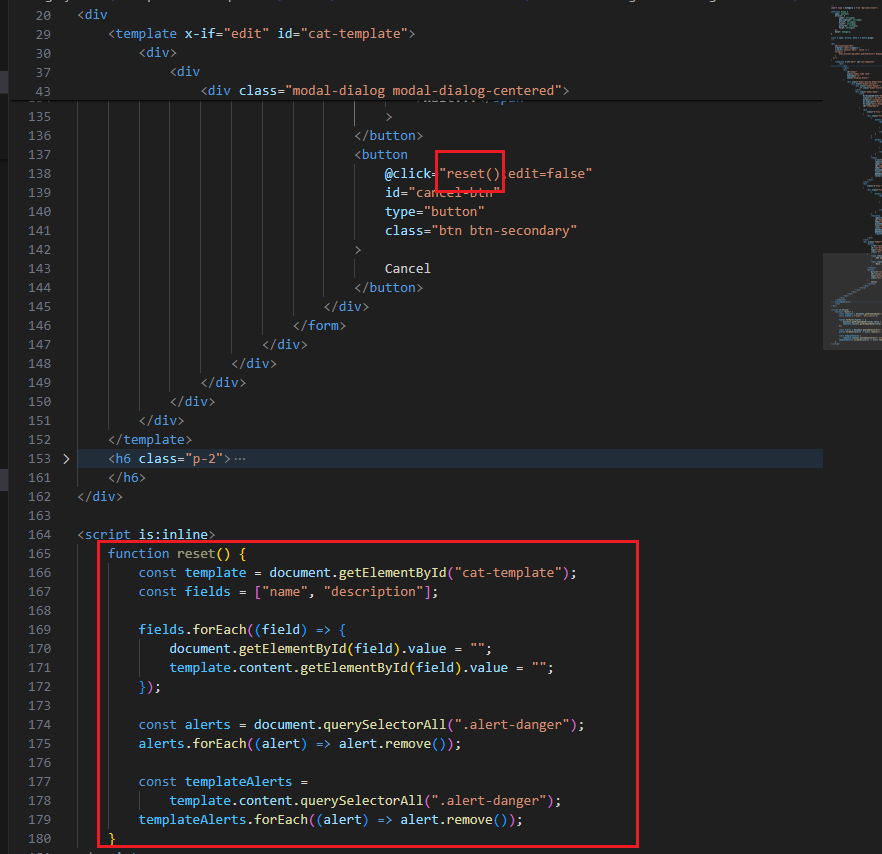
Figure 82
If we get validation errors and try to close the modal by clicking the Cancel button, then attempt to reopen the modal by clicking the Add Category link, we
will still see the validation errors. For that reason, once we click the Cancel button, we clear out all validation errors, text fields, and text area entries.